Now I’m back and happy to enlighten you on the beef home canning process. I get a lot of skeptical looks when I tell my friends that I “can” beef. I get it. I personally don’t seek out recipes that require meat from a can. Ewww. Most meat in a can reminds me of dog chow. Not appetizing. However, this is completely different. The pressure canning process used to preserve beef in jars makes the meat tender and perfect for stew, beef and noodles, stronganoff, or other beef-based dishes. I use a jar of this delicious beef about twice a month.
Just to let you know the enormity of this project, I’ll give you some stats. We began with about 240 pounds of beef. After it was trimmed of fat, cut up, packed into jars and pressure cooked we ended up with 90 quart and 35 pint of beef . The first day it was just my grandma and I. We worked for 4-5 hours and put up 29 quart of beef. Some people might think, “what a pain”. But honestly, I enjoyed the work and the company. How often do I have 4 or 5 hours to just sit and talk to my grandma? No interruptions, no television, no distractions. Just time to catch up with one of my favorite people. I consider that time a gift. On the second day, we began mid-morning and wrapped up well into the evening. We had much more help. My mom and my two sisters, my uncle and his friend, and my great-grandpa were all part of the beef canning team. Aside from the actual time that beef processes in the canner, the trimming of the beef takes the most time. So, we had 4-5 people trimming, one person packing jars and one person manning the canners. Again, sure, it was work, but it was fun too. This project provided a chance to spend time with my family in my often too-busy-life. And...when we finish, we celebrate. Who doesn’t like a party?
Let me walk you through a day of canning beef.
Start with clean jars. It doesn’t matter what kind. Wide, narrow, quart, pint…whatever your preference.

You also need rings to fit your jars

And pressure canners. The big one on the left will hold 16 quart at a time, the other two will fit 7 quart or 10 pint. So, potentially we could do 20 quart at a time. Unfortunately, the canners are so large that only two can sit on the stove top at the same time. That means the third was either cooling or being filled while the other two processed.

Salt. This is canning salt, but regular old table salt would work fine too.

Lids. We heat the lids before placing them atop the top of the jars that have been wiped clean of any debris that results from packing the jars. Then tightly screw down the canning rings.

And of course, beef. Talk about knowing where your food comes from…this beef was raised by my grandpa. The pasture is right outside the window from where we canned it.

Here, my grandma starts by trimming any excess fat from the pieces of meat and cutting any pieces that are too large into a more manageable size.

This was my "special job". I guess you regress a little when you are in the company of people that witnessed your first steps. I took the trimmed meat and packed it into the jars as tightly as possible. Fill to the neck of the jar to leave a little room above the meat. Rookie canners- that’s called headspace.This space is needed for expansion of food as jars are processed, and for forming vacuums in cooled jars. The extent of expansion is determined by the air content in the food and by the processing temperature. Air expands greatly when heated to high temperatures; the higher the temperature, the greater the expansion. Foods expand less than air when heated. This is why you must leave more headspace when using a pressure canner.

Once the jars are filled they look a little bit like they belong in a science museum exhibit…or a serial killer’s basement. But don’t worry, the meat cooks and it’s all good.

Now each jar gets a teaspoon of salt

And a tablespoon of water

Then into the canner. I add water to the canner until it reaches about halfway up the side of the jars.

After you screw down the lid clamps of the pressure canner as tightly as possible (in the same manner that you tighten the lug nuts on your tires, in opposite pairs) heat the canner until steam is shooting out of the canner’s vent pipe. Once you flip down the vent pipe, pressure begins to build inside of the canner. Watch the gauge. Once the pressure reaches 10, you will want to stabilize the pressure by adjusting the stove’s burner temperature. Quarts of beef need to remain at 10 pounds of pressure for 90 minutes. Pints remain at 10 pounds of pressure for 75 minutes.

Here are some pictures of the trimmers. That’s my 93 year old great-grandpa on the right.


Lunch Break. This is what beef canners eat. Wong's fabulous Cantonese cuisine.

And a couple of hours later with all of the beef trimmed and packed into jars, we did what any group of people that have just been up to their elbows in 240 pounds of fresh beef might do…we celebrate with a champagne toast. Cheers!


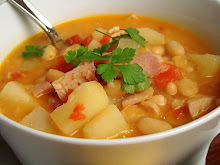
Now, with a year worth of canned beef on my shelf, I incorporate this pantry staple into my meal plan. Check out this 20 minute beef stew.





2 comments:
Ok, I admit, I have NEVER heard of doing this, but I might just have to try it! Right now its orn season for us, but when we get beef, we get a whole beef at a time, too! Thanks for the great information!
This is a great post! What cut of beef did you use? We canned beef stew with raw meat and veggies and it was divine!
Post a Comment