Friday, September 30, 2011
Eggplant Parmesan
A few weeks ago, I made Eggplant Parmesan for the first time. There are so many Eggplant Parmesan recipes out there that I was difficult for me to choose which one would yield the best finished product. Some recipes recommend peeling the eggplant, some leave the skin on. Sometimes the eggplant is fried before being baked into the casserole and sometimes it is not. And there are certainly a variety of ways to bread the eggplant, sauces to make, and cheeses to layer it with.
After reading a number of recipes, I shut my computer and just decided to come up with my own. What I ended up with is a fairly convenient, traditional version of Eggplant Parmesan. I'm so glad that I finally got around to making this dish. It was delicious!
I started with 2 small-ish eggplants.
Then, using a vegetable peeler, I removed the skin.
Naked lil' eggplants...
Sliced into 1/4 -1/2" thick slices.
Place the eggplants in a colander and sprinkle liberally with salt. The salt will draw out the moisture in the eggplant. Let the eggplant sit for about 30 minutes.
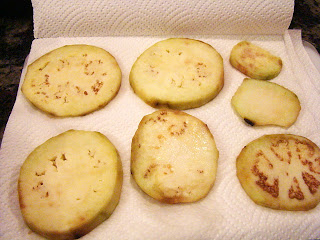
Then place on paper towels.
To squeeze out any excess moisture, I topped the slices with another layer of paper towel and pressed with my grill press. A heavy skillet would work well for this too.
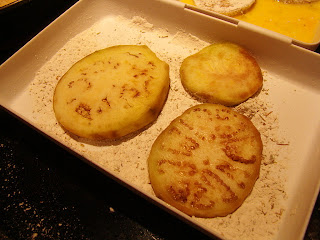
With the eggplant ready to go, I set up my frying station. I heated oil in a skillet and then filled 3 coating trays: the first with flour, the second with a mixture of egg and minced garlic, and the third with a combination of grated Parmesan and panko.
Each eggplant slice was dredged in flour,
dipped in egg,
and coated with panko and Parmesan.
Place the slices in the hot oil and fry until golden brown on each side. Remove to a plate lined with paper towels to drain.
Once the last batch of eggplant is fried, pour a jar of prepared spaghetti sauce right into the drippings in the skillet. I also added in some Italian seasoning. Stir and heat through.
Now the only thing left to do was assemble the casserole. I started by spreading about 1/2 cup of the sauce in the bottom of a 9 X 13 inch baking dish.
Arrange half of the eggplant over the sauce.
Top with Parmesan and mozzarella cheese.
Then repeat the layers. Finish by topping with the remainder of the sauce and a a sprinkle of cheese.
I baked mine for about 20 minutes, until it was bubbly around the edges and the cheese on top was melted.
Fresh basil adds the perfect finish for this cheesy, flavorful dish.
Definitely delicious!
Again, I failed to write down the recipe while I was cooking. Now it's been weeks since I made this and I can not remember the exact amounts of the ingredients used. I did my best to come close based on the pictures above. Here's the recipe:
Eggplant Parmesan
1 large or 2 small, firm eggplants
salt
1/2 cup flour
2 eggs, beaten
3 cloves garlic, minced or pressed
1/2 cup panko (Japanese bread crumbs)
1 cup grated parmesan cheese, divided
oil for frying
1 jar spaghetti sauce
Italian seasoning
2 cups shredded mozzarella
fresh basil, chopped
For the eggplant:
Peel the eggplant and slice into 1/4- 1/2 inch disks. Salt eggplant and let stand for 30 minutes for excess moisture to drain. Press dry between paper towels. Pour flour in a shallow dish. In a second shallow dish, whisk together egg and garlic. In a third dish, mix panko and parmesan. Dredge the eggplant in flour, then dip in the egg mixture, and finally coat with the parmesan/panko mixture. Heat oil in a heavy skillet. Fry eggplant in batches until golden brown on each side. Remove to drain on paper towels.
For the sauce:
Sprinkle the drippings in the skillet with Italian seasoning. Stir in the spaghetti sauce and heat through.
To assemble:
Spread 1/2 cup of spaghetti sauce in the bottom of a 9x13 inch baking dish. Arrange half of the eggplant over the sauce. Top with 1/4 cup of parmesan and 1 cup of mozzarella. Arrange remaining eggplant on top of the cheese. Pour on the remainder of the sauce. Sprinkle with the rest of the cheeses.
Bake at 350 degrees for 20 minutes or until the casserole is bubbling and the cheese is melted. Garnish with fresh basil.
Monday, September 26, 2011
Cheesesteak Pizza
I arrived home late tonight after being away all weekend, so no meal plan yet! I know that I'm behind with many of my posts, so while the meal plan comes together, I thought that I'd share this delicious cheesesteak pizza that I made a few weeks ago.
It's been a while since I've tried a non-traditional pizza in my kitchen. I've been thinking of merging two of my husband's favorites: cheesesteak and pizza for some time now. This short-cut recipe is what I came up with.
I say "short cut" because I used a pre-made pizza crust and pre-sliced steak.
I began by frying up the steak slices in a skillet until cooked through and slightly browned.
Remove the steak slices from the skillet and drain on paper towels.
Then add onions and peppers to the already hot skillet and cook until tender. Sprinkle with a little salt and pepper, to taste.
I love mushrooms, so I threw in some of those too. Stir fry for a few more minutes, until the mushrooms are tender. Remove the veggie mixture from the skillet.
With the pizza toppings ready, start making the creamy cheese sauce. Keep the skillet hot and toss in a couple of tablespoons of butter.
Add a 2-3 cloves of garlic to the butter. Stir around the heated skillet until fragrant.
Then stir in a couple tablespoons of flour, until combined with the butter and garlic.
Now stir in some milk or half and half. Cook and stir over medium heat until slightly thickened.
Now stir in 1/2 cup of shredded provolone, mozzarella, or an Italian cheese blend.
Pre-bake a pizza crust.
Then, spread on the sauce.
Top with the chopped steak.
And the veggies.
Finish it off with another layer of cheese.
Put it into the oven to bake for 10-12 minutes until heated through and the cheese is melted.
Slice it up....
and enjoy!
Now, for a moment of truth: I made this recipe a few weeks ago and I failed to write exact amounts or instructions as I was making it. The following is the recipe for Cheesesteak Pizza as I can best remember it. At least I had the pictures to remind me, so I think it's pretty close. : )
Cheesesteak Pizza
3-5 steak slices, such as Steak Ums
1 onion, thinly sliced
1/2 green pepper, thinly sliced
1 cup fresh mushrooms, sliced
olive oil
2 tablespoons butter
2-3 cloves garlic, minced
2 tablespoons flour
1 cup milk or half and half
2-1/2 cups shredded cheese such as provolone, mozzarella, or Italian blend
salt and pepper, to taste
Heat a tablespoon of olive oil in a skillet. Cook steak slices according to package directions. Remove from skillet, drain on paper towels. Add onions and peppers to the skillet. Saute until tender-crisp. Stir in sliced mushrooms. Cook 2-3 minutes longer. Remove to a plate or bowl.
For Sauce: Add butter to skillet. Heat until melted. Add garlic. Cook for 30 seconds-1 minute. Stir in flour. Whisk in milk. Cook until slightly thickened. Stir in cheese until melted.
For crust: Oil baking sheet or stone. Press dough to fit. Pre-bake according to package directions.
Assemble pizza. Spread sauce over crust. Top with steak, onion, pepper, and mushrooms. Sprinkle cheese over the top and bake until cheese is melted.
Monday, September 19, 2011
7th Birthday Brownie Bliss and Some Party Details...
As I sit down to type this post, it's nearly 10 pm EST. I just realized that exactly 7 years ago at this time I was laying in a hospital bed, clad in a flimsy gown and hooked to all sorts of monitors. Our daughter is the first grandchild on both sides of our family, so both sets of our parents had made the trip to the hospital and were camped out in the waiting room. I'd just received the blessed epidural and a calm had fallen over the delivery room. I was propped up on pillows, watching Sunday night football with my husband and I was too excited to " just rest" as the nurse had advised me.
I knew that life would never be the same, but I really had no idea what lie ahead: Colic. Sooo many sleepless nights (I should have taken that nurse's advise and rested!). First smile. First tooth. First words. First steps. The first time our daughter slept through the night consistently (Unfortunately in that order...as you read this post you will see that sleep is not high on my daughter's list of priorities). First day of school. The first time my daughter read a book all on her own. Her first solo bike ride on two wheels. And now...the first slumber party.
It's been a whirlwind. Our dynamic daughter is an amazing kid, so full of life and joy. She's tireless, except when I am trying to wake her for school in the morning. Ugh.
Parenthood has made me appreciate "the little things" more. Tonight I counted for her as she hoola-hooped to 100. It was quite an accomplishment! I'm looking forward to experiencing a lifetime of firsts with my children. It's certainly never boring!
When I asked my soon-to-be 7 year old daughter what she wanted to do for her birthday this year she all but screamed, "SLUMBER PARTY!" Her other two requests for the night were pizza and brownies (She despises cake, or rather the frosting that accompanies birthday cake. Weirdo.)
We ordered pizzas, and I purchased plenty of chips and popcorn for late night movie-watching junk food. My only food preparation responsibility for the party was brownies. With a fancy, theme-decorated cake out of the question, I focused my creativity on the brownies. Kids love brownies, but I didn't want to just serve our guests a boring, brown, square.
Inspiration struck when I found tie-dye themed plates at the party store. I had an "Ah-ha Moment": I would do a 60's theme with daisy-shaped brownies!
To prepare the brownies, I lined the baking dish with 2 layers of foil, then sprayed it with non-stick cooking spray.
Then I poured in the brownie batter. I have to admit that I "cheated" on the brownies. I used a boxed mix purchased at Aldi, then stirred in some chocolate chips to make them extra chocolaty. No apologies for the boxed mix. It made some delicious brownies.
After baking, I lifted the brownies from the pan and let them cool on the countertop before placing a flower shaped cookie cutter over the brownies and...
cutting them out.
After the brownies were cut, I transferred them to a sheet lined with waxed paper and sifted powdered sugar over the top.
With a final touch of yellow Reese's pieces pressed into the center of each "daisy" I was finished!
Now I only needed to set the table, strategically fling crepe paper from the rafters, and blow up some balloons to transform our dining room into "party central".
Here's a closer look at the table. Sparkly confetti strewn everywhere really spruced up the white space and made the tablescape appear festive.
My husband's parents were visiting this weekend for the occasion. They took our daughters out for the afternoon while I decorated.
The birthday girl was "psyched" when she returned home to the party scene I had created for her special night.
Now all we needed were guests! Here she is with her little sis and 4 "besties", getting ready to blow out all 7 candles on her brownie.
After dinner and dessert, I took the little ladies to the salon for a makeover. That is, I transformed our toy room into a salon.
You know all of those "free gift with purchase" deals and free samples that you get at department store make up counters? I'm not a hoarder, except for when it comes to this stuff. I have a whole drawer full of it. Most of it isn't even mine. My grandma, mom, and sisters send it to me. It makes for perfect play makeup!
I played make up artist for the girls...
while my mother-in-law took over the role of manicurist at the "Nail Salon".
Our make-shift salon was a huge hit!
As for the rest of the night? There was a game of flashlight tag in the lawn, a Barbie movie, a dance party, and then...lights out. The whole night went very smoothly except for the lights out part. At 12:30 I thought that the girls were all settled into their sleeping bags and getting ready to drift off. By 2:00 am I was issuing threats of separating them. At 3:30 am, my daughter was standing in front of me asking if it was morning yet because she was "bored". Really. BORED?! Go to sleep, child!!! Finally at 4:30 all was quiet and I abandoned my post on the sofa for my comfy bed. Only, I couldn't sleep. I was worried that one of the kiddos would wake up and need me. And so I laid wide awake with our bedroom door open, listening. At 8:00 am one of the girls came upstairs to tell me that she was hungry. I shuffled back downstairs to serve donuts with a smile on my face and a huge cup of coffee in my hand. Just 2 hours until the parents arrived to pick up their daughters....Please Lord, help the time pass quickly!
I'm still recovering. I think that I need at least two more years before I plan another slumber party. It makes me wonder: How did my mom do it? She survived 3 daughters and we all had slumber parties.
That must have sucked.
Thanks, mom!
Subscribe to:
Posts (Atom)


