Showing posts with label Food Preservation. Show all posts
Showing posts with label Food Preservation. Show all posts
Friday, September 9, 2011
Drying Chili Peppers and My Basic Chili Recipe
A couple of weekends ago my mom visited. She brought with her a bucket of hot red chili peppers from my grandma's garden. I decided to dry them. At first, I contemplated stringing them up to dry in my basement. That seemed like a lot of work, and with two curious young children and a puppy in this house, I thought that it also seemed like a potential danger.(Our puppy had already sampled a pepper the night they arrived. Lots of sneezing and retching followed. Not good!)
Then I remembered that months ago, my grandma had given me her food dehydrator. It was stashed in my basement under some boxes after our move last February. When I got the dehydrator, I had a whole list of things I wanted to try: fruit leather, beef jerky, yogurt... Instead we bought a new house, moved, and my list of potential dehydrating projects was pushed to the back burner. These peppers seemed to be the perfect reason to dust off this appliance.
After reading up on how to dry peppers in the dehydrator, I began by washing the peppers, then cutting off the tops. Note: if the peppers are spicy, I suggest that you wear rubber gloves while handling them.
I arranged the peppers on the trays that came with the dehydrator.
Then I set the dehydrator between 135 and 145 degrees and slid the trays into place.
I was concerned about the fumes that might result from drying the peppers indoors. Luckily, we have a covered utility porch on the back of our garage. I set the dehydrator on this porch to save my family from burning eyes and sneezes.
I consulted Scott Robert's Ultimate Guide to Drying Hot Peppers for direction on temperature setting and drying time. His recommendation was 8-12 hours. I'm not sure if it was my dehydrator or that the peppers had a high moisture content, but my peppers took much longer to dry. I think that these dried for 18-20 hours at 140 degrees. I wanted them nice and brittle so that I could grind some of them into powder.
Back in the kitchen, I removed the seeds from the dried peppers. They fall out pretty easily once the peppers are dry.
I collected all of the seeds and wrapped them up. I hope to plant some of them in my garden next year.
A few of the larger peppers didn't dry completely. They had the consistency of a sun-dried tomato. I bagged those too and planned to figure out what to do with them later. Unfortunately, when I checked them yesterday, they had turned moldy. I probably should've put them into the fridge....
The rest of the dry seeded peppers went into my electric coffee grinder. In batches, I ground them to a fine powder.
These chilies were super HOT!I decided to do a taste test with my chili powder against a couple of the other chili powders in my spice rack. I tried cayenne pepper and ancho chili pepper against my freshly ground hot chilies. The first two pepper powders packed some heat, but when I tested a few particles of my chili powder on my tongue, there was a 5-alarm reaction! My mouth was still burning at least 4 hours later.
A little of this chili powder will go a long way in spicing up recipes like my homemade chili.
I originally posted my chili recipe on this blog almost 3 years ago. This week, chili also happens to be the subject of the food column I write for a local news publication. After typing the article, I decided that it's time to re-visit that recipe here on Krista's Kitchen. So here goes....
From my article:
We’re barely past Labor Day, but the chill in the air and the looming gray clouds overhead this week make me realize that fall is just around the corner. All week I have been craving my favorite fall foods; dishes that call for apples and squash, hearty stews and comfort foods.
Yesterday, I whipped up a big pot of chili. Some people wouldn’t classify chili as comfort food, but to me, there’s nothing better than a steaming bowl of homemade chili with all of the fixings to warm me up at the end of a gloomy fall day.
There are many schools of thought when it comes to chili. Some feel that the spicier the chili is, the better it tastes, while others prefer a milder flavor. Some like it thick and some want it juicy. Some love the beans and some could do without. And there is a whole group of people who love their Chili Mac.
For the record, I am not from this pasta-loving sect of chili connoisseurs. Personally, I believe that macaroni is the quickest way to ruin a bowl of chili. In fact, I get a little annoyed when served chili-flavored pasta when I order a bowl of chili. If I wanted goulash, I’d ask for goulash. I want chili, darn it!
Now don’t you Chili Mac lovers get all offended. I’m just proving my point that chili is very much a personal preference kind of dish. Note: I do make an exception to the “no pasta in chili" rule when it comes to my beloved Cincinnati Chili.
Now that we have established that the perfect bowl of chili is different for each and every one of us, today I am providing my basic chili recipe. It’s not terribly spicy, with a hint of sweet. It is tame enough for a toddler, yet flavorful enough to be a crowd pleaser.
Although the basics of my chili always remain the same, it never turns out exactly the same way. I’m always slightly switching it up. Sometimes I pour in Spicy V8 in place of tomato juice. Sometimes I dump in a can of chopped green chilies or a jar of salsa. And sometimes I add taco seasoning along with the chili powder or sprinkle in different types of ground hot peppers. This basic chili recipe provides the opportunity to really make this dish your own!
The key to great chili is to taste as you go. Start with the basic recipe and then add in more salt, sugar and spices to suit your personal tastes. Just keep in mind that the flavors will meld and some spices will intensify as the chili simmers. I recommend waiting 15-30 minutes between each flavor-enhancing addition and tasting again before making adjustments to the recipe.
Here are the building blocks for my basic chili recipe: ground beef, onion, whole tomatoes, kidney beans, tomato juice, brown sugar, and of course, chili powder.
After browning the beef with the onion, stir in the spices. Then add the tomatoes and beans.
"Smoosh" the tomatoes as you stir them into the mix. Then heat the mixture to a sizzle.
Pour in the tomato juice and stir until combined. Heat the chili to a boil, then simmer for at least an hour. Taste and add seasonings as necessary while the chili cooks.
Serve with your favorite chili toppings.
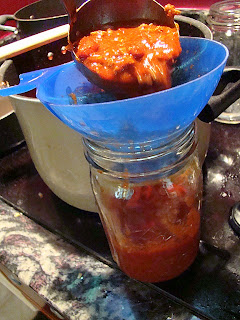
To freeze the chili, cool to room temperature first. Then divide the chili into dinner portion freezer containers. A funnel is a good tool to avoid a mess.
I prefer plastic quart-sized freezer containers for freezing chili and soup. I was out of plastic containers this week, so I used quart-sized canning jars instead. Be sure to only use wide-mouth jars and allow plenty of head-space for expansion as the chili freezes or you will risk the frustration of broken jars.
Freezer bags also work well for preserving chili. Label all containers with the contents and date and then freeze immediately. Bags should be frozen flat and can be stacked later.
Here's the recipe:
Chili
2 lbs. Ground beef
1 medium or large onion, diced
salt and pepper
In a large pot, brown beef and onion. Salt and pepper to taste. Drain. Return to pot.
Add:
80 oz. of tomato juice or 1 ½ large cans (subject to how thick or fluid you prefer your chili)
29 oz. can of whole tomatoes
2- 15.5 oz. cans of kidney beans (rinsed and drained)
1/4 c. brown sugar, packed
1/4-1/3 c. chili powder
Add the spices and sugar to the hamburger mixture. Stir until combined and heat until sizzling. Then add the tomatoes. Crush them up a bit as you stir them into the beef. Dump in the beans and stir. Add the juice. Bring to a boil, then simmer for at least an hour before serving, adjusting the flavors to taste as the chili cooks.
My perfect bowl of chili is topped with a little shredded cheddar or American cheese, Fritos, and a dollop of sour cream. Once I've perfected the chili in the pot, it's all about the fixings!
This recipe makes enough for me to freeze half, serve the other half for dinner, and still put leftovers in the fridge for lunch the next day.
Saturday, August 6, 2011
Home Canning Pickled Peppers AND Pickles
This post is brought to you by the letter "P".
Before I present my latest adventure in home canning, I propose we look at a problem posed by Mother Goose.
Peter Piper picked a peck of pickled peppers;
A peck of pickled peppers Peter Piper picked;
If Peter Piper picked a peck of pickled peppers,
Where's the peck of pickled peppers Peter Piper picked?
As it turns out, this tongue twister is a paradox. That is, a self-contradictory and false proposition. Why? Because Peter Piper couldn't have picked pickled peppers. He could have picked Peppers for pickling but NOT pre-pickled peppers. To pickle something it must be preserved in a brine or marinade.
Which is exactly what we did to these peppers.
I had brought some peppers back from my grandma's garden over the weekend since she has a bumper crop this year. When I returned home, I found that some of the peppers from our garden were ready pick, and then my pretty neighbor Shawna pitched in some of her peppers for the canning effort. So this is a three-garden blend.
Before we did anything else, we prepared the pickling "potion". I asked my oldest daughter to pour together vinegar, water, and garlic. I put this mixture on the stove to boil, then filled my water bath canner (if you're in the market for a water bath canner, check at Walmart. I found that they offer canners at the lowest prices) half full with water and placed that on the stove to heat up as well.
I mentioned that I was using some of my neighbor's peppers to fill the jars this week. My neighbor and I planted our gardens at the same time this year. It's been fun to watch each other's gardens grow and to compare and contrast the progress. She mentioned that she would like to learn how to "put up" her produce, so I invited her over for a crash course in home canning.
To put it pleasantly, my daughters adore our neighbors. In truth, they practically stalk her and her pup from our porch on a regular basis. The patience she put forth while canning with my two precocious little people is praise-worthy.
Since we mostly had banana peppers, we decided to slice them for sandwiches. We each picked our station and went to work, cutting the peppers into rings.
My oldest daughter was excited to help, so I assigned her the job of seeding the peppers. We cut the tops off and then piled the peppers in front of her. She loves her "My Safe Cutter" knife that I purchased from The Pampered Chef for her a couple of months ago. It's such a great tool. I can keep her busy cutting fruit and vegetables the entire time I prepare dinner now. It was the perfect tool for hollowing out the peppers too.
Here is our assortment of peppers, all sliced and ready to be packed into jars. I mentioned that we were using banana peppers, but we also added other peppers to the mix. I had selected a recipe for "Hot Peppers" in my Ball Blue Book Guide to Preserving
Pack the peppers tightly into hot, sterilized jars. (I like to use the end of a wooden spoon to gently press them down). Pour on the hot vinegar mixture, leaving 1/4 inch of headspace. Then run a table knife down the inside edges of the jars to release any air bubbles that may have formed.
Wipe the tops of the jars dry, place the heated lids over the jars, and screw on the bands until tight before carefully placing them in the boiling water of your canner. Bring the water back to a boil, then cover and process for ten minutes. Remove the canner from the heat, then let it cool for 5 minutes before removing the jars to a countertop covered with towels to remain cooling for 24 hours. As the jars cool, you will probably (hopefully) hear the "Plink, plink, plink." of the jars sealing. You might notice from the picture below that I added some chopped zucchini to the top of these jars. We were a little short on peppers to fill the jars that we had prepared, so I added a few chunks of zucchini to the top of each to fill them up.
Hot Peppers from Ball Blue Book of Preserving
1-1/2 lbs. banana peppers
1 lb. jalapeno peppers
1/4 lb. serrano peppers
6 cups vinegar
2 cups water
3 cloves garlic, crushed
Leave peppers whole or cut into 1 inch slices. Mix peppers together. Combine vinegar, water, and garlic in a large saucepot. Bring mixture to a boil; reduce heat and simmer 5 minutes. Discard garlic. Pack peppers into hot jars, leaving 1/4-inch headspace. Remove air bubbles. Adjust 2-piece caps. Process 10 minutes in a boiling water canner.
Notes: You don't have to stick to the recipe when it comes to the types of peppers. You can use all banana peppers or mix types of peppers in any ratio. If you like milder peppers, be sure to remove the seeds before slicing. Reminder: When cutting or seeding hot peppers, wear rubber gloves to prevent hands from being burned.
Before I proceed with the part of the post dealing with pickles, I am going to have to discontinue my puny attempts at alliteration. If not for my own sanity, then to prevent all of you from becoming prejudiced against the precious letter "P". If I keep this up, I may need a prescription!
Okay, let's push on....
We began preserving the pickles in the same way that we began the peppers, by mixing together water and vinegar. Only this time, we added pickling salt to the pot too, then brought the mixture to a boil. It is important to use pickling or canning salt (available at your local grocery with the other salts) instead of regular table salt for canning because table salt can cause the finished product to darken or become cloudy.
Then we sliced the cucumbers. These cucumbers were a little larger than I like for canning. I was away when my cucumbers ripened to optimal size so they were pretty big by the time I arrived home and made it out to my garden to harvest them.
I planted a "pickling" variety of cucumber this year. Pickling cucumbers make for a crunchier pickle than the table or slicing varieties.
Pack the cucumber slices into pint-sized jars.
I also cut some of the cukes into spears.
And packed them into quart-sized jars.
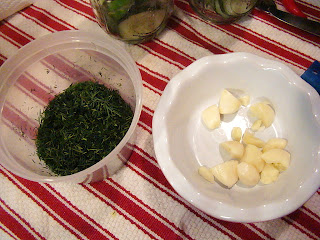
While I was packing, my neighbor prepared the dill (from her herb garden) and peeled and halved cloves of garlic.
We divided the dill evenly among the jars (1-2 tablespoons of freshly chopped dill) and dropped a clove of garlic into each, before pouring on the vinegar brine, releasing the air bubbles, topping the jars, and twisting on the bands.
These also processed for 10 minutes in a water bath canner. This is an advantage of canning pickles and pickled peppers at the same time. If you've got space in your canner, you can process them together.
Here's a jar of our sandwich-sliced pickles cooling on the counter.
And here are the spears. (Which I processed for an additional 5 minutes because I packed them in quarts vs. pints.)
This is our "haul" for the day. I usually only have one jar break when processing over a whole summer of canning. On this day, I had two jars break in the canner. (I guess I'm set for next year, then.) 1 jar of peppers and 1 quart-sized jar of pickle spears busted on the day we canned these or 1 per canner. This is always frustrating because 1. I have to stop and clean the canner, then re-start the water again AND 2. the produce is wasted. Bummer.
Still, we ended up with 4 pints of pickled peppers, 9 pints of sandwich dill pickles, and 1 quart of pickle spears. It may seem like a lot of work, but you can't put a price on the pride derived from preserving your own produce. Plus, we had fun doing it. I'm sure that when the two of us place a pickle on our burger at the next neighborhood cookout, they will taste PERFECT! : )
Kosher-Style Dill Pickles adapted from Better Homes and Gardens Cookbook
Makes: 6 pints (36 servings)
Prep: 40 minutes
ingredients
2-1/4 pounds 4-inch pickling cucumbers (about 36 cucumbers)
3-3/4 cups water
3-3/4 cups white or cider vinegar
6 tablespoons pickling salt
12 to 18 heads fresh dill or 6 to 8 tablespoons dill seed or freshly chopped dill
6 small cloves garlic or 3 large cloves, halved
Directions
1. Wash cucumbers thoroughly and scrub with a vegetable brush, if needed. Remove stems and cut off a slice from each end. (Enzymes at the blossom end of the cucumber may also cause softening.)
2. To prepare the brine, combine the water, vinegar, and salt in a saucepan. Heat until the mixture boils.
3. Pack the cleaned cucumbers loosely into hot, clean pint canning jars, leaving a 1/2-inch headspace. Measure the headspace from the top of the food to the rim of the jar with a clean ruler. Add 2 to 3 heads of dill or 3 to 4 teaspoons of dill seed and garlic to each jar. Place a wide-mouth plastic funnel in the jar and ladle the hot brine over the cucumbers. Remove the funnel. Release trapped air bubbles in the jar by gently working a narrow rubber spatula around the jar's sides. Add additional brine, if needed, to maintain the 1/2-inch headspace. Wipe the jar rim with a clean, damp paper towel. Any food on the rim prevents a perfect seal. Position a prepared lid and screw band on the jar and tighten according to manufacturer's directions. Place each jar into boiling water of a water-bath canner as it is filled. The jars should not touch. Cover the canner. Process filled jars in the boiling water for 10 minutes. Begin counting the processing time when the water returns to boiling.
4. When the jars have cooled, press the center of each lid to check the seal. If the dip in the lid holds, the jar is sealed. If the lid bounces up and down, the jar isn't sealed. Unsealed jars should be stored in the refrigerator and used within 3 days. Let jars stand 1 week before using. Label the jars with the contents and date. Store up to 1 year in a cool, dry place. Makes 6 pints (36 servings).
nutrition facts
Servings Per Recipe 6 pints (36 servings)Calories9Total Fat (g)0Cholesterol (mg)0, Sodium (mg)1067, Carbohydrate (g)2, Fiber (g)0, Protein (g)0, Vitamin A (DV%)0, Vitamin C (DV%)2, Calcium (DV%)1, Iron (DV%)1, Percent Daily Values are based on a 2,000 calorie diet
Notes: We doubled this recipe. Also we sliced or speared our cucumbers before packing them into jars.
Wednesday, June 8, 2011
How to Freeze Asparagus
By some great stroke of luck, I ended up with 7-8 pounds of Michigan asparagus this year. I brought home the first 4 pounds after a May visit with my family in Indiana. Our little family enjoyed it in salads and stir-fries, grilled, and steamed. Then my parents came to visit a couple of weekends ago and my mom brought her portion of asparagus that she "just hadn't had time to use". She left it with me, and I decided to freeze it for later (we've eaten a lot of asparagus lately!)
Asparagus freezes well and thaws out just fine for a side dish or use in recipes. Nothing is as good as fresh of course, but when the price of asparagus shoots (Ha ha. Shoots. Get it?) up after the growing season is over, having asparagus in your freezer is a nice, inexpensive asset.
I've been freezing asparagus since my 4-H days when I exhibited it as a Food Preservation project at our county fair. It really is a simple vegetable to preserve. And with a small amount like this 3-4 pounds, it really takes very little time to take it from "fresh to freezer".
You start by heating a large pot of water to boiling for blanching the vegetable. Why blanch? Here's a quick explanation (from my post about freezing sweet corn):
Blanching vegetables destroys enzymes, changes the texture and sets the color. For extended storage, like freezing, destroying the enzymes improves the keeping quality of the vegetables. The same enzyme that causes fruits and vegetables to ripen also cause them to rot. Blanching before freezing is not necessary, but blanched vegetables will look and taste fresher for a longer period of time.
After you put the water on to boil, wash the asparagus to get all of the sand and soil off.
Snap off the "woody" bottoms if there are any, then sort the asparagus into piles by stalk size: small, medium, and large. The reason for sorting by size is that the blanching time varies based on the size of the stalk.
I forgot to take a picture of the blanching step, but here's the break down: You just drop the stalks into the boiling water for the required amount of time.
Large stalks- 4 minutes
Medium stalks- 3 minutes
Small stalks- 2 minutes
Remove the asparagus from the water and quickly drain.
Then drop it into an ice water bath to quickly cool and stop the cooking process.
Once the asparagus has cooled, drain it again.
Then pack the asparagus into labelled (it's always easier to label a bag before filling) freezer bags. I like to fill each bag half-full (because I'm an optimist!) while holding it upright, then lay it down flat, spread out the asparagus, and squeeze out any air before sealing. This creates a product that freezes quickly, hence preventing the formation of large ice crystals.
Freeze the bags flat until solid, then stack them however you please to save space in your freezer.
Note: You could also slice the asparagus into pieces before blanching. Sliced asparagus make for a speedy addition for stir-fry, casseroles and quiches, or soup.
Whether you are growing your own or you find a great deal at the Farmers' Market this season, be sure to put some up for later when the prices "shoot" up!
Tuesday, April 12, 2011
Stocking Your Freezer
My last post was a week ago. In truth, we've been so busy since returning from vacation that I haven't had the time to write a meal plan or even make a big shopping trip. So, what have we been eating? Not fast food or carryout. I've been pulling meals from my freezer. And I don't mean Lean Cuisine or Stouffer's either. We've been cooking ready-made meals from our freezer. I mean REAL homemade meals that I have put into our freezer over time. We've eaten beef barbecue, casseroles, chili, and grilled out meat that I had frozen into perfectly-sized portions for one meal. I absolutely love that we have this option when life gets busy!
Tomorrow night I am teaching a class that will cover meal planning, batch cooking, overall kitchen efficiency, and how to get the most out of your freezer. Since I haven't cooked up too many new things to write about lately, I thought that I'd share some of the tips and ideas for filling up your freezers on here too.
One of the best ways to put meals in your freezer is a big ol' batch cooking session. You can read all about one of my adventures in batch cooking HERE in the post I titled 18 Pounds of Chicken, 2 days, 10 meals, and my Chicken Noodle Soup Recipe. This post also includes a few books that are great resources for batch cooking and food preservation.
If you can't carve out 2 days of your schedule for a big batch cooking session, you can take on smaller projects. For example, make a double batch of easy meatballs and then divide them into bags of dinner-sized portions (depending on the size of your family). Check out these posts for quick dinners using meatballs:
Spaghetti and Meatballs in Bacon Vodka Sauce

Easy Meatball Stew

Meatball Sliders

Monstrous Meatball Subs

Super Fast and Easy Swedish Meatballs

Meatballs in Tomato Basil Cream Sauce
Or....
you could make a whole bunch of my Cheesy Beef and Bean Burritos.

You can freeze a whole pan or freeze them individually for lunch or dinner on the go!
Some of my other favorite recipes that make extra with leftovers that freeze well are:
Texas Beef Barbecue
Crock Pot Chicken Tacos or Crock Pot Beef Tacos
Savory Shredded Pork
Garden Vegetable Soup
Homemade Chicken Stock
Speaking of soup, I often freeze the leftover soup or even make extra with the intention of freezing some for a future meal. The same goes with casseroles. If possible, I try to make 2 pans and freeze one. Whenever you have an abundance of leftovers, freeze them!
Some other tips:
When you find a great sale on meat, BUY IT! When you get home, divide it into meal-sized portions, then label and freeze. You can add a marinade before freezing and the meat will marinate perfectly as it thaws. You'll have easy meals of chicken breasts, pork chops, or steaks ready for the grill or stovetop when you're ready to use them. For stir-fry, casserole, or soup you can cut the meat into strips or chunks before freezing and save yourself a step on preparation day.
You CAN freeze pre-cooked rice! Thaw the cooked rice and serve it with your stir-fry or add it to casserole and soups.
If you're browning ground beef (or bulk sausage) for a recipe, brown 5 pounds instead of 1 pound. Then freeze the rest of the meat in 1 pound portions for use in chili, spaghetti sauce, sloppy joes, or even (gasp!) Hamburger Helper. It just saves a step later.
Make extra pancakes and waffles and freeze them (place freezer paper between each to keep them from sticking). Reheat later for a quick breakfast.
Whenever I bake cookies, muffins, pies,or even cakes, I often freeze some for later.
Here are the links to some other foods that I have featured on this blog in the past that freeze well:
Pizza dough
Fresh pasta

Corn
Blueberries
Granola

Okay, so the granola doesn't need to be frozen, but it's a great batch cooking item to keep on hand. We love this recipe for breakfast or a snack
And now for some tips for freezing and using your freezer:
Freezing
•When freezing food, leave plenty of clear space around each container or package so that air can circulate around the food, allowing it to freeze quickly and evenly. After the packages are frozen, then you can stack them more efficiently.
•Freeze food in small quantities so that it can freeze faster to prevent the buildup of large ice crystals.
•Use shallow containers with wide surface area relative to depth.
•If using freezer bags, lay them flat on a chilled baking sheet until frozen solid, then stack then however you like.
•Cool food completely to room temperature before freezing.
•If you are batch cooking a large amount of meals, lower your freezer’s temperature by 10 degrees for 24 hours before your big cooking day. Once the food is frozen, return the freezer to the regular temperature.
•Be sure to mark all packages with the contents and date.
About Containers
Glass- If using glass containers, choose dual purpose types that are designed for freezing, but are also heat proof. Or know the limits of your glassware. For example: Pyrex needs to sit at room temperature for 30 minutes before putting it into the oven out of the freezer.
Plastic Containers- Make sure containers close tightly and securely and are made of plastic that will not become brittle. Look for the snowflake symbol on the bottom.
Plastic Freezer Bags- Use only bags that are labeled for freezer use. Once the bag is filled, try to squeeze out as much air as possible before sealing.
*Freeze bags flat, then stack after frozen. Food frozen flat will freeze and thaw much more quickly than food that is frozen in one big lump.
Plastic Wrap and Foil- Only use freezer-safe plastic wrap. Regular plastic wrap is porous and can use it’s cling qualities under sustained cold temperatures. After being wrapped in freezer plastic wrap, it should also be wrapped in heavy duty foil or placed in a freezer bag.
Organizing Your Freezer
•Freezers should be kept at 0 degrees C or -18 degrees F.
•Try to avoid randomly throwing items into your freezer. Instead label, date, and stack food in a way that it is easy to see. If your freezer is deep, keep a list on the door that itemizes the contents.
•For maximum efficiency, keep the freezer 75% full to keep from losing cold air each time the freezer is opened.
•Freezers should be defrosted and cleaned at least twice a year or when more than ¼” of frost builds up on the inside.
Thawing
Of course, all of that hard work spent filling your freezer with homemade meals won't seem like a time-saver if you don't remember to thaw the food before you need it.
In the refrigerator
•8 hours per pound of meat
•4 hours per pound of poultry
•6 hours per pound of fruit or vegetables
•12-24 hours for stews and casseroles
In the microwave
•Allow 6 to 8 minutes per pound of food when thawing in the microwave on low heat or defrost.
The Payoff
I've been reading a book titled Miserly Moms: Living Well on Less in a Tough Economy. This book outlines some fabulous ideas for saving money. Author Jonni McCoy has also penned a few other books worth a look including, Healthy Meals for Less: Great-Tasting Simple Recipes Under $1 a Serving
Here are few excerpts from her book that perfectly illustrate the benefits of making your own meals for the freezer:
"Convenience foods are just that-convenient. And you are going to pay for that convenience, sometimes more than you think. With some planning, you can make your own meals and snacks from scratch, and you'll cut way back on your food bill. In my (Jonni's) price studies, this is what I've found about the cost of convenience foods:
A restaurant meal costs six to ten times more than one made from scratch.
A frozen meal costs four times more than one made from scratch.
A prepacked meal costs three times more than one made from scratch.
Precut foods (ready-to-eat salads, sliced carrots, shredded cheese) cost two times more than if you cut them up yourself."
"Remember, if the manufacturer did anything to "help" you make it, you are paying them for that help"
I would contend that the benefits of making and freezing your own meals isn't only cost effective, it's also healthier. You can control the quality of ingredients and the amount of fat and preservatives that go into each meal you place on your table.
Plus, there is a certain amount of pride that results from feeding your family a meal that you made with your own two hands. : )
Alright. READY. SET. FREEZE! Haul out those freezer bags and storage containers and have at it!
Tomorrow night I am teaching a class that will cover meal planning, batch cooking, overall kitchen efficiency, and how to get the most out of your freezer. Since I haven't cooked up too many new things to write about lately, I thought that I'd share some of the tips and ideas for filling up your freezers on here too.
One of the best ways to put meals in your freezer is a big ol' batch cooking session. You can read all about one of my adventures in batch cooking HERE in the post I titled 18 Pounds of Chicken, 2 days, 10 meals, and my Chicken Noodle Soup Recipe. This post also includes a few books that are great resources for batch cooking and food preservation.
If you can't carve out 2 days of your schedule for a big batch cooking session, you can take on smaller projects. For example, make a double batch of easy meatballs and then divide them into bags of dinner-sized portions (depending on the size of your family). Check out these posts for quick dinners using meatballs:
Spaghetti and Meatballs in Bacon Vodka Sauce

Easy Meatball Stew

Meatball Sliders

Monstrous Meatball Subs

Super Fast and Easy Swedish Meatballs

Meatballs in Tomato Basil Cream Sauce
Or....
you could make a whole bunch of my Cheesy Beef and Bean Burritos.

You can freeze a whole pan or freeze them individually for lunch or dinner on the go!
Some of my other favorite recipes that make extra with leftovers that freeze well are:
Texas Beef Barbecue
Crock Pot Chicken Tacos or Crock Pot Beef Tacos
Savory Shredded Pork
Garden Vegetable Soup
Homemade Chicken Stock
Speaking of soup, I often freeze the leftover soup or even make extra with the intention of freezing some for a future meal. The same goes with casseroles. If possible, I try to make 2 pans and freeze one. Whenever you have an abundance of leftovers, freeze them!
Some other tips:
When you find a great sale on meat, BUY IT! When you get home, divide it into meal-sized portions, then label and freeze. You can add a marinade before freezing and the meat will marinate perfectly as it thaws. You'll have easy meals of chicken breasts, pork chops, or steaks ready for the grill or stovetop when you're ready to use them. For stir-fry, casserole, or soup you can cut the meat into strips or chunks before freezing and save yourself a step on preparation day.
You CAN freeze pre-cooked rice! Thaw the cooked rice and serve it with your stir-fry or add it to casserole and soups.
If you're browning ground beef (or bulk sausage) for a recipe, brown 5 pounds instead of 1 pound. Then freeze the rest of the meat in 1 pound portions for use in chili, spaghetti sauce, sloppy joes, or even (gasp!) Hamburger Helper. It just saves a step later.
Make extra pancakes and waffles and freeze them (place freezer paper between each to keep them from sticking). Reheat later for a quick breakfast.
Whenever I bake cookies, muffins, pies,or even cakes, I often freeze some for later.
Here are the links to some other foods that I have featured on this blog in the past that freeze well:
Pizza dough
Fresh pasta

Corn
Blueberries
Granola

Okay, so the granola doesn't need to be frozen, but it's a great batch cooking item to keep on hand. We love this recipe for breakfast or a snack
And now for some tips for freezing and using your freezer:
Freezing
•When freezing food, leave plenty of clear space around each container or package so that air can circulate around the food, allowing it to freeze quickly and evenly. After the packages are frozen, then you can stack them more efficiently.
•Freeze food in small quantities so that it can freeze faster to prevent the buildup of large ice crystals.
•Use shallow containers with wide surface area relative to depth.
•If using freezer bags, lay them flat on a chilled baking sheet until frozen solid, then stack then however you like.
•Cool food completely to room temperature before freezing.
•If you are batch cooking a large amount of meals, lower your freezer’s temperature by 10 degrees for 24 hours before your big cooking day. Once the food is frozen, return the freezer to the regular temperature.
•Be sure to mark all packages with the contents and date.
About Containers
Glass- If using glass containers, choose dual purpose types that are designed for freezing, but are also heat proof. Or know the limits of your glassware. For example: Pyrex needs to sit at room temperature for 30 minutes before putting it into the oven out of the freezer.
Plastic Containers- Make sure containers close tightly and securely and are made of plastic that will not become brittle. Look for the snowflake symbol on the bottom.
Plastic Freezer Bags- Use only bags that are labeled for freezer use. Once the bag is filled, try to squeeze out as much air as possible before sealing.
*Freeze bags flat, then stack after frozen. Food frozen flat will freeze and thaw much more quickly than food that is frozen in one big lump.
Plastic Wrap and Foil- Only use freezer-safe plastic wrap. Regular plastic wrap is porous and can use it’s cling qualities under sustained cold temperatures. After being wrapped in freezer plastic wrap, it should also be wrapped in heavy duty foil or placed in a freezer bag.
Organizing Your Freezer
•Freezers should be kept at 0 degrees C or -18 degrees F.
•Try to avoid randomly throwing items into your freezer. Instead label, date, and stack food in a way that it is easy to see. If your freezer is deep, keep a list on the door that itemizes the contents.
•For maximum efficiency, keep the freezer 75% full to keep from losing cold air each time the freezer is opened.
•Freezers should be defrosted and cleaned at least twice a year or when more than ¼” of frost builds up on the inside.
Thawing
Of course, all of that hard work spent filling your freezer with homemade meals won't seem like a time-saver if you don't remember to thaw the food before you need it.
In the refrigerator
•8 hours per pound of meat
•4 hours per pound of poultry
•6 hours per pound of fruit or vegetables
•12-24 hours for stews and casseroles
In the microwave
•Allow 6 to 8 minutes per pound of food when thawing in the microwave on low heat or defrost.
The Payoff
I've been reading a book titled Miserly Moms: Living Well on Less in a Tough Economy.
Here are few excerpts from her book that perfectly illustrate the benefits of making your own meals for the freezer:
"Convenience foods are just that-convenient. And you are going to pay for that convenience, sometimes more than you think. With some planning, you can make your own meals and snacks from scratch, and you'll cut way back on your food bill. In my (Jonni's) price studies, this is what I've found about the cost of convenience foods:
"Remember, if the manufacturer did anything to "help" you make it, you are paying them for that help"
I would contend that the benefits of making and freezing your own meals isn't only cost effective, it's also healthier. You can control the quality of ingredients and the amount of fat and preservatives that go into each meal you place on your table.
Plus, there is a certain amount of pride that results from feeding your family a meal that you made with your own two hands. : )
Alright. READY. SET. FREEZE! Haul out those freezer bags and storage containers and have at it!
Subscribe to:
Posts (Atom)


