This post is brought to you by the letter "P".
Before I present my latest adventure in home canning, I propose we look at a problem posed by Mother Goose.
Peter Piper picked a peck of pickled peppers;
A peck of pickled peppers Peter Piper picked;
If Peter Piper picked a peck of pickled peppers,
Where's the peck of pickled peppers Peter Piper picked?
As it turns out, this tongue twister is a paradox. That is, a self-contradictory and false proposition. Why? Because Peter Piper couldn't have picked pickled peppers. He could have picked Peppers for pickling but NOT pre-pickled peppers. To pickle something it must be preserved in a brine or marinade.
Which is exactly what we did to these peppers.
I had brought some peppers back from my grandma's garden over the weekend since she has a bumper crop this year. When I returned home, I found that some of the peppers from our garden were ready pick, and then my pretty neighbor Shawna pitched in some of her peppers for the canning effort. So this is a three-garden blend.
Before we did anything else, we prepared the pickling "potion". I asked my oldest daughter to pour together vinegar, water, and garlic. I put this mixture on the stove to boil, then filled my water bath canner (if you're in the market for a water bath canner, check at Walmart. I found that they offer canners at the lowest prices) half full with water and placed that on the stove to heat up as well.
I mentioned that I was using some of my neighbor's peppers to fill the jars this week. My neighbor and I planted our gardens at the same time this year. It's been fun to watch each other's gardens grow and to compare and contrast the progress. She mentioned that she would like to learn how to "put up" her produce, so I invited her over for a crash course in home canning.
To put it pleasantly, my daughters adore our neighbors. In truth, they practically stalk her and her pup from our porch on a regular basis. The patience she put forth while canning with my two precocious little people is praise-worthy.
Since we mostly had banana peppers, we decided to slice them for sandwiches. We each picked our station and went to work, cutting the peppers into rings.
My oldest daughter was excited to help, so I assigned her the job of seeding the peppers. We cut the tops off and then piled the peppers in front of her. She loves her "My Safe Cutter" knife that I purchased from The Pampered Chef for her a couple of months ago. It's such a great tool. I can keep her busy cutting fruit and vegetables the entire time I prepare dinner now. It was the perfect tool for hollowing out the peppers too.
Here is our assortment of peppers, all sliced and ready to be packed into jars. I mentioned that we were using banana peppers, but we also added other peppers to the mix. I had selected a recipe for "Hot Peppers" in my Ball Blue Book Guide to Preserving
Pack the peppers tightly into hot, sterilized jars. (I like to use the end of a wooden spoon to gently press them down). Pour on the hot vinegar mixture, leaving 1/4 inch of headspace. Then run a table knife down the inside edges of the jars to release any air bubbles that may have formed.
Wipe the tops of the jars dry, place the heated lids over the jars, and screw on the bands until tight before carefully placing them in the boiling water of your canner. Bring the water back to a boil, then cover and process for ten minutes. Remove the canner from the heat, then let it cool for 5 minutes before removing the jars to a countertop covered with towels to remain cooling for 24 hours. As the jars cool, you will probably (hopefully) hear the "Plink, plink, plink." of the jars sealing. You might notice from the picture below that I added some chopped zucchini to the top of these jars. We were a little short on peppers to fill the jars that we had prepared, so I added a few chunks of zucchini to the top of each to fill them up.
Hot Peppers from Ball Blue Book of Preserving
1-1/2 lbs. banana peppers
1 lb. jalapeno peppers
1/4 lb. serrano peppers
6 cups vinegar
2 cups water
3 cloves garlic, crushed
Leave peppers whole or cut into 1 inch slices. Mix peppers together. Combine vinegar, water, and garlic in a large saucepot. Bring mixture to a boil; reduce heat and simmer 5 minutes. Discard garlic. Pack peppers into hot jars, leaving 1/4-inch headspace. Remove air bubbles. Adjust 2-piece caps. Process 10 minutes in a boiling water canner.
Notes: You don't have to stick to the recipe when it comes to the types of peppers. You can use all banana peppers or mix types of peppers in any ratio. If you like milder peppers, be sure to remove the seeds before slicing. Reminder: When cutting or seeding hot peppers, wear rubber gloves to prevent hands from being burned.
Before I proceed with the part of the post dealing with pickles, I am going to have to discontinue my puny attempts at alliteration. If not for my own sanity, then to prevent all of you from becoming prejudiced against the precious letter "P". If I keep this up, I may need a prescription!
Okay, let's push on....
We began preserving the pickles in the same way that we began the peppers, by mixing together water and vinegar. Only this time, we added pickling salt to the pot too, then brought the mixture to a boil. It is important to use pickling or canning salt (available at your local grocery with the other salts) instead of regular table salt for canning because table salt can cause the finished product to darken or become cloudy.
Then we sliced the cucumbers. These cucumbers were a little larger than I like for canning. I was away when my cucumbers ripened to optimal size so they were pretty big by the time I arrived home and made it out to my garden to harvest them.
I planted a "pickling" variety of cucumber this year. Pickling cucumbers make for a crunchier pickle than the table or slicing varieties.
Pack the cucumber slices into pint-sized jars.
I also cut some of the cukes into spears.
And packed them into quart-sized jars.
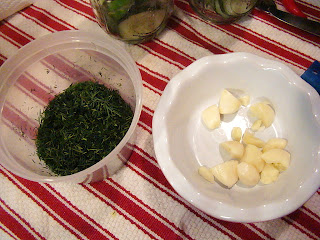
While I was packing, my neighbor prepared the dill (from her herb garden) and peeled and halved cloves of garlic.
We divided the dill evenly among the jars (1-2 tablespoons of freshly chopped dill) and dropped a clove of garlic into each, before pouring on the vinegar brine, releasing the air bubbles, topping the jars, and twisting on the bands.
These also processed for 10 minutes in a water bath canner. This is an advantage of canning pickles and pickled peppers at the same time. If you've got space in your canner, you can process them together.
Here's a jar of our sandwich-sliced pickles cooling on the counter.
And here are the spears. (Which I processed for an additional 5 minutes because I packed them in quarts vs. pints.)
This is our "haul" for the day. I usually only have one jar break when processing over a whole summer of canning. On this day, I had two jars break in the canner. (I guess I'm set for next year, then.) 1 jar of peppers and 1 quart-sized jar of pickle spears busted on the day we canned these or 1 per canner. This is always frustrating because 1. I have to stop and clean the canner, then re-start the water again AND 2. the produce is wasted. Bummer.
Still, we ended up with 4 pints of pickled peppers, 9 pints of sandwich dill pickles, and 1 quart of pickle spears. It may seem like a lot of work, but you can't put a price on the pride derived from preserving your own produce. Plus, we had fun doing it. I'm sure that when the two of us place a pickle on our burger at the next neighborhood cookout, they will taste PERFECT! : )
Kosher-Style Dill Pickles adapted from Better Homes and Gardens Cookbook
Makes: 6 pints (36 servings)
Prep: 40 minutes
ingredients
2-1/4 pounds 4-inch pickling cucumbers (about 36 cucumbers)
3-3/4 cups water
3-3/4 cups white or cider vinegar
6 tablespoons pickling salt
12 to 18 heads fresh dill or 6 to 8 tablespoons dill seed or freshly chopped dill
6 small cloves garlic or 3 large cloves, halved
Directions
1. Wash cucumbers thoroughly and scrub with a vegetable brush, if needed. Remove stems and cut off a slice from each end. (Enzymes at the blossom end of the cucumber may also cause softening.)
2. To prepare the brine, combine the water, vinegar, and salt in a saucepan. Heat until the mixture boils.
3. Pack the cleaned cucumbers loosely into hot, clean pint canning jars, leaving a 1/2-inch headspace. Measure the headspace from the top of the food to the rim of the jar with a clean ruler. Add 2 to 3 heads of dill or 3 to 4 teaspoons of dill seed and garlic to each jar. Place a wide-mouth plastic funnel in the jar and ladle the hot brine over the cucumbers. Remove the funnel. Release trapped air bubbles in the jar by gently working a narrow rubber spatula around the jar's sides. Add additional brine, if needed, to maintain the 1/2-inch headspace. Wipe the jar rim with a clean, damp paper towel. Any food on the rim prevents a perfect seal. Position a prepared lid and screw band on the jar and tighten according to manufacturer's directions. Place each jar into boiling water of a water-bath canner as it is filled. The jars should not touch. Cover the canner. Process filled jars in the boiling water for 10 minutes. Begin counting the processing time when the water returns to boiling.
4. When the jars have cooled, press the center of each lid to check the seal. If the dip in the lid holds, the jar is sealed. If the lid bounces up and down, the jar isn't sealed. Unsealed jars should be stored in the refrigerator and used within 3 days. Let jars stand 1 week before using. Label the jars with the contents and date. Store up to 1 year in a cool, dry place. Makes 6 pints (36 servings).
nutrition facts
Servings Per Recipe 6 pints (36 servings)Calories9Total Fat (g)0Cholesterol (mg)0, Sodium (mg)1067, Carbohydrate (g)2, Fiber (g)0, Protein (g)0, Vitamin A (DV%)0, Vitamin C (DV%)2, Calcium (DV%)1, Iron (DV%)1, Percent Daily Values are based on a 2,000 calorie diet
Notes: We doubled this recipe. Also we sliced or speared our cucumbers before packing them into jars.






2 comments:
Krista, you are a marvel. Your canning project turned out beautiful results. I'm still working up my courage to try canning for the first time ever this year. We'll see !
This looks great and I love the ring for your jar. Wherever did you find those. I hope you will be joining us for our Canning Week Blog Party as we will be having a linky party that this would be perfect for. We are having a guest judge and give-a-ways and sharing lots of recipes and tips all related to canning. Hope you can join in the fun!!!! http://alattewithotta.blogspot.com/p/canning-week-2011.html
Post a Comment