Showing posts with label Pizza. Show all posts

Wednesday, January 18, 2017

Skillet Pizza Bombs


I'm excited to share a new family favorite!  These pizza bombs are easy to assemble (my kiddos like to get in on the action for this step), come together quickly, and there are rarely leftovers. We don't eat like this often- we try to provide a lean protein, vegetable, and usually a grain (preferably a whole grain) at our evening meal, but this is a definitely a treat when it makes it's way into the rotation. In fact, I just made it last week, at my daughter's request, for her birthday dinner. It would be a perfect appetizer recipe too. For instance, I'd bet  that these would be a hit at your Super Bowl party!

It's a little embarrassing to say how I came up with this recipe early in December. I was cleaning out our freezer.  Which, in my defense, I do regularly. Like, honestly. I pull out expired items, defrost, clean, and re-organize. I swear, I do this! During my search for expired items, I came across an open bag of Rhodes dinner rolls. The package clearly read that they were "BEST BY" 10/18/13. 2013! Really!!!?!? I must've been shoving them back into my freezer for years....

***SIDEBAR ALERT*** (I promise it relates to this post.)

Here's a little piece of trivia about me: I'm a risk-taker. I don't mind "living on the edge", so to speak. This doesn't mean that I want to sky dive or bungee jump (at least not anymore) and I certainly have no desire to go on "Fear Factor". Becoming the mother of 3 has given me a greater sense of self-preservation than I possessed in my earlier years. Plus, after 3 pregnancies and a little age on me, my equilibrium and ability to "plunge" and "spin" without a care or consequence has been strangely compromised. Not sure what's up with that. Totally unfair side effect.  That being said, there's not much that actually scares me. In other words, I'm no "chicken". It certainly takes more than a "BEST BY" date to discourage me. I mean, the rolls were frozen, after all. "BEST BY" is a recommendation. I reasoned that at the very worst, the quality would have diminished to inedible, in which case, we'd eat leftovers. Not only am a somewhat fearless, I'm also pretty darn frugal. I hated to throw these out. When life gives you lemons, make lemonade. And when life gave me 3 year old dinner rolls, I decided that we needed pizza bombs. (If you raised your eyebrows at that last sentence, it's okay. I'm laughing at myself.)


I began the Pizza Bomb preparations by spraying a baking sheet with non-stick cooking spray, then laying out the hard balls of dough to thaw.
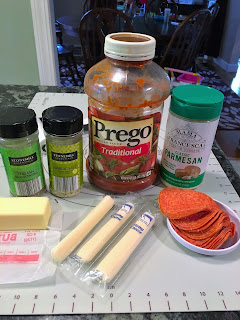
While the rolls thawed, I gathered the rest of my ingredients: butter, marinara (or pizza sauce), mozzarella sticks, pepperoni, Parmesan, garlic salt, and Italian seasoning. You can choose other fillings, but I was keeping it simple.

Then I placed half a stick of butter into my cast iron skillet to melt on the stove top. You can also add minced garlic (just be careful not to burn it) or a sprinkle of garlic salt. You really just want the bottom of the skillet to be coated with butter so that the "bombs" don't stick. Pour off the excess melted butter into a dish so that you can use it to brush the tops of the rolls once assembled.
Once the rolls are no longer frozen, rolls them into a 4-5 inch diameter circle.


Spread about a teaspoon of sauce in the center of the roll, taking care not to get the sauce too close to the edges. If you get the sauce on the edges of the "tiny pizza" it will be challenging to seal when you attempt to make it into a "bomb". This is evidenced in the video clip.  Oops. (Keep scrolling to click the link to that clip.) I also placed a piece of pepperoni and a chunk of cheese equal to 1/3 of a mozzarella stick in the center of each roll.


Bring up the sides of the roll to meet in the middle and pinch to seal.


Then fold up the opposite sides and pinch to seal any openings.


Check out the clip below for a demo.

Disclaimer: This is my first attempt in years at a demonstration clip for this blog. My 8 year old encouraged me to film the steps and served as camera woman. I hope to make more for upcoming posts, WITH IMPROVEMENTS!  For example, next time we'll try it in wide-angle....

Here I am assembling one of these Pizza Bombs.


Arrange the pizza bombs in the skillet with a little space between each to allow them to rise. I fit 15 into my skillet. Behind the scenes note:  I made extras and baked them in a buttered 8-inch round pan, which will also work if you don't have access to a skillet.

Cover the skillet with plastic wrap at set aside to let the rolls rise. I recommend spraying a little cooking spray on the side of the plastic that will be in contact with the rolls to prevent sticking. Let rise in a warm place until doubled, about an hour. Then brush with the remaining melted butter, sprinkle liberally with garlic salt, Parmesan, and Italian seasoning.

Bake at 350 degrees for about 20 minutes until golden brown.

I apologize that I don't have any photos of these final steps. I could swear that I did, but they are nowhere to be found on my camera roll. Possibly my SnapChat filter borrowing, selfie-taking kiddos accidentally deleted them? Hmmm.

They really do turn out perfectly. Even with expired dough! Not that I'm condoning or promoting the use of expired products. Safety first, friends! When in doubt, throw it out! When I made them again, with dough straight from the grocery, the result was the same. Perfectly fluffy, gooey, and most importantly, delicious!

They should look like this when they come out of the oven.


Now, tear into those puppies and enjoy! My family likes to dip them in pizza sauce.


Krista's Kitchen Pepperoni Pizza Bombs
Prep time: 15 minutes + 1 hour for raising dough + approximately 20 minutes for baking
Serves: 4-5

Ingredients
  • Desired amount of frozen dinner roll dough, depending on the size of your skillet (I used Rhodes brand)
  • 1/4 cup butter
  • pizza sauce
  • pepperoni
  • mozzarella cheese sticks, cut into 3rds
  • minced garlic or garlic salt
  • grated Parmesan
  • Italian seasoning
Instructions
Grease a baking sheet or parchment paper. Place frozen rolls on prepared surface to allow thawing. Just thaw until no longer frozen and slightly soft to the touch. (They should still feel cool to touch.)  

Melt 1/2 stick (1/4 cup) of butter in the bottom of a cast iron skillet. Add garlic. Leaving a coating on the bottom of the skillet, pour off excess butter into a dish, reserve for later.

Once thawed, flatten dinner roll dough to a 4-5 inch diameter. Top with 1 teaspoon of pizza sauce, pepperoni, and piece of mozzarella. Bring up sides and pinch to seal, creating a round shape or "bomb". Place in prepared skillet, leaving a little space between each roll for expansion.

Preheat oven to 350 degrees.

Once the skillet is filled with pizza bombs, cover and let rise until doubled, approximately 1 hour.

Gently brush with remaining butter, sprinkle with additional garlic salt, seasoning, and Parmesan. Bake for approximately 20 minutes, until the tops are golden brown and the rolls sound "hollow" when you tap on them.

Let cool 5 minutes or more. Serve with additional pizza sauce.

Notes:

* If you don't have an iron skillet, these can be made in a round cake pan, springform, or even mass-produced on a baking sheet. Simply treat with melted butter and garlic first.

* You can be creative with the fillings. Think mini-Stromboli! Italian sausage, mushroom, onion, olives...you just don't want to over-stuff because they need to seal. Also, keep in mind that veggies create moisture as they bake and you don't want the rolls to get soggy. I might recommend sautéing veggies before using as a filling.


Enjoy, friends!


Thursday, April 7, 2016

"Pretend I'm a Deep Dish" Pizza Skillet


Because I love to eat, my key to sticking to a weight loss plan is that the food still has to taste really good and I need lots of variety. Plans that are extreme; like no/low-carb, no-sugar, no salt, no alcohol, no coffee, no meat, no fat, no....well you get the picture, make me a little crazy and more likely to "cheat". Truth be told, a "cleanse" of any sort makes me positively "postal".  I need an "everything in moderation" approach.  I can handle moderation. Except when it comes to those wasabi-soy almonds. Apparently those are a deal breaker. If those suckers are present in my house, I will kill a whole container of them in a moment of weakness. Just sayin'. 

A few months back, my husband and I decided to eat healthier with the goal of shaving off some pounds. As far as I can remember, this is the first time we have dieted simultaneously, and I have to say that it is much easier when my partner isn't trying to order pizza or suggest that we go out for breakfast while I am trying to watch my intake. It also keeps me accountable when I know that my husband is going to ask, "how many calories is this dinner?" It's been a fun challenge to make the most delicious, filling dinners that are healthy and lower in fat and calories.

That's how I chose this recipe for our dinner. We are a house full of pizza lovers. Since we started counting our calories, when the craving strikes, we have resorted to ordering thin crust pizza with vegetables or grilled chicken and practiced that annoying discipline of portion control; limiting ourselves to a slice or two.  Last month, we even made homemade thin crust and went light on the cheese. But sometimes I love a thick, deep-dish, loaded with sausage and boasting all of that great tomato flavor. Which is why this wanna-be pizza recipe graced our table this week.

I won't say that I didn't miss the crust, but at 225 calories per "slice" for this crustless wonder versus 500-600 calories per slice of my favorite carry-out Chicago-style deep dish, I'm a fan. These little sacrifices are paying off. In just a few months of counting calories (gotta love that "there's an app for that" these days!), eating more fruits and veggies, focusing on lean proteins, drinking plenty of water, and making exercise a daily priority, we have shed a collective 50+ pounds! So for now, "modified" pizza works for us. And it was so tasty! All of the flavors are there. Another bonus, this is a quick and easy meal that I was able to throw together pretty quickly after work.

So here's how it came together:

As is my tradition, I gathered the ingredients. We like our pizza "loaded", and so I rounded up turkey sausage and turkey pepperoni, diced tomatoes, onions, mushrooms, banana peppers, and cheese. I also grabbed some olive oil and Italian seasonings.


 To get started, I opened a can of diced tomatoes and poured them into a colander to drain while I prepared the other components of this dish.


Then I set about preparing the sausage. I purchased Italian turkey sausage in link form, then removed the casings.


I fired up my cast iron skillet and added a couple teaspoons of olive oil and a sliced onion.


The sausage went on top and I browned up the whole mess, breaking up the sausage as it cooked. You can also sprinkle with Italian seasoning or add garlic/garlic salt at this step.


Once the sausage was nice and brown and the onions were perfectly tender, I added in some sliced mushrooms.


Once the mushrooms cooked down a little, I built the "pizza". First, I topped it with the drained diced tomatoes. 


Then, I added some banana peppers and turkey pepperoni.


And finally, the cheese.


Then I popped the whole skillet into a 400 degree oven and baked it for 15-20 minutes until the cheese melted and the edges were bubbling nicely.


Then BOOM! I sliced the "pizza" into 6 pieces and tah-dah....Dinner!


Quick, easy, low-calorie, and delicious!

"Pretend I'm a Deep Dish" Pizza Skillet

1 can diced tomatoes, drained
16-20 oz. Italian turkey sausage, either link or bulk
1 onion, sliced
Italian seasoning
8 oz. mushrooms, sliced
banana peppers
turkey pepperoni
2/3 cup low-moisture, part-skim mozzarella
Olive oil

Preheat oven to 400 degrees. Drain diced tomatoes, set aside. Heat 1-3 teaspoons of olive oil in an oven-proof skillet. Add onions to the heated skilled. Remove sausage from casings, if needed. Add sausage to skillet and break apart as you brown the mixture. Sprinkle with Italian seasoning and/or add garlic if desired.  Add mushrooms to skillet and cook until soft. Top sausage-onion-mushroom mixture with drained diced tomatoes, banana peppers, pepperoni, and cheese. Remove from burner and bake for 10-20 minutes, until cheese is melted and sides are "bubbly".  Remove from oven and slice into 6 portions.

1 "slice"= 1 cup of the mixture= 225 calories

If you're looking for a more labor-intensive Chicago-style pizza (with a crust!) check out this "Lightened Up" Chicago Deep Dish Pizza Recipe.

Happy cooking, everyone!

Love,


Krista


Monday, September 26, 2011

Cheesesteak Pizza

I arrived home late tonight after being away all weekend, so no meal plan yet! I know that I'm behind with many of my posts, so while the meal plan comes together, I thought that I'd share this delicious cheesesteak pizza that I made a few weeks ago.


It's been a while since I've tried a non-traditional pizza in my kitchen. I've been thinking of merging two of my husband's favorites: cheesesteak and pizza for some time now. This short-cut recipe is what I came up with.

I say "short cut" because I used a pre-made pizza crust and pre-sliced steak.


I began by frying up the steak slices in a skillet until cooked through and slightly browned.


Remove the steak slices from the skillet and drain on paper towels.


Then add onions and peppers to the already hot skillet and cook until tender. Sprinkle with a little salt and pepper, to taste.


I love mushrooms, so I threw in some of those too. Stir fry for a few more minutes, until the mushrooms are tender. Remove the veggie mixture from the skillet.


With the pizza toppings ready, start making the creamy cheese sauce. Keep the skillet hot and toss in a couple of tablespoons of butter.


Add a 2-3 cloves of garlic to the butter. Stir around the heated skillet until fragrant.


Then stir in a couple tablespoons of flour, until combined with the butter and garlic.


Now stir in some milk or half and half. Cook and stir over medium heat until slightly thickened.


Now stir in 1/2 cup of shredded provolone, mozzarella, or an Italian cheese blend.


Pre-bake a pizza crust.


Then, spread on the sauce.


Top with the chopped steak.


And the veggies.


Finish it off with another layer of cheese.


Put it into the oven to bake for 10-12 minutes until heated through and the cheese is melted.


Slice it up....


and enjoy!


Now, for a moment of truth: I made this recipe a few weeks ago and I failed to write exact amounts or instructions as I was making it. The following is the recipe for Cheesesteak Pizza as I can best remember it. At least I had the pictures to remind me, so I think it's pretty close. : )

Cheesesteak Pizza

3-5 steak slices, such as Steak Ums

1 onion, thinly sliced

1/2 green pepper, thinly sliced

1 cup fresh mushrooms, sliced

olive oil

2 tablespoons butter

2-3 cloves garlic, minced

2 tablespoons flour

1 cup milk or half and half

2-1/2 cups shredded cheese such as provolone, mozzarella, or Italian blend

salt and pepper, to taste

Heat a tablespoon of olive oil in a skillet. Cook steak slices according to package directions. Remove from skillet, drain on paper towels. Add onions and peppers to the skillet. Saute until tender-crisp. Stir in sliced mushrooms. Cook 2-3 minutes longer. Remove to a plate or bowl.

For Sauce: Add butter to skillet. Heat until melted. Add garlic. Cook for 30 seconds-1 minute. Stir in flour. Whisk in milk. Cook until slightly thickened. Stir in cheese until melted.

For crust: Oil baking sheet or stone. Press dough to fit. Pre-bake according to package directions.

Assemble pizza. Spread sauce over crust. Top with steak, onion, pepper, and mushrooms. Sprinkle cheese over the top and bake until cheese is melted.

Tuesday, May 24, 2011

Rustic Beef and Onion Tart with Crispy Fried Morel Mushrooms


With a bag of morel mushrooms that I found in the woods on my recent trip home to Indiana and a tub of Philadelphia Cooking Creme in my fridge, I was inspired to come up with this simple, savory, dinner tart. Made with refrigerated pizza crust, it comes together in a snap and the whole family loved the combination of flavors.

Last year I competed in The Real Women of Philadelphia cooking contest. If I had time to make and edit a video submission this year, I would've entered this recipe in the running for the entree category. It was a delicious way to use the new Philly Cooking Creme and showcase my favorite fungi. As you read through this post, you will realize that this tart certainly cannot be considered health food. However, since Ms. Paula Deen never discriminates against recipes with lots of butter (or cheese), I'm declaring this one a winner!

Here's what I did:

First, I browned a pound of lean ground beef, seasoned with minced garlic, salt, and pepper. Then I tossed in 1/2 of a sliced red onion and stir-fried it for a couple of minutes until the onion started to get a little tender.


Next, I grabbed a tub of Italian Cheese and Herb Cooking Creme.


I oiled a baking sheet and then pressed a tube of refrigerated pizza dough (I used Pillsbury Thin Crust) to fit. Spread 1/2 of the tub of cooking cream onto the pizza dough.


Then top with the browned beef and onion (drained of excess fat).


Drop the remaining cooking creme by spoonfuls over the beef and onion.


Fold up the sides of the pizza dough to form the tart. Bake at 425 degrees for 15 minutes or until the crust is golden brown.


Meanwhile, heat a stick of butter in a skillet. Toss morel mushrooms with flour, shaking off  the excess flour before placing them in the hot butter. Fry until golden brown and a crispy around the edges, then remove to a plate lined with paper towel to drain. Salt to taste.


Top the pizza with some of the fried morels and serve the rest around the tart.


Garnish with freshly chopped parsley.


Slice it like a pizza to serve and enjoy!

Rustic Beef and Onion Tart with Crispy Fried Morels
1 lb. lean ground beef

1-2 cloves garlic, minced

salt and pepper to taste

1/2 of a medium red onion, cut into thin slices

1 tube refrigerated pizza dough

1 tub Italian Cheese and Herb Philadelphia Cooking Creme

1 lb. morel mushrooms, halved


1/2 cup flour

1 stick butter

fresh parsley, chopped (for garnish)

Directions

1. Heat oven to 425 degrees F. In a skillet, brown beef with garlic, salt, and pepper. Add onion stir-fry over medium heat until onion is tender. Drain off fat.

2. Meanwhile, grease a large baking sheet or line with parchment. Unroll pizza dough on baking sheet Roll or pat dough to a 15x12-inch rectangle. Spread with 1/2 of cooking creme. Top with beef mixture, keeping filling within 1-1/2 inches of all edges. Drop remaining cooking creme over the beef by spoonfuls. Fold edges over the filling, pleating as needed.

3. Bake tart 15 minutes or until crust is golden.

4. Meanwhile, heat butter in a heavy skillet. Toss morels with flour, shaking off the excess. Fry in the butter until golden brown and crisp around the edges. Remove to a paper towel lined plate to drain and salt to taste.

5. Top the tart with some of the fried morels and serve the rest around the tart. Sprinkle with chopped parsley.

Serves: 4-6 

Note: If you don't have morel mushrooms, you can use regular button mushrooms. Either slice and toss them into the beef with the onion and bake into the tart or quarter and fry in butter just like I did with the morels, adding them to the tart after it bakes.
Related Posts with Thumbnails