Monday, August 31, 2009

Canning Peaches


I'm like Ally McBeal, there's always a soundtrack playing in my head. And I can't preserve peaches without this song, released in my senior year of high school, playing over and over in my mind as I put peaches into the jars. Does anyone else remember this?

Peaches lyrics from the Presidents of the United States of America

Movin' to the country,
gonna eat a lot of peaches
Movin' to the country,
Gonna eat me a lot of peaches
Movin' to the country,
gonna eat a lot of peaches
Movin' to the country,
gonna eat a lot of peaches

Peaches come from a can,
they were put there by a man
In a factory downtown
If I had my little way,
I'd eat peaches every day
Sun-soakin' bulges in the shade

Millions of peaches, peaches for me
Millions of peaches, peaches for free...


Now on to these gorgeous, gorgeous Michigan Red Haven Peaches.


Red Haven are my favorite variety of peach. They're juicy, sweet, fine grained, semi-freestone, and they're great fresh, frozen (my favorite), or canned. Most importantly, they're so pretty! I love how the brilliant red center gives my jar of peaches a pretty pink hue. I may be biased because I grew up eating this variety of peaches, but it is an educated choice. I've tried California peaches, a variety of Georgia peaches, and most recently Ohio peaches. In my opinion, these Michigan Red Haven peaches win grand prize in the taste test.

I've been fortunate. Year after year these peaches just turn up at my mom and grandma's houses. I don't really know the details, except that my uncle knows a guy in Michigan and obtains a truckfull of peaches from him every summer. This means that the women in my family are busy putting up peaches every year around this time. I'm not complaining, a day or two of work means that we get to enjoy this delicious fruit all year round.

We always lay the peaches out to finish ripening. This is the pool table in my grandma's basement. My mom usually puts down newspaper in the garage, basement, or laundry room and we spread out the peaches there. Once the peaches are ripe, you have a small window (a day or two) to begin preserving. In my experience, peaches go from ripe to rotten pretty quickly.


Once the peaches are ready for preservation, run a sink full of water and place some peaches in the sink to ready them for peeling. You can also drop the peaches into boiling water for 20-30 seconds and then plunge into cold water and the skins will come right off without even using a paring knife. I find that ripe peaches peel so easily, that I skip the boiling step.


Prepare quart-sized jars by washing and drying. A bushel (48-50 lbs) of peaches yields approximately 21 quart of canned peaches, so I washed 21 jars before starting.


Now you're ready to halve and pit the peaches. Just look at the color around the pit. Gotta love those Red Haven peaches!


Fill a bowl with water and Fruit Fresh or other ascorbic-acid color keeper. Submerse the peeled peaches. I usually clean peaches until this bowl is full, then begin filling the jars.


Drain the peaches in a colander, then fill the jars by placing peaches cut side down. Stack the peaches on top of one another to the top, leaving 1/2" headspace. I fill to the bottom line where the canning ring screws on. Wide mouth jars work best when canning halved peaches so that you can get your hand down in there and arrange the peaches more easily.


Before I even touched a peach in this canning endeavor, I made a light syrup. In a large pot, I combined 20 cups of water and 10 cups of sugar. Bring to a boil and then reduce heat to keep hot while you fill the jars with peaches.


Rather than just write about how to prepare the peaches and put them into jars with the syrup, I had a brainstorm as I was placing peaches into the first jar. I could show you. Because I was at my parent's house, I had a camera man. My dear old dad. Okay, so not that old. Sorry, Dad. We did this in one take because my dad was anxious to return to the pole barn. Of course, when you watch yourself on camera you're extra critical. Why didn't I say this? Why didn't I pull my hair outta my eyes? Why was I wearing that horrible apron?! Hey, don't knock the apron! That happens to be my peach canning apron. Actually, it was the first apron I grabbed off the top of my mom's apron drawer. All ruffle-y and heart embroidered and from the looks of it, straight from a 1978 church bazaar. Gotta love it! At least it kept the sticky peach juice off of my favorite rhinestone-embellished Margaritaville tee shirt. I also added a little background muzak (that is, ambient background music)to the video to tone down the distracting sound of my children playing loudly outside of the kitchen window. You may hear, "Look mom, I'm driving!" I hope to put together more instructional clips in the future, so there's room for improvement. Now that I've established my disclaimer, here you go:


When the jars are filled and ready to process, place them in a water bath canner filled with heated water. The water should cover the top of the jars by 1". Cover and bring the water to a boil. Quarts of peaches should process for 25 minutes. This water bath canner holds 7 quart-sized jars at a time. I put in one batch and then continue to clean peaches and fill jars while it processes. This way, by the time one canner full of peaches is cooling, the next one is ready to begin.
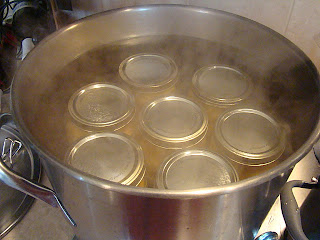


Remove the jars with a canning jar lifter and place them on a dry towel to cool. Leave at least 1" of space between jars to allow air to circulate.


Just like the salsa, the peaches will seal as they cool. You'll know that the jars have sealed by observing the following:
•Hear the seal - Hear the "plink" as lid snaps down while jar is cooling, or tap lid with spoon when jar is cold. A clear ringing sound means a seal.
•Observe the seal - If the lid is curved down, the jar is sealed.
•Press the seal - After the jars have cooled, press the center of the lid. If it is down and will not move, the jar is sealed.

Once the jar is cool, remove the rings or screw bands. Ring bands free of rust may be reused. Wash and dry them and store for future use. Label each jar with the date canned and contents. Store the peaches in a cool, dark, dry place such as a shelf in your basement or your pantry. But first, sit back and admire the fruits of your labor. Isn't this lovely? And yummy too! My family just polished off the first jar tonight for dessert.


Canned Peaches

Equipment:

20-23 clean quart sized widemouth canning jars
20-23 widemouth canning lids
20-23 widemouth ring bands
hot water bath canner
canning jar lifter
canning lid lifter
ladle
canning funnel
colander
large bowl
paring knife
towels

Ingredients:

1 bushel of your favorite ripe peaches
20 cups water
10 cups sugar
Fruit Fresh or other ascorbic acid color keeper

Make a light syrup by combining water and sugar. Bring to a boil. Reduce heat and keep hot. Halve, pit, and peel peaches. Drop into a bowl prepared with water and Fruit Fresh. Drain the Fruit Fresh water off of the peaches by placing them in a colander. Place drained peaches into a jar, cut side down, filling to first line at the top. Using a funnel, ladle syrup over the peaches until the syrup reaches the fill line. Release air bubbles in the jar by running a table knife down the side. Wipe tops of jars. Place heated canning lid on each jar and tightly screw down the ring bands. Add the jars to the heated water in a water bath canner. Make sure that the water in the canner covers the jars by 1". Cover the canner and bring to a boil. Process 30 minutes. Remove from canner. Cool completely. Check seal. Label. Store.

Sunday, August 30, 2009

Meal Plan 8/31- 9/6

Finally! We are home for a whole week. Which means that I am in my very own kitchen cooking for the fam again. Yay! Only...after being away for for the last 2-1/2 weeks, I have a lot of catching up to do. The laundry, the cleaning, planning for the fall, getting my daughter ready to begin school, planning her birthday party, switching the closets for cooler weather...I know that ya'll can relate. I'm getting back into the swing of things. So this week it's easy cooking. I plan to get two or three meals out of the protein that I cook. I'll start off the week using my crock pot and make a roast, then use the beef again on Tuesday for Stroganoff. I've got a big package of giant chicken breast in the freezer, so on Wednesday I'll cook the chicken and use part for Mary at Deep South Dish's Chicken n' Dumpling Bake. Then I'll use the rest of the shredded chicken for enchiladas on Thursday and New Mexico Style Pizza on Friday night. This weekend is Labor Day weekend, which of course warrants a cookout. Weather permitting, we'll be chillin' on the deck and using our grill. So here's the plan:

Monday August 31st

Pot Roast in the Crock Pot

Tuesday September 1st

Easy Beef Stroganoff

Wednesday September 2nd

Chicken n' Dumpling Bake

Thursday September 3rd

Chicken Enchiladas

Friday September 4th

New Mexico Style Pizza

Saturday and Sunday September 5th and 6th

Leftovers and Cook out food

No grocery list yet, I'm behind! I need to make my list tomorrow. Because most of the meal plan above consists of links to previously posted recipes, I'm free to post a couple of "backed" posts that I haven't gotten around yet. Watch for my traditional tuna salad and how to can peaches, complete with my first instructional video!

Hope you all have a wonderful week. I can't believe that September is already here!

Thursday, August 27, 2009

Home Canned Salsa: A How To Guide

I've been away from my blog longer than usual for the last week. This is I've been doing...


No, not just eating chips and salsa. Canning it! (Just the salsa, not the chips, of course) My favorite salsa is still the brand that I ate growing up: "Mom's". I'm not sure where my mom got the recipe, but it's flat out delicious. When I pop open a jar of this salsa in the middle of the winter, one bite magically sends me back to August with the garden fresh taste of summer. This is worlds better than any store-bought salsa from a jar that I've tried! It's a favorite among my friends and family too. I often pour a jar into a bowl and set out a bag of chips when entertaining guests. Super easy appetizer!

When people hear that I'm canning (or as a friend recently pointed out, "jarring") salsa, the requests start coming in. "Oooh! Save a pint for me!" I almost need to keep it a secret. Last year I only put up one batch and it was gone in less than 2 months. This year I wanted enough to last through the winter, so I put up 4 times as much. I don't purchase the veggies for the salsa, they're all straight from the garden. Since I don't have a garden this year, I went to where the veggies are...my grandma's house. Another bonus, Grandma has a canning kitchen in her basement, completely stocked for all of my food preservation needs. It's so much easier to execute home canning projects when you've got the right equipment.


The main ingredient in traditional salsa is tomato. So that's where I'll begin. Wash, remove "bad" spots, and chop a gallon of tomatoes.


Wearing gloves, I diced the hot peppers. This year I used a variety of hot peppers including Poblana, Seranno, and Jalapeno. Three batches of the salsa fell somewhere between a mild and medium on the heat scale. Then I made one batch really hot. The kind of hot that makes your lips burn after you've finished eating. If you're not a fan of spicy salsa, keep the heat down by removing the seeds before chopping and (obviously) don't add as many peppers. Last year I think I only added two to three jalapenos per batch and it just wasn't enough.


Now for the rest of the veggies: 2-3 chopped onions, 2-3 green peppers (or red or yellow), 1-2 tablespoons minced garlic. I used about 1 small garlic bulb per recipe.


Add the chopped tomatoes.


And salt, vinegar, and ketchup. That's right, ketchup. Weird, I know. My sister watched me measuring ketchup into the mix and said, "You know there are already tomatoes in there, right?" Yeah, I know. But I also know how awesome the finished salsa tastes, so I don't question the ketchup. I just follow the recipe and enjoy the finished product.


Stir it all up and cook for 30-40 minutes.


Place a canning funnel in the top of a clean pint sized jar. If you don't have a canning funnel, purchase one! It makes the filling process so much easier, faster, and less messy.


Fill each jar to the top line.


Wipe the top of the jar to clear away any spilled salsa and top with a heated lid. Here's where a canning lid lifter comes in handy. It's another canning equipment essential in my book. It's got a little magnet on the end to grab each canning lid. This way, you avoid burning your fingers in the heating water. A fork will work to lift the lids too, but a the lifter is so much easier! Once you've placed the lid on top of your jar, tightly screw on the canning ring. Place each jar into the heated water in a water bath canner. Last year, I canned salsa in my own kitchen so I used my largest stock pot in place of a canner. The canner is easier because it's larger and you can fit more jars. Also it has a rack on the bottom to keep the jars from jiggling around when the water boils. Make sure that the jars are covered with one inch of water. Bring the water to a boil and process the salsa for 25 minutes in the boiling water. Because tomatoes are high in acid, the water bath method is completely acceptable. If you keep the water boiling for the recommended time, the jars will seal and the high temps will kill any bacteria, especially the bacteria that causes botulism. Different foods process for different times. I consult my Better Homes and Gardens cookbook to find out processing times on water bath canning, however a variety of sources are available. In my family, canning is a way of life, so I haven't given much thought to the details, why's, and what if's of water bath canning. I have pictures of myself canning with my mom and grandma before I could walk! I remember a time, "way back when", that I did read up on food preservation in 4-H manuals, but most of my knowledge is from hands on experience. However, if you're just getting your feet wet with home canning, check out this link for more information.


When the processing time is up, remove the jars using a canning jar lifter, to a towel placed on a flat surface.


Here are some jars cooling on the counter. They will seal as they cool. Worried about whether or not the jars have really sealed? Here are three ways to tell if the finished product is safe for your pantry shelf:
•Hear the seal - Hear the "plink" as lid snaps down while jar is cooling, or tap lid with spoon when jar is cold. A clear ringing sound means a seal.
•Observe the seal - If the lid is curved down, the jar is sealed.
•Press the seal - After the jars have cooled, press the center of the lid. If it is down and will not move, the jar is sealed.


Now, remove ring bands from jar and store in a cool, dark, dry place. Ring bands free of rust may be reused. Never reuse lids for canning purposes. They won't seal. Now there's only one step remaining: when the craving for salsa strikes...Enjoy!


My husband and I popped open the first jar of salsa for a taste test last night. We ate the whole jar! I picked up the bowl and drank the last of it from the bottom. Very attractive, I'm sure. It's fabulous just as it is, but if you want to acheive that extra-fresh, salsa flavor, chop a little red onion and cilantro and toss them in just before serving.
Home Canned Salsa

Yield: approximately 10 pint

Equipment:

10 pint sized canning jars (wide or narrow mouth)
10 canning lids
10 canning rings
water bath canner or large stock pot
canning funnel
canning lid lifter
canning jar lifter
kitchen towels for cooling

Recipe:

1 gallon diced tomatoes
2-5 jalapeno, poblano, serrano, or other hot pepper of choice, diced
2-3 onions, chopped
2-3 green peppers, seeded and chopped
1-2 tablespoons garlic, minced
1 jar diced green chilies
2-4 tablespoons of salt, to taste
1/2 cup vinegar
11 oz. bottle of ketchup

Combine ingredients in a large cooking pot. Bring to a boil. Reduce heat and simmer for 30-40 minutes. Heat water in a small saucepan. Drop in canning lids and heat as instructed on package. Ladle the salsa into jars. Wipe top clean. Top jars with lids and tightly screw on canning rings. Place jars into hot water in a water bath canner or large stock pot. Jars should be covered by 1" water. Bring water in canner to a boil. Cover and process for 25 minutes. Remove jars to a flat surface to cool for 24 hours. Check seal before storing in a cool, dark, and dry place.

Monday, August 24, 2009

Caprese Salad for One


Just a quickie post tonight. I spent the whole day up to my elbows in salsa. 38 pint of delicious salsa are cooling on the countertop as I type. I'm ready to put up my feet and watch Top Chef Las Vegas, but first I bring you Caprese Salad. I had this for lunch on Monday and it tasted so good that I made it again on Tuesday. I'm still far from bored of these wonderful flavors and textures that join forces to create salad perfection. I'd eat it again and again.

This is super simple to throw together. I drizzled (although it all ran together and looks more like I "dumped") balsamic dipping oil onto my plate. This balsamic dipping oil is sold next to the bread in the bakery section of my local grocery. Then I sliced 4 pieces of fresh mozzarella and arranged them over the dipping oil.


Next I piled on the tomatoes. Don't be stingy here! I sliced these plum tomatoes in half lengthwise and then sprinkled with kosher salt and freshly ground pepper. Drizzle another teaspoon of the dipping oil over the tomatoes and top with basil.


This is me taking a bite...Mmmm. The mozzarella sort of marinates in the dipping oil and the sweetness of those plum tomatoes play perfectly against the welcome bite of the balsamic vinegar. And that fresh basil...it just finishes the flavors so beautifully. I know that I didn't re-invent the wheel here. I know it's just a basic Caprese Salad, people have been eating them like, forever... but I'm still in awe of how yummy these 4 ingredients are together.


Caprese Salad, deconstructed. I knocked over that pile of tomatoes and sopped up the dipping oil as I devoured this late summer treat.


Caprese Salad for One

balsamic dipping oil
4 slices fresh mozzarella
1 cup plum tomatoes, halved
kosher salt
fresh ground pepper
fresh basil, finely chopped

Drizzle dipping oil on a plate. Arrange 4 slices of fresh mozzarella over oil. Pile tomatoes in the center of the cheese slices. Salt and pepper to taste. Drizzle an additional teaspoon of dipping oil over the tomatoes. Top with fresh basil.

Sunday, August 23, 2009

Cleaning Out The Fridge Fettuccine Alfredo


I came up with this dish the day before we left on our vacation. I hadn't bought new groceries for the week before our trip, so I needed to work with what I had. I knew that I still had fettuccine in from Ohio City Pasta in the freezer. I think that it was 2 bundles of garlic herb and a bundle of roasted red pepper. I also needed to utilize the half and half that I'd used in the Bananas Foster Stuffed French Toast. Oh, and I had a package of bacon open from the bacon twists that I'd served with the french toast. I also added a diced tomato and some peas because I didn't expect for them to last in the crisper while we were away. I always have flour, garlic, and Parmesan on hand, so the dish came together quickly in my mind. And then it came together beautifully on the plate. I mean, you can't go too wrong with Fettuccine Alfredo. It was delicious!

First, I chopped up 4-6 slices of bacon and fried until crispy. I removed the bacon to some paper towel, leaving the drippings in the pan. I tossed in 3 large cloves of minced garlic. Saute until golden.


Next, I added a couple of tablespoons of flour to the garlic and stirred until smooth to thicken the sauce a bit. I like for my Alfredo sauce to stick to that fettuccine!


Now pour in 2 cups of half and half or milk or cream. Cook and stir over medium high heat until just thickened and then stir in about 3/4 cup of Parmesan cheese.


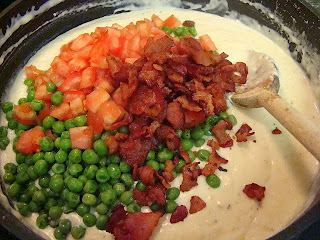
Turn the heat to low and stir in a small diced tomato, the bacon, and about a cup of cooked peas.


Toss with the fettuccine...


And enjoy! Top with some fresh parsley, if you have any, and additional Parmesan cheese.


Cleaning Out the Fridge Fettuccine Alfredo

3 bundles of fresh fettuccine or 1/2 package of dry fettuccine
4-6 slices of bacon, chopped and fried until crisp
3 large cloves garlic, minced
2-3 tablespoons flour
2 cups half and half
3/4 cup Parmesan cheese
kosher salt and fresh ground pepper, to taste
1 cup peas, cooked
1 small or medium tomato, diced
chopped fresh parsley
additional Parmesan cheese

Fry bacon until crisp. Remove from skillet and drain on paper towel. Add garlic to the bacon drippings and saute until golden. Stir in flour until smooth. Add half and half, cook and stir over medium-high heat until just thickened. Stir in cheese until melted. Reduce heat. Stir in peas, tomato, and bacon. Heat through. Toss with fettuccine prepared according to package directions. Garnish with fresh chopped parsley and additional Parmesan cheese if desired.

On the Road Again...

Hello everyone! I am home (for a minute)! We arrived home from our vacation late last night...or was it early this morning? I was taking inventory in my pantry this afternoon and making a grocery list for the week when I remembered that I still need to "can" salsa this summer. I'd spoken to my grandma a couple of weeks ago to set a date, but we never got around to it. You see, I'm using her tomatoes and peppers and her canning kitchen. I decided that I better call and make plans to head home soon. Turns out that the tomatoes are ready now, so I'm outta here again on Tuesday. Which leaves me with no meal plan for the week. I know that I'm making Buffalo Chicken Sandwiches again tomorrow night. Man, are those good! I've also got upcoming posts about a Fettuccine Alfredo that I scraped together with leftovers in my fridge, a basic tuna salad, an easy beef Stroganoff, and of course, I'll be writing all about how I make and preserve salsa. But for now, I've got to catch up on the next episode of Top Chef that I recorded while we were away and fold some laundry! Just for fun, here are a couple of my favorite shots from our trip last week:

My little family aboard the Susan Constant, one of the three ships that landed in America's first permanent settlement in 1607.


My little vintners pretending to stomp grapes.


Have a wonderful week everyone!

Wednesday, August 19, 2009

Spicy Coconut Shrimp Soup


We're still on vacation. I promise that I didn't cook this pretty soup in our tiny condo kitchen. The abbreviated kitchen certainly presents some cooking challenges. I had to make biscuits in a toaster oven this morning! Point being, I wouldn't even try to make "from scratch" soup here. The reason that I am posting this soup today, instead of when we return home, is that we have found ourselves with a little unexpected vacation downtime. I've caught a nasty cold and my toddler has a fever of 102! We decided to lay low today, rent movies and snuggle on the pull-out sofa. With my baby sleeping more than usual, I had a little time for the blog. I made this last week before we left...just for me. My husband was working late in preparation for his week out of the office and the girls begged for grilled cheese. I finally had the ingredients to make this recipe. It has been stuck to my fridge for weeks! I cut the recipe in half and ate it for dinner...and then again for lunch the next day. I adore the coconut soup at our local Thai restaurant. However, I realize that it's laden with calories. I was excited to find this lighter version in an old issue of Cooking Light magazine. It's not quite as creamy and decadent as the soup from Sweet Mango, but all of the flavors are there and I can leave the guilt behind!

The ingredients for this soup are relatively simple, but I did have difficulty finding red curry paste at my local grocery. Here are the ingredients: chicken broth, mushrooms, red bell pepper, brown sugar, fish sauce (I didn't have fish sauce, so I used oyster sauce. Fish...oyster...they both come from the sea, right?), ginger (I used ginger paste), red curry paste, light coconut milk, 1 pound of medium shrimp, green onions, basil, and fresh lime juice.


Combine the chicken broth, sliced mushrooms, red pepper, brown sugar, fish sauce, ginger, and red curry paste. Bring the ingredients to a boil, then reduce heat and simmer for 10 minutes. For a spicier finish on this soup, add in an additional 1/4 teaspoon of red curry paste. I would add the extra curry paste. I didn't notice much heat with the recommended amount.


Stir in the coconut milk and cook another 2 minutes until hot. Add in the shrimp and cook for 3 minutes or until the shrimp are done.


Remove pan from heat and stir in the onions, basil, and juice. According to Cooking Light, "adding the green onions, basil, and lime juice just before serving brightens the overall taste of the soup."


Ahh. My weeknight indulgence for only 194 calories per serving. Or 388 calories if you eat two bowls full like I did.


Spicy Coconut Shrimp Soup
From Cooking Light

3 1/2 cups fat-free chicken broth
1 cup sliced mushrooms
1/4 cup finely chopped red bell pepper
1 tablespoon light brown sugar
1 tablespoon fish sauce
1/2 teaspoon grated peeled fresh ginger
1/4 teaspoon red curry paste
1 cup light coconut milk
1 pound large shrimp, peeled and deveined
1/4 cup thinly sliced green onions
2 tablespoons thinly sliced fresh basil
2 tablespoons fresh lime juice


Combine first 7 ingredients in a large saucepan over medium-high heat; bring to a boil. Cover, reduce heat, and simmer 10 minutes. Stir in coconut milk; cook 2 minutes or until hot. Add shrimp to pan; cook 3 minutes or until shrimp are done. Remove pan from heat; stir in onions, basil, and juice.


Yield: 4 servings (serving size: about 1 1/2 cups)

CALORIES 194 (25% from fat); FAT 5.3g (sat 3.3g,mono 0.4g,poly 0.9g); IRON 3.8mg; CHOLESTEROL 172mg; CALCIUM 85mg; CARBOHYDRATE 9.9g; SODIUM 878mg; PROTEIN 26.9g; FIBER 1.4g

Sunday, August 16, 2009

Vacation Meal Plan 8/17-8/24

We're on vacation this week. One last hurrah before school starts and life goes back to structure and meetings and extra curricular activities. I've found that one of the biggest expenses on vacation is dining out. We're staying in a small condo with an abbreviated full kitchen. It's got a refrigerator, sink, dish washer, microwave, toaster oven, and a tiny stove and oven combo. Pretty impressive array of appliances considering how very tiny it looks. See...


I packed a laundry basket and a cooler full of food from home and we hit the grocery when we arrived at our destination this evening. We'll eat breakfast in the condo, pack picnic lunches, and eat most of our evening meals here too. We have access to a grill, so we'll definitely be cooking out. Nothing "gourmet" this week. I'm keeping it simple...spaghetti sauce from a jar, hot dogs, hamburgers, and grilled cheese. Of course, paper plates. I'm considerably more lenient with my food choices when shopping on vacation too. I'll throw in a bag of chips, a package of cookies. Way more convenience and junk food than I ever buy when we're at home. Cheetos and Fudge Stripe Cookies. We're on vacation after all. Of course, my family loves it.

I've planned out meals for the week and have all of the ingredients, but I'm not assigning the meals to certain days of the week like I do when I'm home. Vacation requires a little flexibility. My children reminded me of that last night when they were still up and giggling from their new sleeping quarters...3 hours after their normal bedtime. Of course they got up earlier than usual! Roll with the punches, Krista.

Here are some of the easy meals we're having this week:

Tacos (from a kit)

Spaghetti (sauce from a jar) with garlic bread

Grilling Out: hamburgers and hotdogs

Beef and Noodles with (instant) Mashed Potatoes

Grilled Cheese and Tomato Soup

and maybe even....

Hamburger Helper

I told you I was keeping simple. And pretty inexpensive too!

Have a good week everyone!

Friday, August 14, 2009

Overnight Stuffed Banana's Foster French Toast


When I have overnight guests, I enjoy serving them breakfast the next morning. Only, after a night of catching up with my company, I don't like to rise n' shine and start banging around my pots and pans in the morning. I prefer for my guests to awaken to the smell of bacon and coffee and whatever is in the oven rather than the crazy racket I make when I get into cooking mode. My solution: I make overnight breakfast casseroles. I have an egg casserole and a couple of french toast casseroles that are popular with my "regulars". However, when I entertained last weekend, I wanted to try something new. I've been thinking about stuffed french toast lately. It's on breakfast menus from IHOP to Bob Evans and it tempts me. So I went in search for the perfect stuffed french toast casserole. I found this one on the Food Network website from the Neely's. Only it wasn't an overnight casserole. The original recipe makes individual french toasts, baked on a rack. I made some minor adustments and this casserole was born. It turned out beautifully! And so good. Dreamy. I have loved Bananas Foster since first bite back in college. One of my sorority sisters was preparing a New Orleans dinner for an RHIT course and we all purchased tickets to support her. It was all amazing, but the dish that has stuck in my head is that Bananas Foster. What better for breakfast than french toast stuffed with a Bananas Foster, cream cheese filling?

Here are the components of this breakfast perfection: butter, brown sugar, cinnamon, bananas, cream cheese, French bread, eggs, heavy cream, whole milk, and rum extract.


Melt butter in a heavy bottomed skillet over medium heat. Once butter is melted add the brown sugar and pinch of cinnamon. Stir with a wooden spoon until the sugar melts into the butter and becomes a sauce. Add bananas and rum extract and toss together.


Let cook until the bananas are soft and incorporated into the sauce.


Remove to a bowl and let cool completely. Once cool, add cream cheese and mash with a wooden spoon.


Using a paring knife, cut a 2-inch-long slits in 1 side of each bread slice, cutting 3/4 of way through bread and creating pocket that leaves 3 sides of bread intact. Divide banana mixture equally among the bread pockets.


Place the stuffed bread into a lightly greased 9 X 13 inch casserole dish.


In a large bowl, add eggs, heavy cream, milk, cinnamon and rum and whisk to combine.


Pour the egg and cream mixture over the bread. Turn each slice of bread over once so that it soaks up the liquid. Now cover and refrigerate overnight.


Bake at 350 degrees for 30-35 minutes. I served mine with warm syrup and whipped cream and a side of bacon twists. Amazing!


Banana Stuffed French Toast adapted from the Food Network website
Recipe courtesy: The Neelys

Prep Time: 15 min Inactive Prep Time: 15 min Cook Time: 35 min Level: Easy
Serves: 8 servings

Ingredients

Filling:
4 tablespoons butter
1/4 cup light brown sugar
Pinch ground cinnamon
1 teaspoon rum extract
3 ripe bananas, peeled, cut into 1/2-inch-thick rounds
4 ounces cream cheese, room temperature

1 large unsliced loaf French bread, bread cut into 8 slices
4 large eggs
1/2 cup heavy cream
1 1/2 cups whole milk
2 teaspoons ground cinnamon
1 teaspoon rum extract
Nonstick cooking spray
Confectioners' sugar, for garnish
Maple syrup, whipped cream

Directions

Melt butter in a heavy bottomed skillet over medium heat. Once butter is melted add the brown sugar and pinch of cinnamon. Stir with a wooden spoon until the sugar melts into the butter and becomes a sauce. Add bananas and rum extract and toss together. Let cook until the bananas are soft and incorporated into the sauce. Remove to a bowl and let cool completely. Once cool, add cream cheese and mash with a wooden spoon.

Using a paring knife, cut a 2-inch-long slits in 1 side of each bread slice, cutting 3/4 of way through bread and creating pocket that leaves 3 sides of bread intact. Divide banana mixture equally among the bread pockets. Place stuffed bread slices in a lightly greased 9 X 13 baking dish.

In a large bowl, add eggs, heavy cream, milk, cinnamon and rum and whisk to combine. Pour mixture over the bread slices. Turn each slice once to coat. Cover and refrigerate overnight.

Bake at 350 degrees until the French toast is golden brown and filling is hot, about 30 minutes. Transfer the toast on a serving platter and garnish with confectioners' sugar and maple syrup.
Related Posts with Thumbnails