Tuesday, August 30, 2011

Sesame Green Bean Salad


This simple, easy to prepare, green bean salad has been my new craving lately! I still have an abundance of green beans growing in my garden, so when I found this recipe in the June/July 2006 edition of Light & Tasty magazine I thought it was a great, fresh way to prepare green beans. I love green beans, but I've got to mix it up a bit sometimes. I have since made 3 batches of this tasty salad! Not only has it accompanied our dinners as a side dish this week, at only 65 calories per serving, it has become my favorite healthy, yet flavorful late night snack.

I began this recipe by cleaning and snapping a pound of green beans.


Then I dropped them into salted water, brought it to a boil, and cooked them to a crisp-tender state. The recipe recommends boiling them for 8-10 minutes. I cooked mine for closer to 12 minutes. I didn't want them mushy, but at the same time, I preferred them a little more on the tender side.


Then I rinsed them under cold water to stop the cooking process and cool the beans down.


While the beans cooked, I gathered the dressing ingredients: canola oil, soy sauce, cider vinegar, sugar, sesame oil, and a little salt.


I poured all of the ingredients into a container with a lid and shook them up until combined.


After transferring the green beans to a serving dish, I poured the dressing over the top and tossed them lightly to coat.


To top it all off, I toasted some sesame seeds in a skillet on the stovetop until fragrant and golden brown.


Then I sprinkled them over the top of the salad. The recipe instructs to serve this salad at room temperature, but it's good cold too. In my opinion, it was even better on the second day- straight outta the fridge!


Last night, I served the salad alongside some pork loin chops that I had marinated in teriyaki all day. Mmmmm. My husband forgot to light the coals in our grill before he began cutting the grass, so I fired up my Pampered Chef grill pan. The chops, which soaked up the dressing from the green beans served beside them, were perfection! It was a lovely pairing.

If you're in the market for a grill pan and press, The Pampered Chef has them on special for just one more day! Click HERE to see the deal.


Here's the recipe:

Sesame Green Bean Salad from Light & Tasty Magazine
5 Servings Prep/Total Time: 20 min.

Ingredients
1 pound fresh green beans, trimmed
1 tablespoon reduced-sodium soy sauce
2 teaspoons canola oil
1 teaspoon sugar
1 teaspoon cider vinegar
1 teaspoon sesame oil
1/4 teaspoon salt
2 teaspoons sesame seeds, toasted
Directions
•Place beans in a large saucepan and cover with water. Bring to a
boil. Cook, uncovered, for 8-10 minutes or until crisp-tender. Drain
and rinse in cold water; pat dry. Place in a serving bowl.

•In a small bowl, whisk the soy sauce, canola oil, sugar, vinegar,
sesame oil and salt. Pour over beans and toss to coat. Sprinkle with
sesame seeds; toss again. Serve at room temperature. Yield: 5
servings.

Nutrition Facts: 3/4 cup equals 65 calories, 3 g fat (trace saturated fat), 0 cholesterol, 238 mg sodium, 7 g carbohydrate, 3 g fiber, 1 g protein. Diabetic Exchanges: 1 vegetable, 1/2 fat.

Monday, August 29, 2011

The Meal Plan 8/29- 9/4 PLUS Some Questions About How to Use Some Garden Goodies...


I had the meal plan all ready to post on schedule last night, then my mom showed up for a surprise visit with a bounty of vegetables that my grandma picked from her garden to send along. A vegetable care package! Cool!

The most fascinating thing I found in all of the bags and buckets of produce was this gargantuan tomato. It was huge. 2-1/2 pounds according to my kitchen scale. Seriously impressive.


It put my regular-sized garden tomatoes to shame.


I am having some difficulty deciding what to do with a few of the items from grandma's garden. Maybe some of you can help me out?

First of all, Grandma sent bunches of flat leaf parsley. I'd like to preserve some. Do any of you have experience with this? What should I do? I've heard about freezing it in ice cube trays. Or maybe I should dry it?


She also sent 3 eggplants. I had just purchased 1 eggplant for the Garden Vegetable Tart that I plan to make later this week, so now I have 4 eggplants. How should I prepare it? Do any of you have a favorite recipe? I have fried it before, but I'd love to try a different recipe.


Finally, she sent a whole bucket full of red hot chili peppers. I was thinking about drying them. If anyone has tips, I'd be happy to read them. Also, have any of you ever dried pepper seeds and planted them the next year? My grandma suggested that I save some of the seeds for planting. I was just wondering if that really works and how I should go about it. Sound off, my pepper lovin' readers!


Okay, so now for the meal plan. I only had to plan for 4 meals this week, and I'm only cooking 3. Tuesday I'm pulling some barbecue out of the freezer to heat for sandwiches. On Thursdays during the school year, my daughters attend an evening children's program at our church, where I also teach a class. They serve dinner there. Love that! On Saturday we will probably cook out with our neighbors and on Sunday we have 2 birthday parties to attend. While I'm only cooking three meals, I'll probably keep pretty busy in the kitchen using up all of those vegetables!

Monday August 29th

Grilled Teriyaki Pork Loin
Sesame Green Bean Salad

Tuesday August 30th

Barbecued Brisket from the freezer
Cucumber Ribbon Salad


Wednesday August 31st

Harvest Vegetable Tart

Thursday September 1st

Dinner @ church for me and the girls.
Leftovers for my husband. : )

Friday September 2nd

Cheesesteak Pizza

Saturday September 3rd

Cookout

Sunday September 4th

Whole family @ a birthday party

Grocery List

Produce

1 lb. green beans
2-3 onions
garlic
2 cucumbers
4 radishes
red onion
green onions
egg plant
tomato
green pepper
red bell pepper

Meat

2 lbs. pork loin
4 lbs. beef brisket
4 Steak-ums

Deli

kalamata olives

Dairy

ATHENOS Crumbled Feta Cheese with Basil & Tomato
butter
grated Parmesan
2 eggs
Pillsbury Thin Crust Refrigerated Pizza dough
Shredded mozzarella/provolone
milk

Canned Goods

Teriyaki marinade
soy sauce
cider vinegar
canola oil
sesame oil
ketchup
beer
white vinegar
liquid smoke
Italian dressing
evaporated milk

Dry Goods

sugar
sesame seeds
brown sugar
smoked paprika
oregano
cornstarch
all-purpose flour
whole wheat flour
cornmeal
cayenne pepper

Freezer

1/2 cup frozen corn

Have a great week, everyone!

Thursday, August 25, 2011

My New Favorite Pasta Salad


A couple of weeks ago my husband's sister came to visit with her husband and our adorable 10-month-old niece. Of course, it is my nature to plan meals for company. On the night of their arrival, we planned for a low-key cookout. However, I wanted to provide some out-of-this-world side dishes to accompany the burgers and brats we prepared on the grill. I already know that they are fans of my go-to Rotini Salad, but I was on the lookout for something new. Enter Elizabeth's Edible Experience. Elizabeth always posts recipes on her blog that make my mouth water. This recipe for Tomato Feta Pasta Salad, which she adapted from an Ina Garten recipe for her book club, was no exception. In the way that recipes often evolve, I tweaked this recipe a bit to my own tastes. The result was amazing. I still love my rotini salad, but this new recipe "takes the cake" since I was in the mood for something a little different.

I began this recipe by adding cooked rotini pasta to a big serving bowl with tomatoes and chopped cucumber that I had picked from my garden. Also in there are sun-dried tomatoes. Elizabeth's recipe called for sun-dried tomatoes packed in oil. I buy mine in bulk from the produce section of a local family-owned market. They are not packed in oil, therefore so much cheaper than the ones in jars! I just snipped them into pieces with kitchen scissors, added them to the bottom of the bowl and drizzled a little olive oil over them while the pasta boiled.


Since I was missing some of the components of this salad, I went ahead and made the dressing before heading to the store to gather those last few ingredients. I combined the ingredients for the dressing: more sun-dried tomatoes, red wine vinegar, extra virgin olive oil, garlic cloves, salt, pepper, and flat-leaf parsley in the blending cup for my immersion blender.


My Cuisinart CSB-76BC SmartStick 200-Watt Immersion Hand Blender, Brushed Chromemade super quick work of combining the dressing ingredients. Of course, if you don't have an immersion blender, you could just blend this in a regular blender or use a whisk for a chunkier dressing.

The resulting dressing was super thick and oh-so-flavorful!


I poured the dressing over the salad and stirred it in.


Then later, (after a trip to the store) I added in the feta, Parmesan, and sliced black olives.


Here it is, all mixed together in the bowl.


This salad was super yummy! However, once I added in all of that cheese it really soaked up the dressing. I think that the next time I make this I will increase the dressing amount by 1-1/2 to 2 X's. I like my pasta salad just a little more on the creamy side. And like I said, the dressing is delicious. You can't possibly go wrong by adding more.

I love how the cheese and dressing cling to the pasta and find their way in between each little spiral. Plus packed with all of those other lovely ingredients, this pasta salad ROCKED!


Tomato Feta Pasta Salad from Elizabeth's Edible Experience adapted from Ina Garten and adapted again by me

Ingredients
1 pound fusilli (spirals) pasta
Kosher salt
Extra Virgin Olive Oil
4 ripe roma tomatoes, medium-diced
2 firm cucumbers, peeled, seeded, and diced
1 small can of sliced black olives
10 oz. pound good feta cheese
6 sun-dried tomatoes, chopped

For the Dressing:

5 sun-dried tomatoes, chopped
4 tablespoons red wine vinegar
12 tablespoons extra virgin olive oil
2-4 garlic cloves, minced
1 teaspoon kosher salt
1 teaspoon freshly ground black pepper
1 cup packed flat-leaf parsley, chopped

Stir in:

1 cup freshly grated Parmesan

Directions

Cook the pasta in a large pot of boiling salted water with a splash of oil to keep it from sticking together. Boil for 12 minutes, or according to the directions on the package. Drain well and allow to cool. Place the pasta in a bowl and add the tomatoes, cucumbers, olives, feta and chopped sun-dried tomatoes.

For the dressing, combine the sun-dried tomatoes, parsley, vinegar, olive oil, garlic, salt and pepper with a whisk, blender, or immersion blender. Pour the dressing over the salad. Sprinkle with the parmesan and toss well.

Notes: Next time I will increase the dressing amount by 1-1/2 to 2 X's.

We called this salad a big GPS. Translation: Big. Greek. Pasta. Salad. With the flavors of the feta, cucumber, and olives, this salad boasts a decidedly Greek flavor.

Looking ahead to your Labor Day cookout menu...this would be an excellent addition to the line-up! Enjoy!

Wednesday, August 24, 2011

Banana Layer Cake with Cream Cheese Frosting


Last week, after our neighbors invited us to their Saturday evening cookout, I immediately spied the very ripe bananas on our kitchen counter and texted back that I would bring dessert. I've been meaning to share my mom's banana layer cake (While I'm pretty sure that my mom didn't write this recipe, it's one of the cakes I remember her making often in my youth) here for a long time, but with so many new recipes out there, it just kept getting pushed back on my to-do list. The cookout invitation created a perfect excuse to make this sweet banana cake covered in creamy, rich, cream cheese frosting, then share it with all of you! The cake is delicious all by it's lonesome, but after smoothing on the decadent frosting there is a definite "WOW" sentiment shared by all who try it.

When I begin a baking project, or any cooking project with a number of steps, I like to do all of the prep work at the beginning so that when it comes to combining ingredients, I can just dump and mix.

Since this is a banana cake, I began by preparing the bananas. While this cake has a lovely banana flavor, you only need one cup. I grabbed for 3 of the very ripe bananas sitting on my countertop.


When it comes to baking with bananas, my motto is "The riper the better". Extra ripe bananas "mash" easier and they are extra sweet which adds to the overall flavor of the cake.

How ripe is too ripe? As far as I am concerned, as long as there is no mold on the fruit, they are fair game.


My banana "mashing" tip: use a pastry cutter to reduce them to a sweet, slimy, goo.


Next, I sifted the salt, flour, and baking soda together.


Then I prepared the pecans. I filled my Pampered Chef Chopper full of whole pecans...


and turned it over to chop, chop, chop!


In seconds I had a nice pile of finely chopped nuts ready to stir into the cake and sprinkle over the top for a garnish.


Finally, I prepared my cake pans. I buttered the pans first. Then I set the pan on a sheet of wax paper to trace the shape with a knife.


The knife leaves a nice, visible circle on the paper.


Cut out the paper liner x 2,


then press the liners into the bottom of the greased cake pans.


Now for just one final step in pan preparation: sprinkle about a tablespoon of flour into each cake pan and shake it around until the sides are dusted. Knock the pans on the countertop to loosen the excess flour, then discard.


With the baking pans ready to go, it is finally time to mix up the cake batter that will fill them. Start by creaming the butter and sugar together.


Add the eggs, one at a time, beating well after each addition.


Add the flour alternately with


the buttermilk, mashed bananas, and vanilla. Mix each addition until just combined for a soft, tender cake.


Finally, gently stir in 1/2 cup of finely chopped pecans until incorporated into the batter.


Pour half of the batter into one of the prepared pans,


and half into the other. You want the batter distributed as evenly as possible so that the layers of the cake are equal in size.


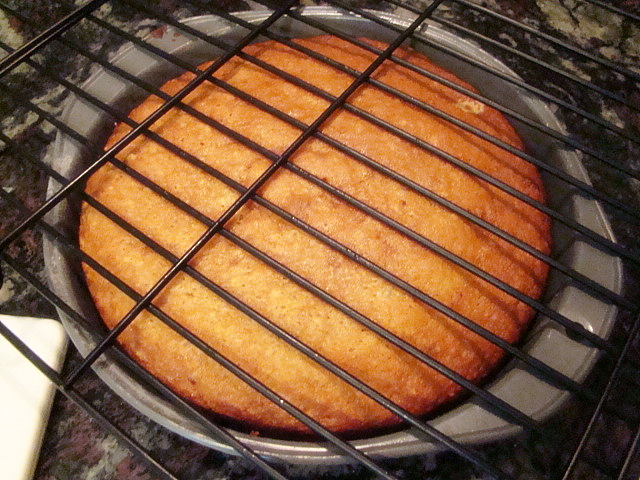
Bake the cakes at 350 degrees for 25-35 minutes or until they test done. Then remove them from the oven and cool on a rack for about 10 minutes.


Loosen the edges of the cakes with a knife.


Next, set the cakes on your countertop with cooling racks on top.


Then,  invert!


Take away the pan and admire your perfect cakes while breathing in the sweet banana smell filling your workspace.


But don't get so carried away that you forget to peel away the wax paper liner...

Notice that my cake finished just a tad on the dark side? I shut off the oven timer when it sounded, but forgot to take the cake out of the oven. Duh!  This one baked about 5 minutes too long. Luckily, the delicious smell of the still-baking cakes grabbed my attention and I rescued them before they burned!


While the cakes finish cooling, begin making the frosting by creaming together a stick of unsalted butter and 8 oz. of cream cheese.


Add the vanilla.


And sift in the powdered sugar. Then mix until smooth.


With the cakes cooled and the frosting mixed, it's time to build this mouth-watering dessert!

Start by placing one of the cakes on a serving plate or cake stand.


Add about 1/4 of the frosting to the top of the first layer.


Smooth it evenly over the surface of the cake.


Now apply the second layer. Take care to center the cake exactly over the first layer to avoid a lop-sided final product. Add more of the frosting to the top of the second layer and spread it out before covering the sides.


I use a big spatula to "rough coat" the cake first, then I use a smaller, metal spatula for more precision to finish the cake.


Since I was not decorating this cake, there was no reason to perfectly smooth the frosting.


Instead, I made a nice, "swirly" pattern over the cake by moving my spatula in a half-circle motion all over the surface.


Now it's time for a garnish. I sprinkled some more finely chopped pecans over the top. 


Tah-dah!


Now the only thing left to do is slice....


and serve!


I hope that you all enjoy this cake as much as my family does. We've loved this recipe for years. It was certainly a hit at the cookout!

Banana Layer Cake with Cream Cheese Frosting

1/2 cup unsalted butter
1-1/2 cups granulated sugar
2 eggs
2 cups flour
3/4 teaspoon salt
1 teaspoon baking soda
1/2 cup buttermilk
1 cup bananas, mashed
1 teaspoon vanilla
1/2 cup finely chopped pecans + more for garnish

Cream butter and sugar. Add eggs, one at a time, beating well after each addition. Sift dry ingredients together. Combine buttermilk, bananas, and vanilla. Add the dry ingredients to the batter alternately with the buttermilk mixture, beating until just combined after each addition. Stir in the pecans. Grease and flour cake pans (line with wax paper if desired). Divide batter evenly between the pans. Bake at 350 degrees for 25-35 minutes or until cakes test done. Remove the cakes to a cooling rack for 10 minutes. Then invert and finish cooling to room temperature. Frost with cream cheese frosting.

Cream Cheese Frosting

1-8 oz. package cream cheese
1/2 cup unsalted butter
1-3/4 to 2-1/4 cups powdered sugar, sifted
1 teaspoon vanilla
finely chopped pecans (for garnish)

Cream cream cheese and butter together. Mix in vanilla. Sift in the powdered sugar. Mix until smooth.

Assembly: Place 1st layer of cake on serving plate. Top with 1/4 of the frosting and smooth evenly. Top with second layer. Smooth on remaining frosting. Garnish with pecans.

Note: Refrigerate cake until ready to serve and refrigerate any leftovers.
Related Posts with Thumbnails