


Since we are stuck in a traffic jam just north of the South Carolina line on our way home from Spring Break 2011, I figured that this is a perfect time to write about the sushi that my husband and I made in our very own kitchen a few weeks ago. Gotta love the wireless notebook!
I always thought that I'd like to make my own sushi, but I just hadn't gotten around to it yet. Then a few Saturdays ago, I found myself at the grocery store with my husband. This almost never happens. It's not that he doesn't offer to shop with me. It's that I tend to shrug off his offers for a date to the supermarket. The thing is, when I wheel my cart through those automatic grocery store store doors, I am a woman on a mission. I stick to my specific list, only pausing to compare prices and nutritional information or to shuffle through my coupons. After I cross an item off of my list, I'm off like a rocket to the next product. I have whittled shopping for our family down to a science and it still takes me about 4 hours to shop 2 stores twice a month. My husband on the other hand, likes to shop when he goes to the grocery...as in browse, check out new products, look around a bit. And truth be told, he likes to put ready-made, convenience foods in our cart such as jalapeno poppers and breakfast sandwiches. Oh yeah, and "pop" or other sugary drinks that I personally think are better left on the shelves. All the stuff that I never buy. You can see how this might conflict my highly-focused, control freak approach to shopping, right? I know, I know. When it comes to grocery shopping as a couple, I'm kind of a jerk.
But this particular Saturday was different. My husband and daughters were out running errands while I took a test to qualify for a teaching license in our state. I called after my test to tell them I would stop at the store on the way home. My husband replied, "Great! We're right by the store. Let's meet up in the parking lot and we can shop together." Oh goody. Luckily, I'd knocked out most of my list at ALDI and just needed to pick up some produce, deli meat, and specialty items at the supermarket. Even luckier was that our grocery store has a childcare center! We signed our daughters in, said good-bye, and bee-lined for the coffee shop. While we waited for our coffees, we watched the store's sushi chef making and cutting maki rolls. "That's what we need to make," my husband noted. "Yep." I said, already sipping my latte and heading toward produce.
I have to admit, I had a really nice Saturday afternoon strolling the grocery with my husband and giving him the tour on "my turf". While exploring the International Food aisle, he noticed the sheets of nori and sushi mats. "What do we need to make our own sushi?" he asked. This question ignited a series of events that took us through the remainder of the evening. First, a scavenger hunt for the all of the ingredients we would need, then a trip back to the sushi counter for another lesson, followed by searching the Internet for suggestions once we were home, and finally getting the kids to bed on time so that we could have our "sushi date" after they were asleep.
While the construction of the actual sushi rolls was surprisingly easy, making the "perfect" sushi rice is a bit involved. I found Sushicup.com, a website with excellent step-by-step instructions and tips for sushi making. Sushicup.com recommends soaking the rice (make sure it's a short grain sushi rice) for 30 minutes and then rinsing thoroughly until the water runs clear before you even cook the rice. Check out the instructions right HERE.


Again, I will refer you to sushicup.com steps #3 and #4 for the cooking of the rice. The rice will cook for 15-20 minutes and then sit covered for about 10 minutes once it is done.

Then transfer the rice to non-metallic bowl and stir in some rice vinegar. I think that I used about 2 tablespoons. To spread the vinegar evenly through the rice, slide a rice paddle or spoon down the side of the bowl, then lift and fold the rice. Slowly cut through the rice with the edge of the paddle (or rubber spatula) and fold the rice. Be careful to not over-stir. Stop when you feel the rice become harder to fold. It is important to stir in the vinegar as soon as you have moved the rice from the saucepan to the bowl. When you are done; cover the bowl with a cotton towel and let the rice cool to between body and room temperature.
I prepared the rice before we put our daughters to bed, so that we could just get straight to making the rolls for our sushi date at home.


I also prepared the other ingredients.
Since this was our first time making sushi, we decided to make simple Philly Maki Rolls. Here's a quick sushi vocabulary lesson: Maki refers to any type of sushi which is made in a roll with sushi rice, toasted seaweed nori, and various fillings. The word maki means “roll,” and most people who have eaten sushi have consumed maki in some form or another. Source: WiseGeek.com
On our quest for the salmon, the gentleman at the seafood counter directed us to this pre-packaged smoked salmon or lox.

I cut it into strips.

Then I cut an avocado and part of a block of cream cheese into strips (or sticks).
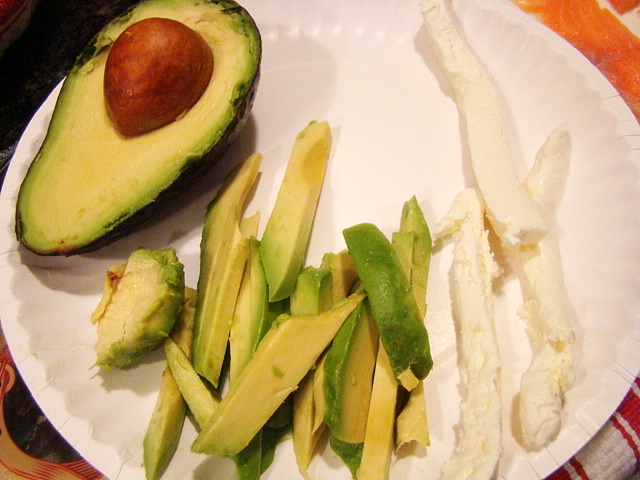
With the rice, the salmon, the cream cheese, and avocado ready to go, we just need the nori. Nori is essentially edible paper made out of seaweed. You can find it in the International Foods section of a supermarket. At least, that's where we found it.

One side of the nori is smooth and the other is rough. The rice is applied to the rough side because the texture helps the rice to stick.

Sushicup.com recommends using a wooden paddle to apply the rice to the nori. The sushi chef at our local supermarket used his hands. We tried it both ways and decided that it's easier to use your hands. Just keep a bowl of water close and wet your hands throughout the process to keep the rice from sticking. For more detailed instructions see HERE.

Once the rice is in place, you can either place the fillings on the rice side, or flip the rice-covered nori upside down and place the fillings on the nori side. If you want rice-side out for the finished product, make sure that you wet your sushi mat before flipping the nori over or the rice will stick.

Use the mat to roll the sushi into a log.

Then give it a squeeze to tighten the roll. If you don’t tighten the roll enough, the ingredients will fall out when you cut the roll. If some of the fillings have squeezed out the ends after you tighten the roll, just push them back in with your fingers.

If you're making your roll with the nori on the outside, use your fingers to wet the nori a little before cutting. The water softens the nori and insures that it isn't too chewy when you bite into the sushi.

Since my husband prefers the rice on the outside, we made some of each.


How to cut the sushi created some debate. We had seen sushi chefs in restaurants cover sushi rolls with plastic before cutting, so we tried that first. We also watched a couple of online sushi cutting demonstrations. Some people used plastic wrap, some did not. In the end, we ditched the plastic wrap and decided that it didn't make any difference. I think the most important thing to have when cutting sushi is a very sharp knife. You want that knife to sail through the sushi rolls, rather than squash the ingredients out.

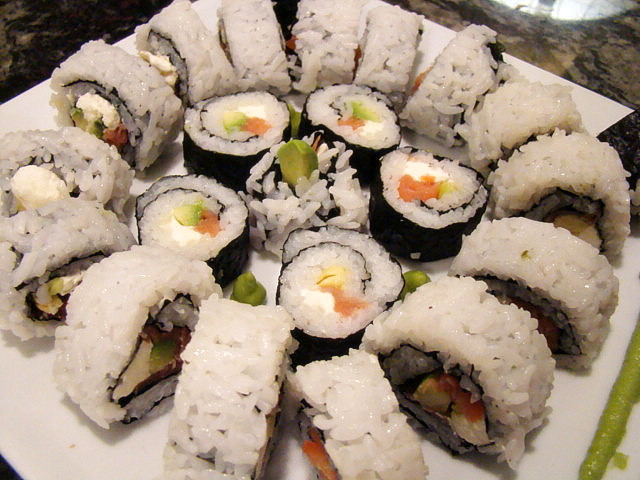
The first pieces of homemade sushi. I was so proud of our work!

We plated up the sushi, poured some wine, and toasted our sushi victory before a cozy, late dinner at the little pub table in our kitchen. Ahhhh.

Don't forget the soy sauce and wasabi!
This sushi was delicious. Seriously, it didn't taste any different than the Philly rolls that we have ordered from a number of sushi restaurants.
This was an awesome date at home. We had fun learning a new skill and working on this project together. I even learned that my husband has a hidden talent: he is an excellent sushi roller! Way better than me. Best of all, even after purchasing the ingredients, we enjoyed this sushi in the comfort of our own home at a fraction of the cost of paying a babysitter and going to a sushi restaurant. Of course it's nice to go out, but it's also nice to have this as an alternative now.
Not only is this a great date, it would be a fun family night activity too. You could get creative with fillings that your family will enjoy if they're not already sushi lovers.
Now that we know how easy it is to make sushi at home, we're excited to make sushi again and try some different flavor combinations.
Shopping List for Philly Rolls:
Sushi Rice
Sushi Mat
Nori
Rice Vinegar
Smoked salmon
Cream cheese (in a block)
Avocado
Soy Sauce
Wasabi
Recipe for the rice at Sushicup.com
If you haven't yet tried making your own sushi, GO FOR IT!
For those of you who HAVE made sushi at home, how did it go? What do you put in your rolls? I'd love to hear your homemade sushi stories, tips, and recipes.


6 comments:
I'm the exact way when it comes to shopping for groceries. I know exactly where I need to go and what to get and get it done in record time.
I have wanted to make my own sushi for ages. Thanks for the step by step. I really think I could do this! ;) Yum!
Very nice rolls! I tried to make sushi at home one time, but didn't have the mat & was very unhappy with my rolls. Haven't tried it again.
My husband does the same thing - he doesn't really "shop" the grocery store, but he's a sucker for the end caps & "so called" junk food on "sale."
excellent job! i love sushi, i've been dying to try it myself. this is just gorgeous.
This looks great! I am totally insprired to try this at home now!
LOL. I am like your husband, I fear. I can spend 4 hrs in a single grocery store, looking at everything.
Your sushi looks supberb! Most excellent!!!
Thanks for your post! I cheated for my first time and bought ore-made rice from my sushi place, baby steps lol. But your post helped!
Post a Comment