


My dear friend, Molly sent me a recipe for "Oreo Balls" back in February. Christmas was already over and we were travelling on Valentine's day. These Oreo Balls called for an occasion. To make them for no reason and with no one to share them with could be dangerous. Every once in a while a really great idea floats into my mind. That's what happened here. I could make these for Easter...only, I'd make them into bunnies! Yes, that's it! Bunny Oreo Truffles. Perfect! I have seriously been thinking about this since February. It was very cool to see this "vision" come to life yesterday.
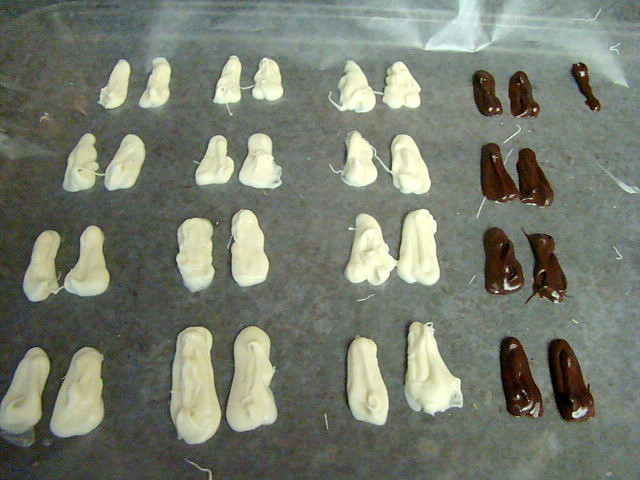
I started by making the ears for the bunnies. I melted both white and dark chocolate and put them into a squeeze bottle. I piped the bunny ears onto a cookie sheet lined with waxed paper.

I melted a couple of pink chocolate melts in my Wilton Candy Melting Plate

Then you can actually use paint brushes and paint the melted chocolate into molds(You can see the candy molds that I painted for my daughter's birthday HERE) or onto candies, like I did with these bunny ears. If painting is fun, then painting with chocolate is even better!

That pile of sugar on one set of the bunny ears warrants some explanation. My toddler was "helping" me. I looked up from carefully piping bunny ears just in time to watch this happen. Okay, so... one set of sparkly ears. : )No problem.

I placed the tray of ears in the fridge to harden and began making the truffles. All you need to make the filling for the truffles are a block of cream cheese...

Excuse me, softened cream cheese...

and a package of Oreo cookies. Actually, I used the less expensive chocolate sandwich cookies that I found at ALDI. I think that they call them "Waves". You can chop them like this or....

crush them in a bag with a rolling pin or meat mallet (or a soup can or a paperweight or a rock from your backyard...any blunt, heavy object that fits in your hand will do). Looking at this, I wonder if the countertop designer for this house actually had a crushed Oreo motif in mind. It matched perfectly.

I both crushed and chopped because I wanted some bigger chunks of Oreos in these truffles. Add the cookies to the cream cheese.

Mix together.

Then roll into balls. I used my cookie scoop to keep the size uniform on these. Now chill. No, not you. I mean chill the balls in the fridge for an hour. But you can chill too if you really want to.

While the balls chilled, I melted my chocolate chips over a makeshift double boiler. If you don't have a double boiler, just place a glass mixing bowl over a saucepan of boiling water (don't let the bottom of the bowl touch the water!) Add in the chocolate chips and keep stirring until melted.

I melted both white chocolate (candy melts melt better!) and chocolate chips for dipping the oreo balls.

I dipped each truffle into the chocolate and rolled it around.You can lift them out with a spoon or even better, a fork. Tap the side of the bowl with the utensil and the excess chocolate will fall back into the bowl and create a smooth effect on the truffle. If you really wanna be a pro you can get a Wilton Candy Dipping Set

Once the truffles were coated, I returned them to the fridge to let the chocolate harden.

To attach the ears, I enlisted the help of my squeeze bottle again. Just squeeze a little chocolate on top the truffle and press the ears into the chocolate.

This is tricky, but with a little patience, you can get the ears to stay in place. The dark chocolate ears melted fast in my hands as I handled them, so I needed to move quickly!

I put the dark chocolate "eared" truffles in the fridge while I worked with the white chocolate bunnies. Once the ears were applied to the white bunnies, they went into the fridge and I pulled the dark chocolate bunnies back out to paint on their faces and give them tails.

Ah...here's everybunny all together!

Okay, I know that I've mentioned before that I love my Wilton Ultimate 3-In-1 Cupcake Caddy and Carrier

I'm so excited to share these with my family at our early Easter dinner tomorrow. The kiddos are gonna love em'! Who am I kidding? The grown ups are going to devour these too.

If you have neither the time or patience to make these truffles into bunnies, you can dress them up with sprinkles too. I did one with pink sprinkles, one with yellow, one with lavender, and one with light green. Oh, and a couple with nonpareils too. Very festive. A drizzle of white chocolate on the dark truffles and dark chocolate on the white truffles would look cool too. Actually, you don't have dress them up at all...but definitely try them! With just 3 ingredients these truffles are so simple, yet SO good!

Oh, wait. I haven't told you how the bunnies got their faces. I melted pink and blue candy discs (melts) in my tray, then used a confection paintbrush to apply the heart-shaped nose. I used a toothpick, dipped in the blue candy coating to dot on the eyes.

Here comes Peter Cottontail, hoppin' down the bunny trail. Hippity hoppity, Easter's on it's way!

Remember the sparkly ears? Here they are. I started out painting little whiskers on a couple of bunnies. Then I looked over at the 7 loads of laundry waiting to be folded and remembered that I also needed to pack that folded laundry into suitcases for our trip. I decided that the rest of the bunnies didn't need whiskers.

The End.

Oreo Balls from my friend Molly's sister-in-law Stacy : )
1 package crushed oreos
8 oz cream cheese, softened
Chocolate chips
Mix together, then roll into balls. Put on wax paper in the fridge for about an hour. Melt chocolate chips and dip balls in. Chill for another hour or 2.
Hope you all are having a lovely weekend!


10 comments:
Those are ADORABLE!
just tooo cute... too complicated for me to make, but I do like the recipe for the truffles
Oh my stars these are just THE cutest!! I love them!!
I think these are so cute, and look delicious too!
Wow Krista! These are SO cute! They're almost too cute to eat BUT I'm sure I could put away at least 3 or 4 of them easily;D
And, guess what? You won my Lush Giveaway and I'm so happy it was you! I hope you and the girls enjoy it. When you get a chance, email me with your address and I'll send it your way on Monday. My email is tony.tracy@att.net. Congrats again!
Way cute!!! My kids will love these :)
Love these adorably cutey pie bunnies...would love to try them for sure ...supee truly.....
thanx a ton loads for the ideas.....
Ad step by step pics...
u have a super delicious site here which i sure love:-)))
fantastic sunday to ya:-))))
These little Easter Bunnies look like a blast! I am going to make them this weekend for sure!
These are so cute! And they look so fun to make! And eat.
Those are so cute!!! I think I need to make them! I am thinking too I can use heart shaped sprinkles for the nose! ;)
Post a Comment