Wednesday, September 29, 2010

Korean Beef Short Rib Noodle Bowl


This is my third go at beef short ribs, and once again, they did not disappoint! Back in May, I made another Asian inspired beef short rib recipe that was pretty amazing. This recipe was quite a bit different from that recipe, using different flavors and cooking technique. This Korean Short Rib recipe requires less time, is easier to prepare, and best of all, braises in the crock pot. It certainly got this cook's seal of approval and my family was digging it too! It totally hit the spot and I'll definitely make it again. I came up with this recipe after finding this recipe on the TLC website, then tailored it to my kitchen.

I began with about 4 lbs. of beef short ribs. Short ribs are obviously a very fatty cut of meat, which is why I prepared the meat a day ahead of when I planned to serve it, so that I could refrigerate the braising juices and properly skim off the fat. Once all of the fat you see here cooks off, you are left with an incredibly tender, flavorful protein. Before this year, I had never prepared or even eaten short ribs. Then I found myself with an abundance, because no one else in my family really wanted them from the beef that came off of my grandparent's farm. Now that I've got the hang of cooking short ribs, I'm definitely a fan!


Because most beef prepared in the slow cooker has better flavor if browned first, I dredged the short ribs in some flour, salt, and pepper.


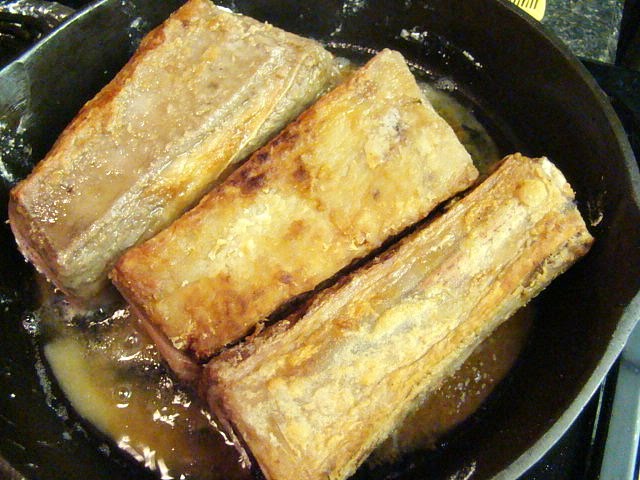
Then I browned them on all sides in a little oil, heated in a skillet.


Once the short ribs were browned, I moved them into my crock pot and then added some chopped onion to the skillet to saute until tender. When the onion was tender I tossed in a couple teaspoons of minced garlic and smashed ginger and stirred for another minute or two until fragrant.


Then I stirred together some soy sauce, water, and brown sugar and poured the liquid into the skillet to deglaze. Bring to a boil, then simmer for about 5 minutes.


I poured the braising liquid over the short ribs. At this point I realized that I didn't have enough liquid, so I added about another cup of water, so that the liquid came about halfway up the sides of the ribs. (I took this picture before I added the additional water).


Then I covered the crock pot and cooked on LOW for 8 hours, until the meat was fall-off-the-bone tender.


Transfer the short ribs to a casserole dish.


Most of the time needed to prepare this recipe goes into separating the flavorful, tender, short rib meat from the fat and bone. This step is a little time consuming. I set up my station at the kitchen table and turned on Dancing with the Stars while I went to work. Here you see the braising liquid in a bowl (top right), the meat (bottom), and the pile of fat and other undesirable stuff (top left). Save the braising liquid and meat, discard the fat (obviously).


I shredded the meat, covered the dish, and put it into the fridge overnight. I also covered the liquid and refrigerated it, so that the fat could rise to the top, until I was ready to make dinner the following day.


Day 2: Skim the fat off of the top of the braising liquid.


Heat the braising liquid and meat on the stovetop until simmering. Also (not shown) boil some water and cook 1/2 lb. of linguine or spaghetti noodles.


Stir a couple of teaspoons of sesame oil into the beef mixture. Cook and stir occasionally for a few more minutes.


Then toss the beef mixture with the pasta and some sliced green onion.


Sprinkle the dish with toasted sesame seeds and garnish with more green onion and serve. This was sooo good! The flavors and textures were wonderful in this hearty cool-weather meal. This totally satisfied my Asian take out fix!


Korean Beef Short Rib Noodle Bowl

3-4 lbs beef short ribs
1 cup flour
salt
pepper
oil
1/3 cup onion
2 t. minced garlic
2 t. smashed ginger
1/2 cup soy sauce
2 T. brown sugar
3/4 cup water + more to add to the crock pot
2 t. sesame oil
3 green onions, sliced
toasted sesame seeds
1/2 lb. linguine or spagetti noodles

Combine flour, salt, and pepper in a large, resealable bag. Shake the short ribs in the flour mixture to coat. Heat about 1/2 inch of oil in a large skillet. Arrange ribs in the skillet and brown, turning to evenly color each side. Remove to slow cooker. Add onion to the skillet and saute until tender. Add in garlic and ginger, stir until fragrant. Combine, soy sauce, 3/4 cup water, and brown sugar. Add to skillet, deglazing. Bring to a boil, then reduce heat to a simmer and cook for about 5 minutes. Pour liquid over short ribs, then add enough water, 1 cup or more, until the liquid reaches halfway up the sides of the beef. Cover and cook on LOW for 8 hours or until the meat is very tender. Remove meat to a casserole dish and separate from fat and bone. Shred beef. Cover and refrigerate. Save the braising liquid, cover and refrigerate overnight. Day 2: Boil water and cook pasta according to package directions. Drain and keep warm. Skim the fat from the braising liquid. Discard. Combine braising liquid and beef in a pot. Heat until simmering. Stir in sesame oil. Toss the beef mixture with hot pasta and sliced green onions. Serve topped with sesame seeds and additional green onions.

*Note: You can make this all in one day, I just prefer to let the braising liquid sit in the fridge overnight so that it's easier to skim all of the fat off of the top.

For a printable copy of this recipe, please click here!

Monday, September 27, 2010

Ice Cream Sundae Party! Hot Fudge and Peanut Butter Sauce Recipes


Last weekend we travelled home to Indiana and threw a big birthday party for our daughter-a pizza party with her grandparents, aunts, uncles, and cousins all in attendance. She loved her birthday party and had a wonderful time, but she was still a little bummed on the way home. "I wanted a party with my friends at home too." She pouted as we drove across the state line and into Ohio. Being the occasional over-indulgent parent that I am, I caved. "Well, maybe we can have a couple of your friends over for cake and ice cream next weekend." Tough negotiator that she is, she came back with, "No cake. Just ice cream." The kid despises birthday cake. Why? She can't stand frosting. (Who is this kid?!) "Okay, just ice cream" I agreed. Hey-no need to spend hours constructing another Ariel birthday cake. Like I was going to argue. So, at the after school pick-up this week, I mentioned to some of the neighborhood moms that we'd be having a little ice cream social at our house on Saturday in honor of my daughter's birthday. I'm glad I indulged her this time. It turns out that a couple of her friends were a little miffed that they'd been excluded from the out-of-state birthday celebration she'd talked about all week AND it gave me the opportunity to try out 2 wonderful ice cream topping recipes!

If you're looking for a fun birthday party on a budget, then try this! We'd already spent more that we budgeted on the weekend festivities back in Indiana. So, for this party, I picked up a big bucket of ice cream at ALDI ($4.99), a bunch of paper bowls at Walgreen's ($1.50) and 2 rolls of streamers ($2). Napkins are also a good idea (Luckily I keep an abundance of those on hand). I already had most of the sundae topping ingredients in my kitchen: Oreos, candy, whipped cream, and the ingredients for peanut butter and hot fudge sauce. With little time for planning games, I set out my daughter's favorite board games around the house (Candyland, Operation, Chutes and Ladders, and Ned's Head). At school they call them stations or centers. My daughter quickly pointed out this comparison. The kids were thrilled. Of course, we put up the bounce house in the lawn too. Oh, and favors? I just poured the leftover candies from the sundae bar into clear plastic cups and sent them home with the happy kiddos as they departed.

In order to save time before the party, I dished out the ice cream the night before, then covered it and put the bowl-filled trays into our basement freezer.


This afternoon before the guests arrived, I set out all of the toppings: homemade hot fudge and peanut butter sauce (recipe below),chopped or crushed Oreos, M & M's, bananas, chopped peanuts, whipped cream, cherries, and sprinkles.


Then I put those 2 rolls of streamers to work!


Gather a group of your favorite kiddos (or adults) around a table,


then supervise as they build their sundaes! This is the creation of one of my daughter's friends.


Once the kids were served, I moved the toppings into the kitchen and the adults went to town!


Here's my creation. Lots of hot fudge, peanut butter sauce, and whipped cream, sprinkled with peanuts, and topped with a cherry. It was perfection! It's pretty safe to say that the adults enjoyed the sundae bar even more than the kiddos.


Let's talk about the seriously delicious Peanut Butter Sauce.


It's easy to make...in the microwave no less!

Just combine a cup of brown sugar, corn syrup, and butter in a microwaveable dish.


Then heat to boiling in the microwave, for 2 1/2 to 3 minutes, stirring twice.


Stir in a cup of peanut butter until smooth.


And finally, stir in 1/2 cup of evaporated milk until completely combined. That's it! Easy as pie! Actually easier....


The sauce was great on ice cream and you can store the leftovers in your fridge for later. Today I pulled out the leftovers and dished up a couple spoonfuls to reheat...


for another snack. It was pretty amazing on apples too! The perfect discovery just in time for apple season.


Here's the recipe from the Taste of Home website:

Peanut Butter Sauce

22 Servings Prep/Total Time: 10 min.

Ingredients
1 cup packed brown sugar
1/2 cup light corn syrup
3 tablespoons butter
Pinch salt
1 cup creamy peanut butter
1/2 cup evaporated milk
Vanilla ice cream
Peanuts, optional
Directions
•In a 1-1/2-qt. microwave-safe dish, combine the brown sugar, corn
syrup, butter and salt. Cover and microwave on high for 2-1/2
minutes or until mixture boils, stirring twice. Add peanut butter;
stir until smooth. Stir in evaporated milk.

•Serve warm over ice cream. Sprinkle with peanuts if desired. Cover
and store in the refrigerator. To reheat, microwave at 50% power for
30-60 minutes or until heated through. Yield: 2-3/4 cups.

Nutrition Facts: 1 serving (2 tablespoons) equals 149 calories, 8 g fat (2 g saturated fat), 6 mg cholesterol, 95 mg sodium, 18 g carbohydrate, 1 g fiber, 3 g protein.

Hot Fudge!

The hot fudge sauce also came together quickly and is oh-so-decadent. I had to stash the leftovers at the back of the top shelf of my fridge because every time my daughters walk past, they beg for another spoonful!

Just melt 3/4 cup of chocolate chips with 1/4 cup of butter in a small saucepan.


Then stir in 2/3 cup of sugar.


And gradually add 2/3 cup of evaporated milk, stirring until the sugar is dissolved. Heat to boiling, then reduce heat and boil over low heat for 8 minutes, stirring frequently.


Here's the recipe:

Mad for Plaid Hot Fudge Sauce from Better Homes and Gardens

Start to Finish: 15 minutes

Ingredients
3/4 cup semisweet chocolate pieces
1/4 cup butter
2/3 cup sugar
1 5-oz. can evaporated milk (2/3 cup)
Directions
1. In a small heavy saucepan melt the chocolate and butter over medium heat. Add the sugar; gradually stir in the evaporated milk; stir to dissolve the sugar. Bring to boiling; reduce heat. Boil gently over low heat for 8 minutes, stirring frequently. Remove from heat. Cool slightly. Serve warm over ice cream. (Cover and chill any leftovers for up to 3 days.) Makes 1-1/2 cups.

Nutrition Facts
Calories145, Total Fat (g)8, Saturated Fat (g)5, Monounsaturated Fat (g)2, Cholesterol (mg)14, Sodium (mg)41, Carbohydrate (g)19, Total Sugar (g)18, Fiber (g)1, Protein (g)1, Calcium (DV%)4, Iron (DV%)2, Other Carbohydrates (d.e.)1, Fat (d.e.)1.5, Percent Daily Values are based on a 2,000 calorie diet

Enjoy!

Sunday, September 26, 2010

Meal Plan and (partial) Grocery List 9/27-10/3

Fall is here! Yay for sweater weather, trips to the orchard and pumpkin patch, and the smell of burning leaves! Inspired by the chill in the air and the gray skies, I was craving soup and crock pot dinners when writing the meal plan this week. You'll notice that I've only planned meals through Wednesday, with leftovers on the menu for Thursday. On Thursday, only my husband and youngest daughter will be dining at home. No meals planned for the weekend either, because I won't be here. My husband and I are going away together! My in-laws are coming to stay with our children and it's a safe bet that they will spoil them with pizza and McDonald's. Because the meal plan is short this week, and the links are provided below to all of the meals in my archives, I am only including the grocery list for Wednesday's dinner, Korean Short Ribs.

Here's the plan:

Monday September 27th

Zippy Chicken Soup or Spicy Black Bean Soup

Tuesday September 28th

Spaghetti and Meatballs (using these meatballs from my freezer and spaghetti sauce from a jar).

Wednesday September 29th

Slow Cooked Korean Beef Short Ribs

Thursday September 30th

Leftovers

Friday October 1st-Sunday October 3rd

This cook is off duty!


Grocery List (for Short Ribs)

Produce

green onions
fresh ginger
garlic

Meat

4 to 4-1/2 lbs. beef short ribs

Canned Goods

Soy sauce
beef broth (It's only 1/4 cup. You can use water too.)
sesame oil

Dry Goods

linguine pasta
sesame seeds
brown sugar
black pepper


Now I need some help planning my meals for the next week. On our getaway, my husband and I will visit Cape May, Atlantic City, and Philadelphia. Any suggestions for good eats in these places? They don't have to be fancy : ) Thanks!

Thursday, September 23, 2010

Butter Chicken

Ever wish that you could be two places at one time? Before I get into this evening's post about Butter Chicken, I want to explain how I have accomplished this feat tonight. Not only am I posting this meal here on Krista's Kitchen, I will also be a featured food blogger on Thursdays at The Mental Clutter Coach. Organizing expert April Welch is the author of this blog addressing organizational issues and helping people to recognize their goals, dreams, priorities, and talents. Check out her "webisodes" that help readers simplify and become more efficient at common tasks such as packing for a business trip. Recently she asked me to provide some some cooking pictorials and so tonight I'm there with a Savory Shredded Pork, and I'm here with Butter Chicken. Check it out if you get a chance!


I saw this Butter Chicken (otherwise known as Chicken Makhani) on Tasty Kitchen and it looked and sounded so good that I had to give it a try. I think that I've only tried Indian food once, and I thought this recipe seemed like a good opportunity to give it another go. I really liked this, but the whole time I was eating it I was thinking of Thai food. As a result, I was also thinking how great this would be if I'd added coconut milk instead of cream. I'm more accustomed to the flavors of Thai food and I couldn't help but notice some similarities between this recipe and a Thai dish that I've tried before. I decided to do a little research about the similarities between Thai and Indian food. I know that both use curries, but apparently those curries are very different. In my research I found a number of message boards and articles where cooks fiercely defended the differences between the two cuisines and their curries. Still, it can't be argued that there are some similarities. At least with the spices and cilantro in this dish it seemed apparent to me. I did find this bit of information on Wikipedia citing the influence on Indian food in Southeast Asia:

Indian cuisine is very popular in South East Asia because of its strong historical influence on the region's local cuisines. Indian cuisine has had considerable influence on Malaysian cooking styles and also enjoys popularity in Singapore. Indian influence on Malay cuisine dates to the 19th century. Other cuisines which borrow Indian cooking styles include Filipino,Vietnamese, Indonesian, and Thai. The spread of vegetarianism in other parts of Asia is often credited to ancient Indian Hindu and Buddhist practices.

This probably explains why, being more drawn to Thai cuisine, that I wanted to add coconut milk to this tasty dish to make it taste more like Thai food.

Either way, it was yummy and spicy and fulfilling.

I just followed the recipe on Tasty Kitchen. Here's what I did:

First, I combined the spices. This called for 1/4 teaspoon of cardamom, which I did not have. After locating it at my local supermarket for a pricey $14 a jar, I opted to find a substitute. All of the sources that I consulted assured me that there is NO good substitute for cardamom, but many did recommend spices like cloves, cinnamon, ginger, and allspice. I just added a sprinkle of each in addition to the garlic, salt, cayenne pepper, black pepper, coriander, and cumin.


Then I grabbed for some limes that I purchased nearly 2 weeks ago. They were looking a little rough and felt pretty hard. I anticipated that they wouldn't yield much juice.


Luckily, I was surprised and squeezed enough juice from the first lime that I didn't need another. I squeezed mine over a strainer that I placed on top of the spice bowl to keep out any pulp and/or seeds. Stir the spice/juice mixture together.


Pour the marinade over 4 chicken breasts, cut into bite-sized pieces. I squished the marinade around with the chicken inside the bag to evenly distribute it among the pieces. Then I put the chicken into the fridge overnight to marinate.


Tonight, when it was time to prepare dinner, I melted 1/4 cup of butter in a skillet and added a diced onion, sauteing until translucent.


Then I added in the chicken and cooked until no longer pink and the juices ran clear.


Next, I dumped in a can of diced tomatoes and a can of tomato sauce. Stir it all up and bring to a boil. Reduce the heat to simmer and cover for 30 minutes, stirring occasionally.


When the 30 minutes are up, pour in a pint of heavy cream (I used half and half)...or coconut milk.


Stir in a bunch of cilantro....


And serve over rice. YUM!


Butter Chicken from Tasty Kitchen

•4 pieces Boneless Skinless Chicken Breasts (cut Into Bite Sized Pieces)
•5 cloves Garlic, Minced
•1 teaspoon Salt
•½ teaspoons Black Pepper
•½ teaspoons Cayenne Pepper
•¼ teaspoons Ground Coriander
•¼ teaspoons Cumin
•¼ teaspoons Cardamom
•1 whole Lime, Juiced
•1 whole Onion, Diced
•¼ cups Butter
•1 can (14.5 Oz. Can) Tomato Sauce
•1 can (14.5 Oz. Can) Petite Diced Tomatoes
•1 pint Whipping Cream
•1 bunch Chopped Cilantro, to taste
•2 cups Basmati Rice (or However Much You Want)

Preparation Instructions

Combine first 9 ingredients and marinate overnight.

Saute the onion in the butter until soft. Add marinated chicken and cook about 10 minutes. Add the tomato sauce and diced tomatoes. Cook for 30 minutes over medium-low heat with the lid on. Add the whipping cream (I have used light cream or half-and-half also) and cilantro just before serving over Basmati rice.

Note: this is a little spicy, but you can cut back on the cayenne if you want.

My Notes: I used half and half, but would like to try this with coconut milk. As I did not have any cardamom, I used a blend of cinnamon, nutmeg, ginger, cloves, and allspice.

Tuesday, September 21, 2010

Buttermilk Pie


I made this pie a few weeks ago. I volunteered to bring dessert to a cookout, and then realized that I really didn't have many dessert-type ingredients in the house. I did have a quart of buttermilk in the fridge and a pie crust in the freezer. I remembered seeing a recipe for buttermilk pie somewhere, and after a quick search, I found this recipe on the Better Homes and Gardens website.

The preparation for this pie was similar to my favorite Sugar Cream Pie or a Custard Pie, which as I type this, I realize that I have never posted my favorite Sugar Cream Pie here. Look for that one this fall! This pie was not as sweet and dense as a sugar cream pie or as soft as a custard pie. It was somewhere in between. The consistency kind of reminded me of cheesecake. I didn't chill it for the whole recommended 4 hours before the cookout, because I ran out of time. But I wish I had because the leftovers were so much better after chillin' in the fridge all night.

Here's what I did:

First, I melted a stick of butter in a saucepan.


Then I stirred in a cup of sugar and a few tablespoons of flour. After this step, remove the saucepan from the heat.


While the butter melted, I beat 3 eggs until just fluffy.


Then I added buttermilk and vanilla to the eggs.


Gradually whisk the buttermilk mixture into the butter-sugar mixture...


Until it's smooth.


Then pour the mixture into a pre-baked pie crust.


I sprinkled mine with nutmeg, because that's what I do with my cream pie. It gives the pie a little extra flavor and color.


Bake and cool. Then chill for at least 4 hours or overnight.


Enjoy!


Buttermilk Piefrom Better Homes and Gardens

Prep: 25 min.
Chill: 4 hr.
Bake: 12 min./45 min.
Cool: 1 hour

Ingredients
1 recipe Pastry Single-Crust Pie, see recipe, or 1 rolled refrigerated unbaked piecrust (1/2 of a 15-oz. pkg.)
1/2 cup butter
1 cup sugar
3 Tbsp. all-purpose flour
3 eggs
1 cup buttermilk
1 tsp. vanilla
Directions
1. Preheat oven to 450 degrees F. Prepare pastry and line 9-inch pie plate. Line pastry with double thickness of foil. Bake 8 minutes. Remove foil. Bake 4 to 6 minutes more or until crust is lightly browned; cool. Reduce oven temperature to 350 degrees F.

2. In saucepan, melt butter over medium-low heat. Stir in sugar and flour. Remove from heat; set aside. In mixing bowl beat eggs with electric mixer on medium speed just until fluffy (about 1 minute). Stir in buttermilk and vanilla. Gradually whisk buttermilk mixture into butter mixture until smooth. Pour into prebaked crust.

3. Place pie on oven rack; carefully tent whole pie with foil. Bake 50 to 55 minutes or until center is set when gently shaken. Cool on wire rack for 1 hour. Cover; refrigerate at least 4 hours before serving. Makes 8 servings.
Related Posts with Thumbnails