Showing posts with label Bread. Show all posts

Wednesday, August 18, 2010

The Best Focaccia Bread...EVER!


The meal plan this week features 2 recipes that call for focaccia bread. I almost picked up a couple of focaccia rounds from the grocery, but with the ingredients already available in my pantry, there was really no reason not to just make my own. So tonight begins a series of three posts. First, the how-to for this awesome focaccia. Tomorrow, I'll use it in a tomato bread salad. And on Friday, I'm making a focaccia pie!

Back in June, I baked my own focaccia bread for the first time. You can check it out HERE in my post about Focaccia: Four Ways. I used a recipe from The Best Ever Italian Cookbook. However, when I did the write up for the dinner club where I served the focaccia, I stated that I was less than pleased with the chewy result and would be shopping for another focaccia recipe. Well, I've been shopping...and I think that I've finally found THE focaccia recipe for me. Today's focaccia loaves turned out perfectly!

A few weeks ago, I checked out Surfing the Menu: Two Chefs, One Journey: A Fresh Food Adventure from my local library. I admit that I didn't check out the cookbook in search of the perfect focaccia recipe. If I'm being truthful, the sole reason that I checked out this book is that it was co-authored by Curtis Stone. Anyone remember The Take Home Chef on TLC? On the Take Home Chef, Curtis and the TLC film crew descended upon unsuspecting supermarket shoppers. Then he'd help the shopper select ingredients and return with them to their home kitchen to whip up dinner for their family and friends. You might also remember Curtis Stone's most recent television endeavor from last season's The Celebrity Apprentice. If you're a fan of either show, then you're probably familiar with Curtis Stone. Back in the day, I may or may not have fantasized about Curtis coming up to me in the supermarket and asking (in that cute Australian accent) "Who are YOU cooking for tonight?" If this had really happened I might have melted on the spot. Not only is Mr. Stone easy on the eyes, but he's an amazing chef too!

"Surfing the Menu" takes seasoned chefs Curtis Stone and Ben O' Donoghue back to their native Australia in search of fresh inspiration. It's as much a travel guide for "The Land Down Under" as it is cookbook, with descriptions of the places visited, the local fresh ingredients, and recipes inspired by the region. I appreciated that there were plenty of pictures of the gorgeous scenery, the food, and...Curtis Stone. : )

On page 121, Ben O'Donoghue comes up with this focaccia bread recipe while visiting the monastery town of New Norcia. According to "Surfing the Menu", rosemary grows "everywhere" in New Norcia, so I thought it appropriate that I sprinkled both of my loaves of focaccia with this herb. Plus, I love rosemary in bread. I almost always sprinkle my pizza dough with rosemary before I pop it into the oven.

I took some liberties with this recipe. For example, it calls for more than 4 cups of semolina flour, but there was no semolina flour to be found at my local supermarket. Semolina flour is the coarsely ground endosperm of durum wheat. Never bleached and high in protein, it is used to make the highest quality "white" pasta. But it can also be used to add extra flavor and texture in some bread recipes. I settled for using only bread flour in this one. Bread flour is unbleached flour made from a special blend of wheat higher in protein than the wheat used in all-purpose flour. Protein produces gluten, which gives the desired loftiness or chewiness required in products like bread and pizza crust. It absorbs greater quantities of water and has a more elastic dough-handling quality than all-purpose flour too. The bottom line is that bread flour produces better volume and crumb structure in bread than other types of flour. It definitely worked for this recipe!

Here's what I used to make this focaccia dough: Bread flour, 2 packets of active dry yeast, warm water, olive oil, salt, and a pilsner beer.


I didn't follow the "mix by hand" instructions in the recipe either. I used my KitchenAid mixer. Sure, I could've mixed the dough by hand, but this was easier and I use any excuse available to fire up my KitchenAid mixer! I poured the 2 1/2 cups of warm water into the mixing bowl with 4 cups of flour.


Then I blended until smooth.


I'm accustomed to proofing my yeast before adding it to the bread recipe, but the recipe notes assured me that the beer would stimulate the yeast, so I poured it directly into the mixing bowl. Mix until combined.


Now for the beer. The recipe called for 3 1/2 oz. or 100 ml of a pilsner beer. I picked up the only pilsner available at my local ALDI. It's a German Pilsner called Wernesgruner that retails for $6.99/6 pack. It's just okay. I don't know if I'd pick it to drink with dinner, but it worked great in this recipe. Stir in the beer and wait for the mixture to "activate". I let it sit for 5-10 minutes. I didn't really notice a big change or an activation...it wasn't like when yeast gets foamy on the top as it proofs before you add it to a recipe. After waiting around for a bit, I deemed the mixture "activated" and pressed on with the recipe.


I added the remaining flour and the salt, mixing until the dough formed a sticky ball.


Then I turned it onto a floured surface. I use The Pampered Chef Rectangular Pastry Mat. Love it!


Knead the dough with floured hands for 8-10 minutes, until springy and smooth. Kneading (and rolling) dough is hands down my daughters' favorite kitchen activity. No pun intended. They like it even better than making cookies!


Let the dough rest for 5 minutes. While you rest the dough, prepare 2 baking sheets, dusted liberally with flour (the recipe called for semolina flour). I used bread flour and corn meal to give the focaccia a little extra crispness. I was concerned with putting the dough onto floured baking sheets, rather than oiled sheets. It turns out that my concerns were warranted. I'll get to that later...


After resting, divide the dough into two equal parts.


Roll each portion out to an oval with about 1 inch of thickness. This really doesn't require much rolling. Don't roll it too thin. You're going for a soft bread with a crisp crust, not a cracker.


Transfer the focaccia to the prepared baking sheets and using your fingers, press dents into the dough, all over the surface. Unlike the focaccia that I made earlier this summer, this dough seemed to spring right back from these finger pokes. You can't really see them in the picture, but I promise, they are there. Pat your toppings into the surface now. I sprinkled rosemary onto both, and then sliced red onions for one of them.
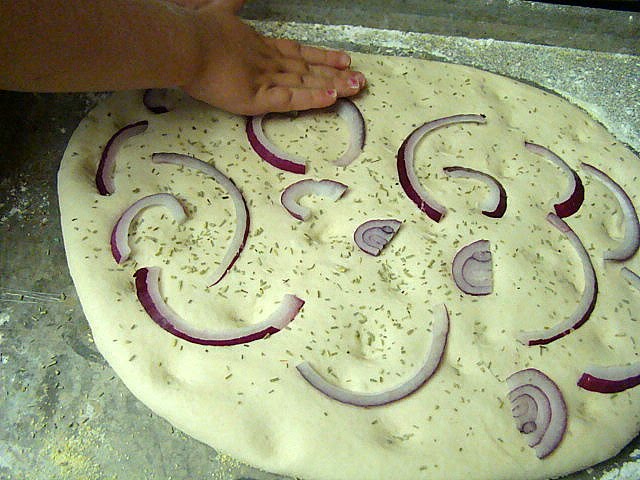


When she saw what I was doing, my toddler took a break from playing dress up and decided that it was her sole purpose in life (or at least for the afternoon) to press onions into the focaccia dough. She took it very seriously. When she'd finished pressing the onions that I'd sliced, she begged me to "slice more!"


Cover the baking trays with tea towels and put them somewhere warm until the dough nearly doubles in size. It should take 1 1/2 to 2 hours.

Before baking, drizzle 1/4 cup of olive oil over each focaccia loaf. (I used a pastry brush to evenly distribute the oil over the dough.) Sprinkle some sea salt and freshly ground pepper over the top. Then bake the loaves at 375 degrees for 20-25 minutes until cooked and golden brown.


These baked up beautifully!


Only one problem...they stuck to the pan. Remember that I was worried about floured baking sheets rather than oiled? Here's the thing, preparing the sheets with flour and cornmeal did lend itself to a nice, crisp focaccia crust. But if you decide to use flour and/or cornmeal, then be sure to use it liberally. If not, I think that a nice layer of oil on the sheet would work well too. Use a spatula to loosen the bread from the sheet and transfer the loaves to a rack for cooling.


This bread was wonderful on it's own. It would also be great dipped in olive oil mixed with dipping spices. My family loved it! I was on the phone with a friend when I took the first bite. I started raving about how it was "the best bread ever". "What's up with you and all of these bread recipes lately?" She was referring to the Monterey Ranch Bread from last night. I didn't miss a beat before answering, "Didn't you know? It's my goal to gain 100 lbs. before the New Year." I might be joking, but with Monterey Ranch bread and this focaccia in my life, this exaggeration might not be too far-fetched.


The focaccia was also the star of this amazing Tomato-Bread Salad that I will feature tomorrow. It was SO good!


Now I can't wait to make the focaccia pie!

Focaccia adapted from Surfing the Menu

8 cups bread flour, plus more for kneading and dusting
2 1/2 cups warm water
2 packets (1/4 oz each) active dry yeast
3 1/2 oz. pilsner beer
1 tbsp. salt
1/2 cup olive oil
cornmeal for dusting
coarse sea salt and freshly ground black pepper
Toppings: rosemary, roasted garlic, olives, sun dried tomatoes, parmesan cheese, caramelized onion, raw red onion (optional)

1. Place 4 cups of flour in a large bowl. Add in warm water and mix until smooth. Mix in the yeast until blended. Add beer. When the mixture starts to activate, add the remaining flour and salt. Form a loose dough. Turn out onto a floured surface and knead until springy and smooth, 8-10 minutes. Rest for 5 minutes.

2. Divide the dough in half. Dust two baking sheets liberally with flour and cornmeal. Roll each portion out to a flat oval shape about 1 inch thick. Transfer to prepared baking sheet. Push holes into the surface of the dough using fingertips. If using a topping, pat into the surface now. Cover with clean, dry tea towels and let rise in a warm, breeze-free spot until almost doubled, 1 1/2 to 2 hours.

3. Preheat oven to 375 degrees. Before baking, drizzle 1/4 cup olive oil over each focaccia. Use a pastry brush to evenly distribute oil. Sprinkle with salt and pepper. Bake until cooked and golden, 20-25 minutes. Immediately transfer to wire racks to cool.

Monday, August 16, 2010

Monterey Ranch Bread


I you are trying to diet and wrestling with your will power at this very moment then GO AWAY....NOW! I mean it. Come back of course, on another day...but right now I'm looking out for you, dear reader. This bread is absolutely horrible for you. Packed with carbs, fat, and of course, calories, I can assure you that this bread is NOT on any diet. Sorry.

But it is AMAZING!

When I came across this recipe on Noble Pig, I knew immediately that my family would love it. It combines some of their most favorite foods in one handy recipe. Bread. Butter. Ranch Dressing. Cheese. Yep. They were going to eat it, no question about that here. As expected, they were head over heels for this one. As a matter of fact, they didn't even touch the rest of their dinner, they just kept asking for more bread. So much for a well balanced diet tonight.

When I was in college, there was this pizza place at Purdue called The Mad Mushroom. They sold cheese sticks. That is, a round sheet of pizza dough brushed with garlic butter and covered with large amounts of cheese and then baked bubbly and cut into strips. We'd order it late at night (or rather early in the morning) and then dip those sticks into the cups of ranch dressing that were included in the box. I distinctly remember the Mad Mushroom delivery guy repeatedly showing up at my husband's fraternity house, his insulated, red pleather cover with the velcro flap hoisted onto his shoulder and FULL of cheese sticks. Rrrrrip. He'd flip open the cover, and the cheese stick aroma would fill the air. Some sweet soul would hurriedly scratch down their name on the receipt and the Mad Mushroom dude handed over the goods as we all looked on....drooling. That box didn't ever make it to a table. Oh no. As if in a trance, we'd drop directly onto the front room steps and a crowd would inevitably form around the magic box (or boxes) of cheese sticks. If you could look past your self and the ranch-dripping cheese stick in your own fist, you would see others cramming them into their own mouths and grabbing for another as fast as they could chew them down. Good stuff...but certainly not figure friendly. Freshman 15? Pshaw! What about 20 or 30!? No wonder I needed Weight Watchers when I graduated.

This recipe made me think of those Mad Mushroom Cheese sticks. After I type this, I'm going to erase the link from my favorites, go jogging, and forget all about it. It's for the best. Really. This bread, combined with the sheer joy of being back in my kitchen after a couple of weeks and cooking up a storm, plus the take out Chinese that I've been grazing on since Saturday are making me quite "puffy" this week. I need to get a grip.

My camera was out with my husband when I began making this bread, so the pictures begin with the garlic butter toasted bread coming out of the oven. The recipe called for 8 tablespoons (that's a whole stick!) of butter to be melted and then brushed over one loaf of French bread that has been sliced in half lengthwise. Thinking of those Mad Mushroom cheese sticks, I took the liberty to add some garlic powder to the butter before brushing it on. Put it under the broiler to toast until golden brown. I've said it over and over again, and I still forget to adhere to my rule: DO NOT walk away from the broiler. Not even for a second. I was loading the dishwasher while toasting my garlic bread tonight. As I dropped silverware into the dishwasher basket, I smelled something burning. Darn it! I dove for the oven door. Luckily, the bread wasn't beyond saving, the edges just got a little dark. It's not like I had another loaf of French bread chillin' in my pantry.


Next mix together 1-1/2 cups of ranch dressing and 4 cups of Monterey Jack cheese. I didn't have 4 cups of Monterey Jack, so I used a blend of Colby Jack, Cheddar, and Mozzarella...emptying each pouch of cheese from my fridge until I had reached 4 cups.


Spread the cheese and ranch dressing over the toasted bread and then return it to the oven at 350 degrees for 8-10 minutes until the cheese is melted. Once removed from the oven, sprinkle it with fresh chopped parsley.


Wait 5 minutes (if you can) before slicing.


Now, in the quiet of your kitchen, before calling the family to the dinner table, take a moment for yourself and sample this delicacy...wallowing in the cheesy, crusty, amazing glow.


Then you can transfer it to a plate or basket and call in the gang.


Please consume responsibly. : )


Monterey Ranch Bread found on Noble Pig from Taste of Home and adapted by me

8 Tablespoons butter, melted
1/2-3/4 teaspoon garlic powder
1 loaf French bread, split in half lengthwise
4 cups Monterey Jack cheese, shredded (or a blend of Colby Jack, Mozzarella, and Cheddar...basically whatever shredded cheese you have in the house)
1-1/2 cups ranch dressing
Fresh parsley for garnish

Melt butter and stir in garlic powder. Brush on bread with a pastry brush. Place bread under the broiler until it's slightly brown and crispy.

Combine cheese and ranch dressing and divide evenly over bread. Place in a 350o degree oven until cheese is melted, about 8-10 minutes.

Sprinkle with parsley once you remove from the oven. Let sit 5 minutes before slicing.

Thursday, June 24, 2010

Focaccia: Four Ways!


I made focaccia bread for the first time ever this afternoon! Sure, I've made an easy version of mini focaccias found HERE...and when I worked in the deli in college we baked focaccia bread...after we took the dough out of the freezer the night before proofing, baking, and bagging it. But I've never rolled up my sleeves and kneaded, shaped, and topped foccacia from scratch. I'm so glad that I did! Focaccia is pretty fun to make and versatile in what you can top it with. I went with caramelized onions, olives, roasted garlic and parmigiano-reggiano cheese, and red onion and rosemary. My house smells gloriously of fresh baked bread, garlic and rosemary as I sit here typing. Mmmmm.

So, who is going to eat all of this focaccia? A group of our family and friends at an Italian dinner tomorrow night! I'll definitely take pictures and post about it next week. The fact that we will be attending this dinner is just plain lucky. On Tuesday, I was talking to one of my Indiana friends and informed her that we'd be in town this weekend for a wedding. "When are you coming in?" she asked. I answered, "Friday...why?" She told me that a gourmet club formed by a group of our college friends was holding their first ever dinner on Friday night. The theme: Italian. I'm so excited to see all of our friends, catch up, and see what everyone brings to share. What luck! What timing! The hostess emailed and suggested that we bring the bread. Good call, since I'm not sure that my tiramisu or tortellini alla panna would have weathered the 5 hour drive very well. Right away I pulled out my copy of The Best Ever Italian Cookbook and flipped to focaccia.

The recipe called for 1 recipe Basic Pizza Dough, 3 tablespoons of olive oil, and coarse sea salt. I had to flip back a few pages to find the pizza dough recipe. Once I'd gathered the ingredients for that, I realized that I had a blank canvas to top as I pleased. Yay!

Here's how I made the focaccias:

I know that this picture looks like I made myself a nice cup of Chai while I was mentally preparing to make the bread, but really it's my yeast proofing in a cup of warm water, stirred with a pinch of sugar.


Actually, it's 4 cups of yeast proofing because I quadrupled the recipe. I believe that 16 people are attending the dinner. If we have extra bread at the end of the night, we can eat it throughout the weekend while enjoying the lake at my in-law's house.


Once the yeast has dissolved and started to foam, add it to 1/3 of the flour and a teaspoon of salt in a mixing bowl. You can stir this with a spoon, but I opted for my mixer.


Once combined, add in another third of the flour and mix or stir until the dough forms a mass and begins to pull away from the sides of the bowl. If you're not using a mixer, at this point you can turn it onto a floured surface and add the remaining flour as you knead. I put the dough hook on my mixer and added the remaining flour as it mixed. Does the following picture look a little ominous, or is it just me? Like Captain Hook is about to make some focaccia...


After a little time with the dough hook, I still turned the dough onto my pastry mat and kneaded it for a couple of minutes until it had that "just right" smooth and elastic feel.


Then I plopped the dough ball into a lightly greased bowl, covered it, and kept it someplace warm until doubled...about 50 minutes.


To determine whether the dough has risen enough, poke two fingers into the center. If the indentation remains, it's ready. Punch it down...


And transfer it to a pastry mat or lightly floured surface and knead it for another 3-4 minutes.


Brush a large, shallow baking dish with a tablespoon of oil and use your fingers to press the dough into an even layer, 1 inch thick. I failed to read this instruction and just looked at the picture provided which showed the dough covering the whole baking sheet. Consequently, my focaccias turned out MORE crispy and LESS soft and chewy than I would have liked. Cover the pans and let rise again for 30 minutes.


While the dough raised, I prepared my toppings. I started the onions caramelizing in a couple of tablespoons of oil.


I took out the roasted garlic that I purchased from my grocery store antipasta bar. I've roasted my own garlic in the past, you can check it out HERE...but I was trying to make this a project that I could fit into my daughter's naptime...so purchased garlic was a great shortcut.


I sliced up the cloves.


Then I grabbed for the olives. This is an Italian blend of olives, also purchased from the antipasta bar. I had lots of samples while choosing this blend...

I cut them in half.


Oh, and there was the King of Parmesan... the Parmigiano-Regianno cheese. If you’ve never used Parmigiano-Reggiano cheese before, you’re in for a treat. Parmigiano-Reggiano has a sweet-nutty flavor and crumbly texture that is a favorite of both cheese lovers and connoisseurs. This cheese has significantly more flavor than regular parmesean, so you can use less of it and conserve calories. Good thing, because this retails for 18.99/lb. Pictured below is $6.46 worth of Parmigiano-Reggiano. Whenever it's time to re-stock my supply of this cheese, I take a chunk out of the deli cooler and have the nice girl at the cheese counter cut it down to an affordable size for me. Try it sometime!


I cut a small chunk off of my already small chunk of cheese and popped it into my Pampered Chef Cheese Rotary Grater. I feel like I'm on The Olive Garden staff everytime I use it. All of the fun and none of the fuss of pre-bussing tables, doing side work, and being extra friendly to people for a couple of bucks + tips.


By the time I rounded up my toppings, the focaccia had puffed up and it was time to give it "dimples". Use your fingers to press rows of light indentations into the surface of the dough.


Then brush with a couple tablespoons of olive oil, apply toppings if desired, and sprinkle with a little coarse salt. Here's the olive focaccia.


The caramelized onion....(Note: I stirred a teaspoon or so of crushed rosemary into the onions before spreading them onto the dough)


The red onion and rosemary.


I grated cheese over this one...


And the roasted garlic. Again, I added rosemary and cheese. Can you tell that I really like rosemary on my focaccia?


They all baked (two at a time, of course) in a 400 degree oven for 25 minutes until golden brown. Here are all of my focaccia cooling on racks in our dining room. I could just dig in!


Here's a closer look at the baked version of each of these Italian flat breads:

The caramelized onion.


The olive.


The red onion.


Abd the roasted garlic.


I stacked them all up in my Wilton Ultimate 3-In-1 Cupcake Caddy and Carrier. Who knew it would work so well for focaccia!?


Sealed up nice and tight and ready for the 5 hour road trip!


Here's the recipe:

Focaccia from The Best Ever Italian Cookbook

Ingredients:

1 recipe Basic Pizza dough, risen once
3 tablespoons olive oil
coarse sea salt

Basic Pizza Dough

Ingredients

1 package dry yeast
1 cup lukewarm water
1 tsp. salt
3 to 3-1/2 cups unbleached white flour

1. Warm a mixing bowl by swirling some hot water in it. Drain. Place the yeast in the bowl and pour on the warm water. Stir in the sugar, mix with a fork, and allow to stand for 5-10 minutes until the yeast dissolves and begins to foam.

2. Use a wooden spoon or mixer to mix in the salt and 1/3 of the flour. Mix in another third of the flour, stirring until the dough forms a mass and begins to pull away from the sides of the bowl.

3. Sprinkle some of the remaining flour on a smooth work surface. Turn dough onto surface and knead it working in the remaining flour a little at a time. Knead for 8-10 minutes until dough is smooth and elastic. OR switch to the dough hook attachment on your mixer and mix until the flour is incorporated and the dough forms and smooth ball. Knead for a couple of minutes on a smooth surface.

4. Lightly oil a mixing bowl. Place the dough in the bowl. Stretch a moistened, wrung-out dish towel across the top and leave it stand in a warm place until the dough has doubled in volume, about 40-50 minutes.

For Foccacia:

1. After punching dough down, knead it for 3-4 minutes. Brush a large shallow baking pan with 1 tablespoon of oil.

2. Place the dough in a pan, and use your fingers to press into an even layer 1 inch thick. Cover the dough and let rise in a warm place for 30 minutes. Preheat oven to 400 degrees. Prepare toppings, if using them.

3. Just before baking, use your fingers to press rows of light indentations into the surface of the focaccia dough.

4. Brush with remaining oil, add toppings if desired, and sprinkle with coarse salt. Bake for about 25 minutes, or until just golden. Cut into squares or wedges and serve as an accompaniment to a meal, or alone, at room temperature.
Related Posts with Thumbnails