Saturday, December 10, 2016

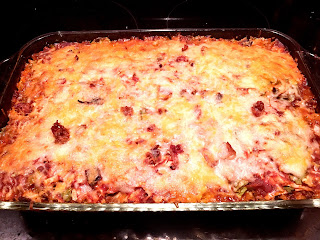
Stuffed Cabbage Casserole


This Stuffed Cabbage Casserole is the best thing I have made all week. In fact, it is SO good that I knew I needed to share it here. Every single member of my family ate it and enjoyed it. Some even went back for seconds. When that happens, I know that a recipe is a keeper.

But here's the thing- this isn't a speedy weeknight dinner. 

I chose this recipe because I was craving stuffed cabbage. And it seemed to me that boiling cabbage leaves, making a tasty filling, then rolling up each leaf, individually, with that filling...only to bake them after all of that work would be super time consuming. Instead, I opted for this seemingly simpler version that employs all of the elements of stuffed cabbage. In fact, I always go with "unstuffed" cabbage type recipes. Over the years I've featured two such recipes on this blog: Stuffed Cabbage Soup and an Un-Stuffed Cabbage Skillet. Both recipes did come together quickly and did not disappoint, and so, with a history of positive experiences with the "un-stuffed" cabbage, I decided that this recipe was the "way to go" to satisfy my craving. And I'm not sorry. If you love stuffed cabbage, you'll love this recipe. Maybe you'll even love it more...

While I had optimistically eliminated the stuffing step in the interest of efficiency, this week's fabulous stuffed cabbage casserole still had lots of other steps happening. There was bacon frying and rice cooking and cabbage chopping and meat browning and sauce making and then....THEN....the baking. About halfway through preparation, I thought to myself, "I wonder if I could have stuffed cabbage leaves by now?"

But I wouldn't know, because in truth, I've never made authentic stuffed cabbage.

I'm not saying that this recipe is time-consuming to discourage any of you, dear readers. It really is totally worth it. This is one of those recipes that I know I will make again. What I'm saying is, this recipe is better suited for a Sunday dinner than say, a busy Wednesday night. Or maybe make it ahead and then serve it up on a busy weeknight.

There you go.

Long disclaimer over.

You've been warned.

Um. Krista? 

Yeah?

A simple "This casserole takes a good bit of time to prepare." would have been sufficient. I could have made the thing in the time it took me to read the introduction to this recipe.

Sorry about that. Being direct and concise in my writing (and conversations) is not really one of my strengths. Perhaps a New Year's resolution may be in order. #goals

In the meantime, feel free to use the down ↓ arrow key to scroll on by and get to the recipe. ðŸ˜Š

Now, let's get on to how this recipe came together.

I began by cooking the rice and frying bacon


While the rice cooks and the bacon fries, start fine-chopping or shredding the cabbage. You want to use a 2 lb. head of cabbage.


Next you'll want to brown 2 lbs. of lean beef with a diced onion in a skillet. I failed to take a picture of the browning of the beef and onion. Be sure to salt and pepper the beef as it cooks. Once it's browned, drain the meat. While the meat drained, I added my spices  and  garlic to the skillet and heated them until fragrant.
Then add the browned beef, rice, and 1 can of tomato sauce to the skillet. Bring to a boil, then simmer for at least 5 minutes.

Now it's time to assemble the casserole.


You want to layer the casserole as follows: cabbage, sauce (beef, tomato, rice mixture), cabbage, sauce, and end with cabbage on top. I sprinkled salt and pepper over each layer of cabbage too. Smooth the sauce evenly over each layer of cabbage.


Top with the remaining can of tomato sauce.


Smooth the sauce.


Now cover and bake for 45 minutes.

Remove the casserole from the oven and sprinkle with cheese. Then return the dish to the oven for another 10 minutes until the cheese is completely melted and the casserole is bubbling nicely around the sides.


Voila!


The recipe says that it serves 12, so I divided it accordingly. Truth be told, with people heading back for seconds, I'd say it serves more like 6-8. So much for serving size! Ooops.


And there you have it, a relatively healthy, awesomely delicious dinner that your family will thank you for. At least mine did...

Here's my over-simplified nutrition analysis for this dish:
Cabbage=a good source of dietary fiber, Vitamin C and K
Ground beef (I used 90/10)= a lean source of protein
Tomato sauce=Vitamin A and C and lycopene
Brown rice= a whole grain! Lots of good stuff including Vitamin B6 and Manganese
Cheese=Calcium
Bacon=who cares if bacon is healthy?!? Bacon is delicious. Bacon=meat candy. And it totally makes this dish. 😃


Cabbage Roll Casserole from Taste of Home adapted by Krista's Kitchen

TOTAL TIME: Prep: 30-45 min. Bake: 55 min. + standing YIELD:12 servings

Ingredients

  • 2 pounds 90/10 ground beef
  • 1 large onion, chopped
  • 3 garlic cloves, minced
  • 2 cans (15 ounces each) tomato sauce, divided
  • 1 tablespoon Italian blend seasoning                            
  • 1 teaspoon dried thyme
  • 1/2 teaspoon dill weed
  • 1/2 teaspoon rubbed sage
  • 1/4 teaspoon salt
  • 1/4 teaspoon pepper
  • 1/4 teaspoon cayenne pepper
  • 2 cups cooked brown rice
  • 4-6 bacon strips, cooked and crumbled
  • 1 medium head cabbage (2 pounds), shredded
  • 1 cup shredded part-skim mozzarella cheese (I used a blend of mozzarella and cheddar)                            
  • Coarsely ground pepper, optional

Directions

  • 1. Preheat oven to 375°. In a large skillet, fry bacon until crisp. Remove from skillet, drain and crumble. Set aside. Wipe excess grease from the skillet. Add garlic and spices, heat and stir until fragrant. Add ground beef to the skillet. Cook beef and onion over medium to medium-high heat, crumbling beef, until meat is no longer pink. Drain. Salt and pepper to taste. Stir in one can of tomato sauce and rice. Bring to a boil. Reduce heat; simmer, covered, 5 or more minutes.                                                           
  • 2. Layer a third of the cabbage in a greased 13x9-in. baking dish. Top with half of the meat mixture. Spread evenly and smooth over the top of the cabbage. Repeat layers; top with remaining cabbage. Pour remaining can of tomato sauce over top.
  • 3. Cover and bake 45 minutes. Uncover; sprinkle with cheese and bacon. Bake until cheese is melted and casserole is bubbly, about 10 minutes. Let stand 5 minutes before serving. If desired, sprinkle with coarsely ground pepper. Yield: 12 servings.

Nutritional Facts

1 piece: 256 calories, 13g fat (5g saturated fat), 56mg cholesterol, 544mg sodium, 17g carbohydrate (4g sugars, 3g fiber), 20g protein.

Tuesday, November 1, 2016

Trick or TREAT?


Of course you picked "treat"! Who wouldn't? Especially if these amazing (addictive) brownies brookies are the reward. That's right, "brookie".  Brownie + Cookie = Brookie.

Now when you can't decide if you're craving a brownie or a cookie, you don't have to! This is exactly what happened on a rare lazy, rainy, family-movie-marathon-Sunday in our household. We were all craving some kind of home-baked, decadent treat, but couldn't agree upon a recipe. My family was lobbying for brownies, but I had cookies on the brain. We compromised with this. Best of both worlds. And it was perfect, because these are so easy. No need to take tray after tray of cookies out of the oven.

I found a recipe from "Pinch of Yum" that offered excellent details for chocolate chip cookie brownies. The author had clearly done her "brookie" research, and her post was very helpful to the success of this recipe. After reading all of the instructions and insights, I altered the recipe to fit my craving.

On the day that I made these, I was craving candy corn and dry roasted peanuts. Around these parts, at this time of year, one can often find a delectable mix of peanuts and candy corn set out at parties and tailgates. It's that whole "sweet and salty for the win" combo. I had this in mind as I gathered my baking ingredients. And so...rather than chocolate chips for the cookie layer, I opted for peanut butter chips and candy corn.

The beauty of these is that you can use any brownie and cookie recipe combo to customize them to your liking.  This time I went with the Triple Fudge Ghiradelli brownie mix and the peanut butter chip/candy corn cookie mix. (And it was INCREDIBLE!) But the possibilities are endless. I've seen them with Oatmeal Scotchies baked on top of brownies and I imagine that peanut butter cookies with chopped Reese's cups stirred in would make for an amazing peanut butter/chocolate combination. Or hey, maybe stir in or top with some chopped up Halloween candy. You've gotta get rid of it before the Christmas candy starts rolling in, right? Be creative!

Let's gather the ingredients. A quick glance shows that you just need a brownie mix, oil, water, and egg for the brownie layer and ingredients for a small batch of cookie dough + whatever stir-ins you choose. In this case, I selected peanut butter chips and candy corn.

To get started, line an 8x8 or 9x9 baking pan with foil and spray with a little non-stick cooking spray or grease with butter.

Then prepare the brownie mix and pour it into the pan.

Prepare the cookie portion, just as you normally make cookies- cream the butter and sugars, add the egg and vanilla, beat in the dry ingredients until just mixed.

Finally, stir in the chips.
Drop the cookie dough by spoonful over the brownie batter. Or find a determined, brownie-lovin' 3 year old to complete this step for you. I recommend the latter. It was pretty entertaining.
You only want to use about 2/3 of the cookie batter. I took the remaining batter and baked it into 5 or 6 cookies. This was a really good thing, since these brookies took about an hour to bake and at least 20 minutes to cool to the point that they were ready to cut. Conversely, cookies only take 10 minutes to bake. I used the cookies to satiate the hungry crowd who was growing increasingly impatient for the brookies as the smell of them baking filled the house.
Gently press the cookie dough into the brownie batter and smooth it a bit.

Our finishing touch was the candy corn. My pre-schooler and I arranged a little over 1/4 cup on top and then gently pressed them into the dough for a festive fall twist.
Pop the pan into a 350 degree oven. The recipe recommended baking for 40 minutes. When I checked at 40 minutes, they were still really "jiggly" in the center. I continued baking them for another 20 minutes, checking at 5 minute intervals, until the center was a little more "set". Not completely firm- I do love my brownies pretty gooey- but the cookie layer should be baked so that a toothpick would come out clean if you tested it.

This was a very long wait for a certain young man...

The recipe also recommended covering with aluminum foil to allow the brookies to bake without getting too brown. I followed "Pinch of Yum's" suggestion, and baked them for 20 minutes uncovered, then 10 minutes covered, then I uncovered them for another 5-10, and finally I covered them up for the remaining baking time.

Hey! Maybe that's why they took so long to bake?!? I kept opening the oven! Ha!

Mine came out of the oven looking like this. Now you just need to let them sit and cool for a bit. I'd say 20-30 minutes is ideal.

Ugh. More waiting!

I cooled mine on a baking rack to allow cool air to get underneath and speed things along.


Finally, a little over two hours after I announced, "I'm baking brownies!" these were ready to cut and serve.

And let me tell you, they are worth the wait!

I actually had to take the last 9 over to the neighbor's today. I just couldn't stop eating them. Every time I walked by the plate I'd break off another piece. And that bite would be so good that I'd find a reason to walk by the plate again for another piece. And another. And another. My will power was just no match for the mighty "brookie". And so I made them my neighbors' problem. Aren't I thoughtful? (Insert evil Halloween laugh here).

Okay, so here's the recipe as adapted by me. If you have a chance, pop over to "Pinch of Yum" and read the original author's post. After all, she tested it like 4 times as she was perfecting the recipe. Once you try these amazing treats, I promise, you will join me in thanking her for the hard work!

Peanut Butter Chip-Candy Corn "Brookies" 
Adapted by Krista's Kitchen from Pinch of Yum

Ingredients:

  • 1 stick salted butter (1/2 cup, very soft)
  • ¾ cup white sugar
  • 2 tablespoons brown sugar, packed
  • 1 egg
  • ½ teaspoon vanilla
  • 1 cup + 2 tablespoons flour
  • ½ teaspoon baking soda
  • ¼ teaspoon salt
  • 3/4 cup peanut butter chips
  • 18.9 ounce brownie mix - I used Ghiradelli Triple Fudge mix
  • (eggs, oil, and water for brownie mix)
  • heaping 1/4 cup of candy corn
Instructions
  1. With an electric mixer, cream butter and sugars in a small mixing bowl. Add vanilla and egg; cream again until smooth. Add the flour, baking soda, and salt. Stir gently until incorporated. Stir in chips. Store in refrigerator until ready to use.
  2. Preheat oven to 350 degrees. Prepare brownie batter as directed. Pour batter into a foil lined and greased 8x8 or 9x9 baking dish. Scatter pieces of cookie dough over the top of the brownie batter. In my 8x8 square pan, I was able to get about ⅔ of the cookie dough to fit over the brownies and I just saved the rest for regular cookies. Press gently on the dough just until it starts to sink down into the batter a little bit and smooth slightly. Arrange candy corn evenly over the top, pressing gently into the cookie dough.
  3. Bake for 40 minutes, then check for doneness, covering with foil if you need to keep the cookies from getting too brown on top. Let stand for 20-30 minutes and cut into pieces for serving.
Notes from Pinch of Yum:
Beware of taking these out too early because the cookies look brown - usually when I do that, the brownies are still underdone and they sink down in the middle. I found that it was easiest to alternate baking them covered and uncovered. I did the first 20 minutes uncovered, the next 10 minutes covered, and the last 5 minutes uncovered. This allows the brownies to bake without the cookies getting too brown. I've also taken foil and just made a cover around the edges so the middle can bake without burning the tops of the edges.

Thursday, October 27, 2016

Stuffed Shells, Lightened Up

Stuffed shells, albeit a little more time consuming than say, lasagna...and much more time consuming than spaghetti with sauce from a jar (aka what I serve for dinner at least once a month), are a big hit when they make an appearance on our dinner table. This recipe gets my personal "Mom's Seal of Approval" award for several reasons. 1) I can make them ahead, and then pop them into the oven when I get home from work or school activities. 2) Everyone eats these without complaining. 3) They are delicious. They actually remind me of my favorite lasagna recipe. 4) They are fairly cost effective- not counting the salad and bread, the cost per serving was $2.09 for 6 servings. In reality, my 2 youngest did not eat a full serving portion, so there were enough leftovers for 2 addition meals. *Grocery prices based on my Ohio ALDI receipts. 5) They are low calorie- for stuffed shells, that is. With a few lighter ingredient substitutions, these come in at 430 calories per serving. Very reasonable for a flavor-packed, filling, cheesy dinner!


Here's how it all came together:

Count out 24 shells, or about half of the package. Or cook the whole package. You can always use the extra noodles to make a different recipe later in the week. Or boil them all and double the recipe so that you can deliver the other dish to a friend who could use a night off from making dinner. Or  freeze the extra pan for a future meal. Or hand out individual shells to trick or treaters. Or.... you get the idea. I cooked the whole box.


Brown up a pound of hamburger with an onion. Salt and pepper to taste. Drain the excess fat.

Then stir in a can of tomato paste.

And 2 cups of hot water.

Add in bouillon, oregano, and basil. Bring it up to a nice simmer and keep it there, uncovered, for 30 minutes.

Whilst your sauce simmers and the shells boil, go ahead and mix up the ingredients for the filling.

Once the shells are ready to come out of the water, roll out some parchment paper. Then drain the noodles and place them open and face down on the parchment. Why face down? This is my little trick to keep them from rolling closed when I am trying to fill them. If they cool this way, they are easier to fill.
See?!? Now just take a small spoon and add a scoop or two of filling to each shell. If you're feeling ambitious you can pipe it in from a plastic baggie or pastry bag. However, I think this is just as quick and easy.

Place the filled shells in a "greased" (I used non-stick olive oil spray) 9X13 baking dish.

Now let's check back with that sauce that's been a-simmerin' away on the stovetop. This recipe made a surprisingly rich and tasty meat sauce. I was a little skeptical when reading the ingredients: Water, tomato paste, bouillon.... But seriously, this sauce was awesome! Now is the time to taste it and see if you need to add any additional seasonings. I finished mine off with a little garlic salt after taste-testing.


Spread the sauce over the stuffed shells and bake them covered for 30 minutes at 350 degrees until bubbling around the edges. If you make this ahead and refrigerate, you might need to bake longer, checking to make sure the center is nice and hot. Then uncover and sprinkle with cheese and bake some more until the cheese is melted.


It should look something like this when it emerges from your oven. YUM!


We plated ours up with a spinach salad and some garlic bread. And everyone was happy around our dinner table. #winning

Ahhhh. That first bite! Mmmmmm. CHEESY!


Italian Stuffed Shells from Taste of Home
adapted by Krista's Kitchen

TOTAL TIME: Prep: 50 min. Bake: 35 min. YIELD:6 servings


Ingredients


  • 1 pound ground beef lean ground beef (90/10) 
  • 1 cup chopped onion
  • 3 garlic cloves, minced
  • 2 cups hot water
  • 1 can (12 ounces) tomato paste
  • 1 tablespoon beef bouillon granules or 2 cubes
  • 1-2 teaspoons garlic salt                           
  • 1-1/2 teaspoons dried oregano
  • 1 teaspoon dried basil 
  • pepper, to taste                          
  • 2 egg whites, lightly beaten
  • 2 cups (16 ounces) 1% cottage cheese
  • 2 cups (8 ounces) shredded part-skim mozzarella cheese, divided
  • 1/2 cup grated Parmesan cheese
  • 24 jumbo shell noodles, cooked and drained

Directions

  • 1. In a large skillet, cook beef, onion and garlic over medium heat, crumbling beef, until meat is no longer pink; drain. Stir in water, tomato paste, bouillon and spices. Reduce heat; simmer, uncovered, for 30 minutes.
  • 2. Meanwhile, combine egg, cottage cheese and 1 cup mozzarella. Salt and pepper. Stuff shells with cheese mixture.
  • 3. Preheat oven to 350°. Arrange shells in a greased 13x9-in. or 3-qt. baking dish. Pour meat sauce over shells. Cover; bake 30 minutes. Uncover; sprinkle with remaining mozzarella cheese and parmesan. Bake until cheese is melted, about 5 minutes longer.
    Freeze option: After assembling, cover and freeze. To use, partially thaw in refrigerator overnight. Remove 30 minutes before baking. Preheat oven to 350°. Bake as directed, adding remaining 1 cup mozzarella and parmesan after 30-40 minutes and increasing time as necessary for a thermometer inserted in center to read 165°. Yield: 6 servings.

Nutritional Facts

4 stuffed shells and sauce: approximately 430 calories

Thursday, April 14, 2016

Throw Back Thursday Trial and Error Tuna Patties

Tuna patties are decidedly a food from my childhood. I remember my petite, blond mama with her perfectly hot-rolled hair, sliding plates of golden-brown tuna patties, topped with melted American singles, across the bright orange Formica counter top in our dark-wood accent kitchen.

Since this IS a "throw back" post, here's a picture of the lady who was slinging those tuna patties off the griddle. "Hi, Mom!"


And...so that I am (hopefully) forgiven for posting pictures of retro-mom on the Internet, here's one of me, circa 1990, in the very same kitchen that I just described. Unfortunately the lighting in this picture doesn't really do the counter tops justice. They were pretty vibrant!


Why yes, I totally am canning pumpkin bread for Christmas gifts while wearing puffy satin pajamas in this picture. Isn't that what all of the cool kids were doing on a Friday night in the early 90's? #nerdalert


Every once in a while, I still get a hankering for a tuna patty. Golden and crisp on the outside, all savory perfection on the inside. Hold the cheese, please.

The great thing about tuna patties is that you can really make them your own and they're hard to mess up as long as you follow this basic formula: "bind" the tuna together, add extra ingredients for flavor and texture, season the patties, form the patties, fry the patties. Here's a closer look:

To bind (make everything stick together)

The main ingredient here is obviously tuna. Although, this formula works with other proteins as well. Think salmon, crab, even turkey. After you've got the protein ready, you'll need something to bind the meat together. Eggs and crumbs are a popular choice. I remember that my mom used cracker crumbs. Ritz, I think. Since we are trying to eat a little "lighter" these days, I opted for egg whites and panko bread crumbs this time. Traditional bread crumbs work great too.  


Add extra ingredients

The next step in the formula is to add in any extra ingredients for flavor and texture. This time, I added in diced sweet onion and sliced scallion (green onion) as my "extras". If you're going for a healthy boost, you could add grated veggies, such carrots or zucchini. Another flavorful option is grated or shredded cheese. Just a tip for the "extras": you don't want to add tons of extras because you still want those patties to hold together when you cook them up.

Seasoning

My husband requested Old Bay seasoning for this recipe. We're big fans of the Old Bay. In fact, our oldest child is border-line obsessed with this spice blend from the Chesapeake Bay area.  It turned out it to be a great choice. I also poured in a few "glugs" (a tablespoon or two) of hot sauce. You may want to try flavors like lemon and dill or Parmesan and basil or rosemary. Like I said, make them your own!

Forming the patties

The biggest challenge with this step is that you want patties that will maintain their patty "status" throughout the cooking process. As in, you don't want them to fall apart. Avoid making the patties too big or too thin so that they are easy to manage with your spatula once in the frying pan.

Frying

Make sure to "grease" your skillet so that the patties don't stick. A couple of tablespoons of olive oil should be sufficient. Heat the prepared skillet over medium-high heat so that you get a nice sear on the patties before you are ready to flip them. Browning enhances the flavor and appearance of the tuna patty and makes it less likely to stick to the skillet.

And now for the photographic play-by-play....

Here is the "cast of characters" for my recipe: 2 cans of tuna, eggs, panko, onion, green onion, Old Bay, and hot sauce.


First things first, open up your cans of tuna and drain off the liquid. I just use a can opener to cut around the lid, then press that lid down, squeezing out the liquid, while tilting the can over the sink so that the excess liquid pours out of the can and down the drain. Add the tuna to a medium-size mixing bowl with diced onion, green onion, hot sauce, and Old Bay seasoning.  


Stir it up, then add the panko and egg white to the bowl.


While I chose to add just the whites, you may want to add the whole egg. If so, use 1 or 2 whole eggs instead of 3 egg whites. The key is that you want the mixture to bind together. So, if the mixture is too dry, add another egg or a little extra water or milk. If it's too wet, you can always add more crumbs (Panko, cracker, bread, whatever you choose). Just keep in mind that the main ingredient should probably be TUNA in a tuna patty, so don't get all carried away trying to create the perfect balance; adding more liquid then more crumbs, then more liquid, then more crumbs...

You see how this could get out of hand, right? It's like trying to cut your doll's (or sibling's) hair when you were a kid. You make one snip, but something just doesn't look right. So you try to "even it out". Which requires another snip. Then another. And another...

Those of you who have been in this situation know exactly where this path to attempted perfection leads, right? 

Bald Barbie.

Or bald sister.

Either way, the moral of the story is that acting conservatively is probably a good plan when it comes to both the novice snipping of hair AND the addition of ingredients to tuna patties.

*As I re-read this segment, I realize that I may just be the first person in all of blogging to compare making tuna patties to novice hair-cutting. Talk about a "meandering mind"! Stay tuned for my next random thought....

Once you've got the ingredients all mixed up, it should look something like this. The mixture should stick together.

Like tuna Velcro.

Ewww. Never mind. Can you imagine? Tuna Velcro?! Gross.


Now that everything is mixed up, it's time to make the patties.

I prefer not to form tuna patties with my hands. This is probably not shocking news. Nobody wants stinky tuna hands. 

And so, I scooped the tuna mixture out with a 1/3 cup-sized measuring cup. As it turns out, by using the 1/3 cup, this recipe made 5 perfectly uniform tuna patties. Uniform is good, since you want them all to cook to the same desired golden brown, at the same temperature, within the same time frame.

When forming tuna patties, I spread a piece of waxed paper (parchment works fine too) on my kitchen counter, then drop each scoop onto the paper.


Then, I place another piece of waxed paper on top and press down with either my hand, or the bottom of a cup, or a spatula, or a rolling pin, or...well, you can use just about anything within reach that will flatten those puppies down.

I use this method with any hand-formed meat patty and for rolling out pie crusts too. The idea is that when you finish, you'll have clean hands and BONUS: no counter top clean up!


Now that I've shared my earth-shattering meat patty "life hack", check out these perfect tuna patties.


BOOM!

Okay, now into the skillet. Just pre-heat your skillet to medium-high heat. Add a tablespoon or two of olive oil and fry up those tuna patties until they are nice and crisply golden-browned on the outside and cooked through. I think that I cooked mine for about 4 minutes per side.


You want to make sure that you let them cook for long enough on the first side especially, so that the surface of the patty holds together and starts to "crisp up" before you attempt to flip it, otherwise you may risk the patty falling apart.


These turned out awesome! My family demolished the entire skillet. My husband and I ate them with a little bit of homemade, "lightened-up" remoulade sauce that I had left over from another recipe. Our oldest daughter ate one sandwich-style between a "skinny bagel", grilled with a slice of cheese (a little throw-back to those tuna patties of my childhood). Next time I'm going to have to double the recipe...

Now follow the formula and make your own version!

Or you can copy my recipe. I'm cool with that.

Enjoy!


Krista's Kitchen Tuna Patties

2- 5 oz. cans of chunk light tuna in water, drained
3 egg whites
1/3 cup panko bread crumbs
1/4 cup onion, diced
2-3 green onions, sliced
1-2 tablespoons hot sauce, such as Frank's Red Hot
1-2 teaspoons Old Bay Seasoning
1-2 tablespoons olive oil

Mix the first 7 ingredients thoroughly in a bowl. Heat olive oil in a skillet at medium-high. Measure out patties by packing the tuna mixture into a 1/3 cup measuring cup. Turn onto waxed or parchment paper. Cover with another sheet of waxed paper and press the mixture down into patties that are 1/2"-3/4" thickness. Transfer patties to the skillet and fry for 4 minutes per side until nicely crisp and golden brown.

According to my smart phone calorie counting app (MyNetDiary) 1 patty= 94 calories


Related Posts with Thumbnails