Posts
Posts


THE MEAL PLAN IS BACK! It's hard to believe that I haven't posted a meal plan since November. Time sure does fly during the holidays (at least for me)! Here's to a year of delicious (and mostly healthy) dinners! Below you will find my first meal plan of 2011. Be sure to click the links provided to obtain recipes for the meals I have already featured on this blog. The rest of them, the new ones, I will post throughout the week. I'm roasting a chicken on Wednesday, so on Thursday and Friday I'll be making meals with the leftover chicken (one of my favorite tricks for stretching 1 meal into 3!)
Alrighty, here goes...
Monday January 10th
Dinner Out
Well isn't this an easy start to my first meal plan of 2011? I have a good excuse, though. It's my daughter's birthday and she wants to go out for pizza. Stay tuned for my post about her birthday party tomorrow.
Tuesday January 11th
Crispy Orange Beef Stir Fry
Wednesday January 12th
Balsamic Roast Chicken
Thursday January 13th
Barbecue Bacon Ranch Chicken Salad Sandwiches (or dip!)
Friday January 14th
New Mexico Style Pizza
Saturday January 15th
Crock Pot Brats with Sauerkrat
Sunday January 16th
Leftovers
Grocery List
Produce
ginger
garlic
green onions
2 oranges
2 red onions
sweet red pepper
cilantro
onion
Meat
3 lbs. flank steak
1 whole roasting chicken 6-7 lbs.
4 slices bacon
1-1/2 lb. bratwurst
Dairy
Monterrey Jack or Mexican blend shredded cheese
1/2 cup shredded cheddar
reduced fat sour cream
Canned Goods
soy sauce
hoisin sauce
honey
rice vinegar
sesame oil
cooking oil
dry red wine
balsamic vinegar
barbecue sauce
ranch dressing
salsa verde
lime juice
32 oz. sauerkraut
Dry Goods
corn starch
rice
red pepper flakes
crushed rosemary
1- Italian bread shell pizza crust (or refrigerated pizza dough)
cumin
oregano
brown sugar
hot dog buns
Freezer
whole kernel corn, 1/2 cup
Sunday, January 9, 2011

Wednesday, January 5, 2011
Beer Cheese Fondue
Do you fondue?
This was my very first time. I received a fondue set for Christmas. And so, I decided to take this new kitchen "toy" for a test drive on New Year's Eve. I searched the Food Network website for fondue recipes, and found an abundance of delicious looking recipes, both sweet and savory. I choose this particular recipe because I already had everything needed...with the exception of a bottle of lager beer. This Sandra Lee recipe was easy to prepare and deliciously cheesy. Now that I've gotten my fondue feet wet, I'm excited to break the set out again and try some other recipes like this Italian Cheese Fondue by Giada De Laurentiis. Mmmm. I'm getting more excited for the Super Bowl by the minute!

To begin, you just melt 1/4 cup of butter in a saucepan.

Then whisk in 1/4 cup of flour...

until smooth.
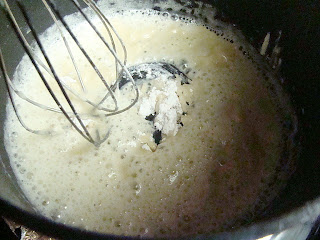
Now for the beer. I went with Red Stripe, because 1) it was labelled as a "lager" and 2) it was the only individual sale bottle of lager beer available at my local supermarket. Truth be told, I don't know much about beer. I'm not picky and I'm certainly not a beer snob. If it's cold and fizzy at a tailgate party, then I'm good to go! The Red Stripe did just fine in this recipe and I later found that it tastes pretty good on it's own too. : )

Whisk 12 oz. of the beer into your roux.

Next, bring the mixture to a slow boil. Reduce the heat and simmer until the mixture thickens to the consistency of heavy cream. Mine accidentally went a little further, it was more like gravy. After adding in the cheese, I ended up adding more beer to thin the mixture because it got pretty thick.

Now add in some Worcestershire sauce, dry mustard, and cayenne pepper. I followed the recipe to begin with, then added more of these ingredients, to taste.

And now for the star of the show: Cheese! I stirred in 4 cups of shredded cheddar (half sharp, half mild), one cup at a time, until it melted. If it suits your taste, you may want to add a little salt after tasting.

Mmmm. Cheesy!

Once the fondue was ready, I assembled the fondue set and cut up the bread for dipping. This was my first time using a gel cooking fuel canister. I picked mine up at the grocery store. As I was lighting the canister, it occurred to me: this fondue appeals to a wide audience. If you like beer...this fondue is for you! If you like cheese...this fondue is for you! If you like bread...this fondue is for you! And finally, if you're a pyro-maniac...you'll love this too...especially the part where you get to set the fuel aflame. Any Beavis and Butthead fans left out there? "Fire. Yeah! Fire is cool! He heh he heh!"

I'm regularly faced with the question, "White or wheat" (the answer is always wheat for me). This time I went with both.
I selected this crusty wheat bread from the bakery at my local grocery. Sandra Lee's recipe for this fondue actually includes a recipe for Cracked Wheat Beer Bread to serve with the fondue found HERE.

I also cut up a loaf of white bread, that I'd baked earlier in the day.

All set! Just a sprinkle of parsley for garnish.

And enjoy!

Cheesy Beer Fondue from Sandra Lee on FoodNetwork.com
Ingredients
4 tablespoons butter
1/4 cup all-purpose flour
1 (12-ounce) bottle lager beer
1/2 teaspoon Worcestershire sauce
1/4 teaspoon dry mustard
1/4 teaspoon cayenne pepper
salt, to taste
4 cups shredded Cheddar
Directions
Melt butter in a medium saucepan over medium heat. Whisk in flour and cook for 1 to 2 minutes while stirring constantly to make a roux. Add beer and bring to slow boil. Reduce heat and simmer, stirring occasionally until mixture thickens to the consistency of heavy cream. Add Worcestershire, mustard and cayenne, stirring thoroughly. Add cheese 1 cup at a time, melting cheese after each addition. Stir fondue until it is smooth. Turn into fondue pot and serve with cubed bread.
Notes:
*I added additional Worcestershire, mustard powder, and cayenne to taste. The original recipe didn't call for salt, but I added a sprinkle of sea salt too.
*I thought that the wheat bread, which had more texture and a hint of sweetness was by far superior with this fondue. However, my husband hands-down preferred the white bread....which stands to reason, because we have the same opinion on the white vs. wheat debate when it comes to rolls and sandwich bread.
*Be sure not to thicken the beer too much before the addition of cheese or the fondue will be pretty thick and you will need to thin it with more beer.
If you're in the market for a fondue set, you can check out the set featured in this post in my left sidebar under "Today's Featured Post Product".
This was my very first time. I received a fondue set for Christmas. And so, I decided to take this new kitchen "toy" for a test drive on New Year's Eve. I searched the Food Network website for fondue recipes, and found an abundance of delicious looking recipes, both sweet and savory. I choose this particular recipe because I already had everything needed...with the exception of a bottle of lager beer. This Sandra Lee recipe was easy to prepare and deliciously cheesy. Now that I've gotten my fondue feet wet, I'm excited to break the set out again and try some other recipes like this Italian Cheese Fondue by Giada De Laurentiis. Mmmm. I'm getting more excited for the Super Bowl by the minute!

To begin, you just melt 1/4 cup of butter in a saucepan.

Then whisk in 1/4 cup of flour...

until smooth.

Now for the beer. I went with Red Stripe, because 1) it was labelled as a "lager" and 2) it was the only individual sale bottle of lager beer available at my local supermarket. Truth be told, I don't know much about beer. I'm not picky and I'm certainly not a beer snob. If it's cold and fizzy at a tailgate party, then I'm good to go! The Red Stripe did just fine in this recipe and I later found that it tastes pretty good on it's own too. : )

Whisk 12 oz. of the beer into your roux.

Next, bring the mixture to a slow boil. Reduce the heat and simmer until the mixture thickens to the consistency of heavy cream. Mine accidentally went a little further, it was more like gravy. After adding in the cheese, I ended up adding more beer to thin the mixture because it got pretty thick.

Now add in some Worcestershire sauce, dry mustard, and cayenne pepper. I followed the recipe to begin with, then added more of these ingredients, to taste.

And now for the star of the show: Cheese! I stirred in 4 cups of shredded cheddar (half sharp, half mild), one cup at a time, until it melted. If it suits your taste, you may want to add a little salt after tasting.

Mmmm. Cheesy!

Once the fondue was ready, I assembled the fondue set and cut up the bread for dipping. This was my first time using a gel cooking fuel canister. I picked mine up at the grocery store. As I was lighting the canister, it occurred to me: this fondue appeals to a wide audience. If you like beer...this fondue is for you! If you like cheese...this fondue is for you! If you like bread...this fondue is for you! And finally, if you're a pyro-maniac...you'll love this too...especially the part where you get to set the fuel aflame. Any Beavis and Butthead fans left out there? "Fire. Yeah! Fire is cool! He heh he heh!"

I'm regularly faced with the question, "White or wheat" (the answer is always wheat for me). This time I went with both.
I selected this crusty wheat bread from the bakery at my local grocery. Sandra Lee's recipe for this fondue actually includes a recipe for Cracked Wheat Beer Bread to serve with the fondue found HERE.

I also cut up a loaf of white bread, that I'd baked earlier in the day.

All set! Just a sprinkle of parsley for garnish.

And enjoy!

Cheesy Beer Fondue from Sandra Lee on FoodNetwork.com
Ingredients
4 tablespoons butter
1/4 cup all-purpose flour
1 (12-ounce) bottle lager beer
1/2 teaspoon Worcestershire sauce
1/4 teaspoon dry mustard
1/4 teaspoon cayenne pepper
salt, to taste
4 cups shredded Cheddar
Directions
Melt butter in a medium saucepan over medium heat. Whisk in flour and cook for 1 to 2 minutes while stirring constantly to make a roux. Add beer and bring to slow boil. Reduce heat and simmer, stirring occasionally until mixture thickens to the consistency of heavy cream. Add Worcestershire, mustard and cayenne, stirring thoroughly. Add cheese 1 cup at a time, melting cheese after each addition. Stir fondue until it is smooth. Turn into fondue pot and serve with cubed bread.
Notes:
*I added additional Worcestershire, mustard powder, and cayenne to taste. The original recipe didn't call for salt, but I added a sprinkle of sea salt too.
*I thought that the wheat bread, which had more texture and a hint of sweetness was by far superior with this fondue. However, my husband hands-down preferred the white bread....which stands to reason, because we have the same opinion on the white vs. wheat debate when it comes to rolls and sandwich bread.
*Be sure not to thicken the beer too much before the addition of cheese or the fondue will be pretty thick and you will need to thin it with more beer.
If you're in the market for a fondue set, you can check out the set featured in this post in my left sidebar under "Today's Featured Post Product".
Monday, January 3, 2011
Super Easy (and Delicious) Stromboli

My family loves this easy stromboli recipe! I got the recipe from my mom and I've been baking this up for parties and get togethers for the last 4 or 5 years. It's always a hit! This would be a perfect addition to your Super Bowl party line-up, but if you don't want to wait that long to give it a try, then cut the recipe in half and make it for an easy dinner tonight!
To begin, thaw 4 frozen loaves of bread. Let rise until doubled. You may notice from the picture below that mine actually more than doubled this time. I set them out before leaving the house for some errands and I returned later than I expected. If you make the same mistake, no worries...the strombolis still turned out great!

Roll each loaf into a 12 X 15 inch rectangle, then sprinkle with shredded mozzarella. Next arrange ham, pepperoni, salami, and provolone slices over the top. Finally, sprinkle with Parmesan cheese and spices. I used garlic powder and Italian seasoning on a couple of the loaves. Then, I ran out of Italian seasoning, so I used oregano, basil, and rosemary. I also sprinkled red pepper flakes on one of the loaves for a spicy version. The beauty of the 'boli is that you can stuff and season them however you like... they're relatively hard to mess up.

Once filled, roll up jelly roll style, tucking in the ends and sealing the seams. Place seam side down on 2 greased cookie sheets, then brush with some beaten egg and sprinkle again with a little Parmesan cheese.

Then bake at 375 degrees for 25 minutes. I must not have sealed one of them very well because it exploded into the other one during baking. Or maybe this 'boli really like the other one. Kinda cute, really. They were spooning. : )

Let them cool for 5 minutes before slicing.

Then serve em' up! We like to dip ours in pizza sauce. Kids and adults alike love this recipe. My daughters call it pizza bread.

Easy Stromboli
4 loaves frozen white bread, thawed
2 cups shredded mozzarella cheese
1/2 lb. shaved deli ham
1/2 lb. salami, sliced
1/2 lb. pepperoni, sliced (I like to use sandwich pepperoni)
1/2 lb. provolone, slice thin
1/2 cup grated Parmesan
Spices: garlic powder, Italian blend spice, oregano, basil, parsley, rosemary, red pepper flakes. (Use what you like in the amounts that you like)
1-2 eggs, beaten
additional Parmesan to sprinkle on top
Let bread dough rise until doubled. Roll each into 12 X 15 inch rectangles. Sprinkle 1/2 cup mozzarella down the center of the bread. Arrange 1/4 of all of the meats and provolone over the mozzarella. Sprinkle with Parmesan and spices. Roll up, jelly roll style, tucking ends and sealing seams. Repeat with remaining loaves of bread and ingredients. Place seam side down on 2 greased baking sheets. Brush with beaten egg and sprinkle with additional Parmesan. Bake at 375 degrees for 25 minutes, until golden brown. Let stand 5 minutes before slicing. Serve with pizza sauce.
Note: I made one loaf spicy this time, adding sliced banana peppers and crushed red pepper to the ingredients. This was the favorite of my husband and I!
One more note: I know that the meal plan has been noticeably absent during the holiday season. I should be back in "the swing of things" by next week. Look for my first meal plan of 2011 then. In the meantime, if you're looking for inspiration, click on "Meal Planning" in my right side bar to view over 90 meal plans from week's past.
Saturday, January 1, 2011
Bring in the New Year Right....With Dark Chocolate Mousse!
Happy New Year, friends! I wish you all a wonderful, healthy, joyous 2011.
Typically we spend New Year's Eve out, partying away the night with friends. But this year we opted to stay in for a low-key evening with our kiddos; watching movies and eating some good food. I prepared some old favorites and tried out a couple of new recipes too... like this chocolate mousse.

Hey, just because I didn't shimmy into my lil' black dress to welcome in 2011 doesn't mean that the dessert shouldn't be worthy of a black tie affair!
This is my first try at chocolate mousse. I went with a basic recipe from Epicurious.com. It was was rich and decadent and intensely chocolaty....all that I hoped it would be. In the future, I may try some variations on this recipe, flavoring with espresso or liqueurs, but for this first attempt, I was very happy with the classic version.
This mousse began with a simple custard made with cream and eggs.

Heat 3/4 cup of the heavy cream in a saucepan until hot.

While the cream heats, whisk together 4 egg yolks with 3 tablespoons of sugar and a pinch of salt.

Add hot cream to the egg in a slow stream, whisking until combined.

Transfer mixture to saucepan and cook over moderately low heat, stirring constantly, until it registers 160°F on a thermometer.

Pour custard through a fine-mesh sieve into a bowl.

Stir in a teaspoon of vanilla extract.

Now for the chocolate! This recipe calls for 7 oz. of fine quality bittersweet chocolate. Many of the fine-quality bittersweet chocolates sold at supermarkets typically contain 50 to 60 percent cocoa solids. If you choose chocolate with a higher percentage, your mousse may be slightly denser. I went with these 70% dark chocolate bars purchased at Aldi. The use of a darker chocolate did yield a mousse that was a bit heavier. I prefer dark chocolate to milk chocolate, so the bittersweet flavor of the mousse was perfect for me. I would recommend using a lighter chocolate if you are not a dark chocolate fan.

Unwrapped.

Chop the chocolate and melt with your preferred method: double boiler, microwave, etc. I melted the chocolate until smooth in a glass bowl placed over a saucepan full of hot water. Whisk into the custard until combined.


Let the chocolate custard cool while you mix the remaining heavy cream until it holds stiff peaks.

Whisk 1/4 of the whipped cream into the chocolate custard to lighten.

Then fold in the remaining cream, gently but thoroughly...

until the whipped cream is completely incorporated.

Divide the mixture into 8 (6-ounce) stemmed glasses or ramekins. You can spoon the mousse into the cups, but I chose to pipe it in using my Wilton Decorating Tip-#1M Star. It's a $1.28 well-spent. I love to frost my cupcakes using this tip too!


Cover and chill for at least 6 hours. Top with whipped cream and garnish with chocolate shavings.

Let stand at room temperature for 20 minutes before serving.

Indulge!

Chocolate Mousse from Epicurious.com
Gourmet | December 2002
2 cups chilled heavy cream
4 large egg yolks
3 tablespoons sugar
1 teaspoon vanilla
7 oz fine-quality bittersweet chocolate (not unsweetened), chopped
Garnish: lightly sweetened whipped cream
Special equipment: an instant-read thermometer
Heat 3/4 cup cream in a 1-quart heavy saucepan until hot.
Whisk together yolks, sugar, and a pinch of salt in a metal bowl until combined well, then add hot cream in a slow stream, whisking until combined. Transfer mixture to saucepan and cook over moderately low heat, stirring constantly, until it registers 160°F on thermometer. Pour custard through a fine-mesh sieve into a bowl and stir in vanilla.
Melt chocolate in a double boiler or a metal bowl set over a pan of simmering water (or in a glass bowl in a microwave at 50 percent power 3 to 5 minutes), stirring frequently.
Whisk custard into chocolate until smooth, then cool.
Beat remaining 1 1/4 cups cream in a bowl with an electric mixer until it just holds stiff peaks.
Whisk one fourth of cream into chocolate custard to lighten, then fold in remaining cream gently but thoroughly.
Spoon mousse into 8 (6-ounce) stemmed glasses or ramekins and chill, covered, at least 6 hours.
Let stand at room temperature about 20 minutes before serving.
Cooks' notes:
• Mousse can be chilled up to 1 day.
• To vary the flavor, you can replace the 1 teaspoon vanilla with 2 teaspoons instant-espresso powder (dissolve it in the hot cream) or 3 tablespoons Grand Marnier or 2 tablespoons Cognac (either one whisked into strained custard).
Typically we spend New Year's Eve out, partying away the night with friends. But this year we opted to stay in for a low-key evening with our kiddos; watching movies and eating some good food. I prepared some old favorites and tried out a couple of new recipes too... like this chocolate mousse.

Hey, just because I didn't shimmy into my lil' black dress to welcome in 2011 doesn't mean that the dessert shouldn't be worthy of a black tie affair!
This is my first try at chocolate mousse. I went with a basic recipe from Epicurious.com. It was was rich and decadent and intensely chocolaty....all that I hoped it would be. In the future, I may try some variations on this recipe, flavoring with espresso or liqueurs, but for this first attempt, I was very happy with the classic version.
This mousse began with a simple custard made with cream and eggs.

Heat 3/4 cup of the heavy cream in a saucepan until hot.

While the cream heats, whisk together 4 egg yolks with 3 tablespoons of sugar and a pinch of salt.

Add hot cream to the egg in a slow stream, whisking until combined.

Transfer mixture to saucepan and cook over moderately low heat, stirring constantly, until it registers 160°F on a thermometer.

Pour custard through a fine-mesh sieve into a bowl.

Stir in a teaspoon of vanilla extract.

Now for the chocolate! This recipe calls for 7 oz. of fine quality bittersweet chocolate. Many of the fine-quality bittersweet chocolates sold at supermarkets typically contain 50 to 60 percent cocoa solids. If you choose chocolate with a higher percentage, your mousse may be slightly denser. I went with these 70% dark chocolate bars purchased at Aldi. The use of a darker chocolate did yield a mousse that was a bit heavier. I prefer dark chocolate to milk chocolate, so the bittersweet flavor of the mousse was perfect for me. I would recommend using a lighter chocolate if you are not a dark chocolate fan.

Unwrapped.

Chop the chocolate and melt with your preferred method: double boiler, microwave, etc. I melted the chocolate until smooth in a glass bowl placed over a saucepan full of hot water. Whisk into the custard until combined.


Let the chocolate custard cool while you mix the remaining heavy cream until it holds stiff peaks.

Whisk 1/4 of the whipped cream into the chocolate custard to lighten.

Then fold in the remaining cream, gently but thoroughly...

until the whipped cream is completely incorporated.

Divide the mixture into 8 (6-ounce) stemmed glasses or ramekins. You can spoon the mousse into the cups, but I chose to pipe it in using my Wilton Decorating Tip-#1M Star. It's a $1.28 well-spent. I love to frost my cupcakes using this tip too!


Cover and chill for at least 6 hours. Top with whipped cream and garnish with chocolate shavings.

Let stand at room temperature for 20 minutes before serving.

Indulge!

Chocolate Mousse from Epicurious.com
Gourmet | December 2002
2 cups chilled heavy cream
4 large egg yolks
3 tablespoons sugar
1 teaspoon vanilla
7 oz fine-quality bittersweet chocolate (not unsweetened), chopped
Garnish: lightly sweetened whipped cream
Special equipment: an instant-read thermometer
Heat 3/4 cup cream in a 1-quart heavy saucepan until hot.
Whisk together yolks, sugar, and a pinch of salt in a metal bowl until combined well, then add hot cream in a slow stream, whisking until combined. Transfer mixture to saucepan and cook over moderately low heat, stirring constantly, until it registers 160°F on thermometer. Pour custard through a fine-mesh sieve into a bowl and stir in vanilla.
Melt chocolate in a double boiler or a metal bowl set over a pan of simmering water (or in a glass bowl in a microwave at 50 percent power 3 to 5 minutes), stirring frequently.
Whisk custard into chocolate until smooth, then cool.
Beat remaining 1 1/4 cups cream in a bowl with an electric mixer until it just holds stiff peaks.
Whisk one fourth of cream into chocolate custard to lighten, then fold in remaining cream gently but thoroughly.
Spoon mousse into 8 (6-ounce) stemmed glasses or ramekins and chill, covered, at least 6 hours.
Let stand at room temperature about 20 minutes before serving.
Cooks' notes:
• Mousse can be chilled up to 1 day.
• To vary the flavor, you can replace the 1 teaspoon vanilla with 2 teaspoons instant-espresso powder (dissolve it in the hot cream) or 3 tablespoons Grand Marnier or 2 tablespoons Cognac (either one whisked into strained custard).
Thursday, December 30, 2010
One Lovely Bowl of Noodles: Chiang Mai Curry Noodles with Chicken

For weeks now I've been craving a GREAT bowl of noodles. I'm a little burned out on all of the fudge, the gingerbread, and even the noteworthy prime rib roast that the holidays brought into my life. Not that I didn't thoroughly enjoy those things...I did...I really did...I have a lovely line around my mid-section where my jeans have been cutting into me ALL WEEK to prove it! But, what I really wanted was a steaming, spicy, bowl of noodles.
And then I remembered the Chiang Mai Curry Noodles with Chicken recipe that I saw back in August on One Perfect Bite. This recipe totally hit the spot! It had all of the flavors that I was looking for; the complex spice and heat from the curry, the mellow coconut milk, the acidity of the lime, the freshness of the cilantro and the slight bite of the minced shallot, plus the color, texture, and heartiness added from the chicken and vegetables. I loved it! Mary, the creator of this recipe, prepared this for her young grandsons, so she cut back on the spice when she cooked this up in her kitchen. I went ahead and added that spice back in. On the evening that I made this, my children were playing at a friend's house and my husband was working late. I had the whole house to myself. It was unusual and SO relaxing to be alone in the quiet of my kitchen around dinnertime. Just the sounds of my chopping and stirring and some holiday music in the background. This almost never happens!
My children came home from their playdate and my husband arrived from work all around the same time. We settled in for a late dinner. I had already changed into my pajamas while the curry was simmering on the stove. After everyone found their way to our usual seats around our table, we spent a lovely evening re-hashing our day and speculating about what surprises Christmas might bring. Ahhh....the perfect bowl of noodles, eaten in my pj's, surrounded by the loves of my life. It doesn't get much better then that! I served the girls rice noodles swimming in homemade chicken stock (I wasn't sure that they would appreciate the spicy curry) and then I sat down to slurp up my mouth-watering bowl of Mai Chiang Curry Noodles topped with cilantro, green onion, and shallot. It was sort of a feeding frenzy on my part. I'm pretty sure that my manners checked out for a coffee break after I put the first spoonful to my mouth. No holds barred. In fact, I have curry stains on my tank top to prove it!
Here's how I executed Mary's recipe:
First, I heated some oil in my skillet and then added in the garlic and cooked for a minute, until fragrant.

Next, I added in 2 rounded tablespoons of red curry paste and stirred until softened.

I added in 2 cut up boneless skinless chicken breasts. I cooked this over high heat, coating with the curry paste and garlic for a minute or so.

Remove the chicken from the skillet and keep warm.

Then I tossed my sliced veggies: onion, carrot, and sweet red pepper into the skillet and ....

I stir-fried until tender.

Then, I stirred in more spices: tumeric and yellow curry powder.

Once the veggies were coated with spices, I added in coconut milk, chicken stock (I used homemade, but the stuff from a can or box would work fine too), soy sauce, and sugar.

Bring it to a boil, then reduce heat and simmer for 8 minutes so that the flavors can meld.

Now, squeeze in about 2 tablespoons of fresh lime juice to brighten the flavor. Remove the skillet from the heat source. Cover and keep warm while you prepare the noodles and fixin's.

Divide prepared noodles into bowls and then ladle the hot curry over the top. I put the toppings: chopped shallot, cilantro, and green onion right onto the dinner table for easy access.

Voila!

Halfway through my bowl in this shot...I'm surprised that I even stopped to take a breath, let alone a picture!

This was just what the doctor ordered to help me "chill" and enjoy the season in the days before Christmas. Asian-inspired spicy chicken noodle soup for the soul. Loved this!
Chiang Mai Curry Noodles with Chicken from the kitchen of One Perfect Bite and adapted by me.
Ingredients:
2 tablespoons vegetable oil
1 tablespoon minced garlic
2 teaspoons red curry paste (2 tablespoons)
2 large boneless, skinless chicken breasts
1 large carrot, cut into fine julienne strips
1 small red pepper, cut into fine julienne strips
1 medium onion, halved lengthwise and thinly sliced
1 (14-oz.) can coconut milk
1-3/4 cups chicken stock
1 teaspoon ground turmeric
1 teaspoon curry powder (I used yellow curry powder)
2 tablespoons dark soy sauce
1 teaspoon sugar
2 tablespoons freshly squeezed lime juice
Salt, to taste
1/2 pound dried Chinese-style egg noodles or wide rice noodles
1/3 cup finely chopped shallots
1/3 cup coarsely chopped fresh cilantro
1/3 cup thinly sliced green onion
Directions:
1) In a medium sauce pan set over medium heat, warm the oil until it begins to ripple, and then add garlic. Cook for about a minute and add red curry paste, stirring it to soften it, about a minute. Add chicken and cook for about a minute, tossing to combine it with the curry paste. Remove chicken from pan and add carrot, red pepper and onions. Stir over medium-high heat until softened. Return chicken to pan. Add coconut milk, chicken stock, turmeric, soy sauce, and sugar, and stir well. Bring to a slow boil, and lower heat to bring it down to a simmer. Cook for about 8 minutes, until flavors have begun to meld. Stir in the lime juice, remove from heat, and cover to keep warm.
2) Cook the noodles per package instructions. Drain, rinse in a colander under cold water, drain again, and divide noodles among serving bowls. Ladle on hot curry, and sprinkle each serving with shallots, cilantro, and green onions. Serve immediately.
Yield: 4 servings
Notes:
*I could not find wide rice noodles, so I just used "regular".
**I was concerned that my children would be turned off by the spicy nature of this dish...but it wasn't too spicy at all. In fact, my toddler enjoyed the leftovers the next day.
***This made quite a bit more then 4 servings. I even put the leftovers in an aluminum casserole, re-heated them, and served at a friend's Christmas party with the toppings the next night. There was plenty to go around!
Subscribe to:
Posts (Atom)