I'm excited to share a new family favorite! These pizza bombs are easy to assemble (my kiddos like to get in on the action for this step), come together quickly, and there are rarely leftovers. We don't eat like this often- we try to provide a lean protein, vegetable, and usually a grain (preferably a whole grain) at our evening meal, but this is a definitely a treat when it makes it's way into the rotation. In fact, I just made it last week, at my daughter's request, for her birthday dinner. It would be a perfect appetizer recipe too. For instance, I'd bet that these would be a hit at your Super Bowl party!
It's a little embarrassing to say how I came up with this recipe early in December. I was cleaning out our freezer. Which, in my defense, I do regularly. Like, honestly. I pull out expired items, defrost, clean, and re-organize. I swear, I do this! During my search for expired items, I came across an open bag of Rhodes dinner rolls. The package clearly read that they were "BEST BY" 10/18/13. 2013! Really!!!?!? I must've been shoving them back into my freezer for years....
***SIDEBAR ALERT*** (I promise it relates to this post.)
Here's a little piece of trivia about me: I'm a risk-taker. I don't mind "living on the edge", so to speak. This doesn't mean that I want to sky dive or bungee jump (at least not anymore) and I certainly have no desire to go on "Fear Factor". Becoming the mother of 3 has given me a greater sense of self-preservation than I possessed in my earlier years. Plus, after 3 pregnancies and a little age on me, my equilibrium and ability to "plunge" and "spin" without a care or consequence has been strangely compromised. Not sure what's up with that. Totally unfair side effect. That being said, there's not much that actually scares me. In other words, I'm no "chicken". It certainly takes more than a "BEST BY" date to discourage me. I mean, the rolls were frozen, after all. "BEST BY" is a recommendation. I reasoned that at the very worst, the quality would have diminished to inedible, in which case, we'd eat leftovers. Not only am a somewhat fearless, I'm also pretty darn frugal. I hated to throw these out. When life gives you lemons, make lemonade. And when life gave me 3 year old dinner rolls, I decided that we needed pizza bombs. (If you raised your eyebrows at that last sentence, it's okay. I'm laughing at myself.)
I began the Pizza Bomb preparations by spraying a baking sheet with non-stick cooking spray, then laying out the hard balls of dough to thaw.
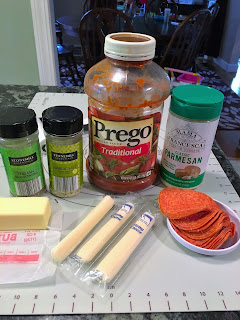
While the rolls thawed, I gathered the rest of my ingredients: butter, marinara (or pizza sauce), mozzarella sticks, pepperoni, Parmesan, garlic salt, and Italian seasoning. You can choose other fillings, but I was keeping it simple. Then I placed half a stick of butter into my cast iron skillet to melt on the stove top. You can also add minced garlic (just be careful not to burn it) or a sprinkle of garlic salt. You really just want the bottom of the skillet to be coated with butter so that the "bombs" don't stick. Pour off the excess melted butter into a dish so that you can use it to brush the tops of the rolls once assembled.
Once the rolls are no longer frozen, rolls them into a 4-5 inch diameter circle.
Spread about a teaspoon of sauce in the center of the roll, taking care not to get the sauce too close to the edges. If you get the sauce on the edges of the "tiny pizza" it will be challenging to seal when you attempt to make it into a "bomb". This is evidenced in the video clip. Oops. (Keep scrolling to click the link to that clip.) I also placed a piece of pepperoni and a chunk of cheese equal to 1/3 of a mozzarella stick in the center of each roll.
Bring up the sides of the roll to meet in the middle and pinch to seal.
Then fold up the opposite sides and pinch to seal any openings.
Check out the clip below for a demo.
Disclaimer: This is my first attempt in years at a demonstration clip for this blog. My 8 year old encouraged me to film the steps and served as camera woman. I hope to make more for upcoming posts, WITH IMPROVEMENTS! For example, next time we'll try it in wide-angle....
Here I am assembling one of these Pizza Bombs.
Arrange the pizza bombs in the skillet with a little space between each to allow them to rise. I fit 15 into my skillet. Behind the scenes note: I made extras and baked them in a buttered 8-inch round pan, which will also work if you don't have access to a skillet.
Cover the skillet with plastic wrap at set aside to let the rolls rise. I recommend spraying a little cooking spray on the side of the plastic that will be in contact with the rolls to prevent sticking. Let rise in a warm place until doubled, about an hour. Then brush with the remaining melted butter, sprinkle liberally with garlic salt, Parmesan, and Italian seasoning.
Bake at 350 degrees for about 20 minutes until golden brown.
I apologize that I don't have any photos of these final steps. I could swear that I did, but they are nowhere to be found on my camera roll. Possibly my SnapChat filter borrowing, selfie-taking kiddos accidentally deleted them? Hmmm.
They really do turn out perfectly. Even with expired dough! Not that I'm condoning or promoting the use of expired products. Safety first, friends! When in doubt, throw it out! When I made them again, with dough straight from the grocery, the result was the same. Perfectly fluffy, gooey, and most importantly, delicious!
They should look like this when they come out of the oven.

Krista's Kitchen Pepperoni Pizza Bombs
Prep time: 15 minutes + 1 hour for raising dough + approximately 20 minutes for bakingServes: 4-5
Ingredients
- Desired amount of frozen dinner roll dough, depending on the size of your skillet (I used Rhodes brand)
- 1/4 cup butter
- pizza sauce
- pepperoni
- mozzarella cheese sticks, cut into 3rds
- minced garlic or garlic salt
- grated Parmesan
- Italian seasoning
Instructions
Grease a baking sheet or parchment paper. Place frozen rolls on prepared surface to allow thawing. Just thaw until no longer frozen and slightly soft to the touch. (They should still feel cool to touch.)
Melt 1/2 stick (1/4 cup) of butter in the bottom of a cast iron skillet. Add garlic. Leaving a coating on the bottom of the skillet, pour off excess butter into a dish, reserve for later.
Once thawed, flatten dinner roll dough to a 4-5 inch diameter. Top with 1 teaspoon of pizza sauce, pepperoni, and piece of mozzarella. Bring up sides and pinch to seal, creating a round shape or "bomb". Place in prepared skillet, leaving a little space between each roll for expansion.
Preheat oven to 350 degrees.
Once the skillet is filled with pizza bombs, cover and let rise until doubled, approximately 1 hour.
Gently brush with remaining butter, sprinkle with additional garlic salt, seasoning, and Parmesan. Bake for approximately 20 minutes, until the tops are golden brown and the rolls sound "hollow" when you tap on them.
Let cool 5 minutes or more. Serve with additional pizza sauce.
Notes:
* If you don't have an iron skillet, these can be made in a round cake pan, springform, or even mass-produced on a baking sheet. Simply treat with melted butter and garlic first.
* You can be creative with the fillings. Think mini-Stromboli! Italian sausage, mushroom, onion, olives...you just don't want to over-stuff because they need to seal. Also, keep in mind that veggies create moisture as they bake and you don't want the rolls to get soggy. I might recommend sautéing veggies before using as a filling.
Enjoy, friends!
Enjoy, friends!


