Tuesday, June 30, 2009

Spicy Shrimp


If you're following along with this week's meal plan, then you probably expected to see Spicy Coconut Shrimp Soup for tonight's post. So did I. Sometime this afternoon, I had a few minutes between finishing my morning to-do list and putting my daughter down for a nap. Not enough time to begin a new task, like diving in to the ominous baskets of unfolded laundry staring at me from the family room floor, I decided to look over the coconut soup recipe and round up the ingredients for later. That's when I realized that I still hadn't found red curry paste. I went to two stores last week and left both empty-handed. So I Googled it, looking for a red curry paste recipe. I found recipes, but they all sounded pretty involved and also called for ingredients that I didn't have in my kitchen. Continuing the ingredient search, I found that the mushrooms in my refrigerator had "seen better days" and this soup calls for sliced mushrooms. Until I can make this soup the way I want it, I will table it until another day. So, now what to make for dinner? I had already thawed the shrimp for the soup, so whatever I was making needed to use shrimp. It also needed to use whatever I had on hand in my fridge and pantry. After a day of cleaning, I had no desire to drag my two small children through the grocery store. After last night's indulgent Buffalo Chicken Hoagies, I wanted to keep this dinner on the lighter side as well. All of that self-imposed criteria in mind, this light, flavorful (spicy!) shrimp served over brown rice is what I came up with. I am very happy with the result.

Here is what I used: olive oil, an onion, sweet red pepper, 3 cloves of garlic, onion salt, pepper, a can of diced tomatoes with green chilies, Frank's Red Hot sauce, chicken broth, flat leaf parsley, and of course, shrimp...1 pound. Please pardon the cookbooks in the background, they're on loan from my mom. I'm combing them for new recipes and copying before I head to my hometown for a visit next week.


I heated a tablespoon of olive oil in a skillet and sauteed 1 finely chopped onion, 1/2 chopped red pepper, and 3 cloves of minced garlic until tender.


I added 2 tablespoons of hot sauce, a can of diced tomatoes with green chilies, 1/4 cup of chicken broth, about 1/4 cup chopped parsley, some onion salt, and freshly ground pepper to the veggies. Bring it all to a boil and then cover and reduce heat to simmer for 10 minutes.


Throw in a pound of peeled, de-veined shrimp. I used medium-sized shrimp here. Aldi's special $3.99/lb! Cover and cook until shrimp are pink and done. About 5 minutes.


Serve it up over hot, brown rice. I loved this dinner. It's pretty low in calories and fat and just downright good! It did pack quite a bit of heat. Like so much heat that it made my nose run while I was eating. I'm sorry, is that too much information? But I like spicy, so once I settled in to the heat of it, I thoroughly enjoyed my dinner. I used a new brand of canned tomatoes and green chilies, which I also found on sale at Aldi for only $.89. I popped just one of the little diced tomatoes onto my tongue to taste before I dumped in the whole can and I'm pretty sure that it left a burn mark on my tongue. That could be why this dish turned out so very spicy.


Spicy Shrimp

1 medium onion, finely chopped
1/2 large sweet red pepper, chopped
3 garlic cloves, minced
1 tablespoon olive oil
1 can diced tomatoes with green chilies
1/4 cup chicken broth
1/4 cup minced fresh parsley or cilantro
2 tablespoons hot sauce (I used Frank's Red Hot)
1/2 teaspoon onion salt
fresh ground pepper, to taste
1 pound raw medium shrimp, peeled and deveined
hot cooked rice

In a large skillet, saute the onion, pepper and garlic in oil until tender.
Stir in the tomatoes and green chilies, broth, parsley, hot sauce, onion salt and
pepper. Bring to a boil. Reduce heat; cover and simmer for 10 minutes,
stirring occasionally. Stir in shrimp; cook 5-7 minutes longer or until shrimp
turn pink. Serve with rice.

Monday, June 29, 2009

Buffalo Chicken Hoagies


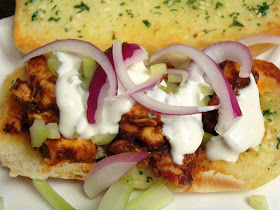
In February I made a Philly Cheese Mac that I found on Cinnamon, Spice, and Everything Nice by Reeni. That girl has fabulous recipes! I titled the post "How to Make Your Man Love You More". Since he is one of my favorite people in the whole wide world, I sometimes choose recipes specifically tailored to my husband's tastes. Tonight's recipe falls into that "how to make your man love you more" category. And if you're a fan of Buffalo chicken, you'll love this too. These hoagies are awesome! I know I'll make them again and again. This spicy, flavorful chicken served on toasty garlic bread and smothered in cool ranch dressing is finished off with crunchy celery, red onions, and garden fresh lettuce. I kind of want to invite friends over the next time I make these hoagies just so I can share the love!

Let's round up the ingredients: ready-to-use Southwestern style chicken strips, butter, hot sauce, barbecue sauce, chili powder, garlic, parsley, hoagie rolls, lettuce, celery, and red onion (not pictured).


First off, melt 1/4 cup of butter in a heated skillet. Stir in 2 tablespoons of hot sauce, 1 tablespoon of barbecue sauce, and 1/2 teaspoon of chili powder. Now toss in those Southwestern chicken slices. So easy!


Cook over low heat, until heated through. I ended up cooking mine over low heat while I toasted the bread and cleaned and chopped the veggies to really give the chicken an opportunity to wallow in the sauce.


While my chicken cooked in that delicious sauce, I mixed together the rest of the soft butter (hey, I never said it was figure friendly), 6 cloves of minced garlic, a tablespoon of minced parsley, and about a teaspoon of kosher salt. Lay the hoagie buns on a tray and fire up your broiler.


Spread the garlic butter on both sides of the hoagies. I knew that my children wouldn't enjoy the heat of buffalo chicken, so I sprinkled some cheese onto two of the buns to make garlic bread. Heidi at Tried and True Cooking with Heidi had the brilliant idea to turn extra buns into garlic bread. She's got a ton of family pleasers on her blog. Broil the bread until lightly browned.


Here's the garlic bread which I served to the kiddos alongside ramen noodles. That's right, ramen noodles. My daughter has been begging for ramen noodles for dinner for a week!(Such a gourmet!) Tonight was the perfect night to serve that 3 minute concoction while my husband and I immersed ourselves in Buffalo chicken bliss. Oh, the garlic bread was a big hit too! What a great way to use up buns!


Once the chicken and hoagies were ready, I was set to make the sandwiches. I topped each hoagie with chicken and sprinkled with some finely chopped celery. The recipe calls for 4 hoagies, but I found that there is really only enough chicken for 2 hoagies, 3 tops. If you're cooking for a larger crowd, I'd definitely purchase more chicken. It seems there is enough sauce for another batch of chicken anyhow.


I poured on our favorite ranch dressing and added some thinly sliced red onion.


Now all you have to do is place a piece of fresh lettuce on top and put a lid on it! I served mine with some extra celery sticks and ranch and our summer staple, corn on the cob. I can't say enough good things about this sandwich. Part of me wishes I had another one right now...and part of me wishes that I could fit into my shorts from 2 summers ago!


Buffalo Wing Hoagies adapted from Taste of Home

1 package (9 ounces) ready-to-use Southwestern chicken strips
1 cup butter, softened, divided
2 tablespoons Louisiana-style hot sauce
1 tablespoon barbecue sauce
1/2 teaspoon chili powder
6 garlic cloves, minced
1 tablespoon minced fresh parsley
1/2-1 teaspoon salt
4 hoagie buns, split
red onion, thinly sliced
4 leaves fresh lettuce
2 tablespoons finely chopped celery
4 tablespoons your favorite ranch salad dressing

In a large skillet, combine the chicken, 1/4 cup butter, hot sauce, barbecue sauce
and chili powder. Cook, uncovered, over low heat for 5 minutes or until heated
through. Meanwhile, in a small bowl, combine the garlic, parsley and remaining
butter; spread over cut sides of buns. Place on a baking sheet; broil 8 in. from
the heat for 3-5 minutes or until lightly browned. Spoon chicken mixture onto
bun bottoms; top with lettuce, celery, onions, and salad dressing.

Sunday, June 28, 2009

Grilled Bruschetta


Bruschetta is one of my very most favorite summer foods. It's bursting with fresh tomato and basil flavor atop the satisfying crunch of fresh baked crusty bread and a final kick of balsamic vinegar. And NOW is the time for bruschetta. You can't bottle it or freeze it. Bruschetta is at it's very best with summer fresh ingredients.

Let's look at the ingredients: tomatoes, basil, garlic, olive oil,kosher salt, fresh ground pepper, fresh baked French or Italian bread, balsamic vinegar, and freshly grated or shaved Parmesan cheese.


I begin by combining the diced tomato, thinly sliced basil, minced garlic, olive oil, salt and pepper. It needs to sit for the flavors to mix and mingle for at least 15 minutes.


Next, I slice up my bread, about an inch thick. I like to use Italian bread. I think it's a little softer and there's more surface area to cover with that delicious bruschetta.


I brushed mine with a little olive oil and ground a little fresh pepper over each slice.


Then I turned the bread over to "the grillmaster", my husband, for toasting. Funny story: While making my Grilled Sub Sandwiches recently, I was "manning" the grill. My oldest daughter addressed me with a touch of attitude, "What are you doing! You can't use the grill! Do you know how to work that? Daddy uses the grill." I just gave her a sideways look. No lie, since the birth of our children, we have fallen into very traditional roles in this house. I do the housework. He does the yard work. I do the laundry. He takes out the trash and changes the light bulbs. I cook. He grills. But I had a whole life on my own before I entered into marital bliss. I CAN GRILL, DARN IT! Probably not the time to go into all of this with a 4 year old, so I let it go and reminisced. But, I've gotta teach that girl how to grill!


Now for the balsamic vinegar. I happened to have some wonderful balsamic dipping oil that our friends introduced us to over the winter. We were playing cards. On the table were a basket of cut up French bread and a bowl of this dipping oil. At first bite, I thought, "that's pretty good." An hour later, we'd eaten a whole loaf of bread and re-filled the bowl of dipping oil twice. It's addictive! If you don't have any "dipping oil" straight up balsamic vinegar works great too. Just use a little less. About 5-8 drops per slice of bread.


Here's the bread, adorned with balsamic dipping oil, just waiting for the yummy bruschetta topping.


Top with the bruschetta topping and grate a little Parmesan cheese over the top. I used parmigiano-reggiano cheese. Love that stuff!

The whole weekend here has been gorgeous. No way were we wasting one second indoors for eating. For a light summer meal, we ate this on the deck with a pitcher of ice cold water and a big bowl of cut up watermelon. This bruschetta was lovely for a low-key Sunday night, but it's awesome with a few close friends on your deck at happy hour. I'm seriously tempted by girlichef's Blueberry Pomgria or Mary at My New 30's Watermelon Margaritas (and I don't even like tequila!)Next time....


Krista's Bruschetta

1-1/2 cup fresh ripe tomatoes, chopped
10 basil leaves, finely chopped
4 cloves garlic, minced
2 tablespoons olive oil
1 teaspoon salt
fresh ground pepper, to taste
Parmesan cheese, freshly grated
1/2 loaf Italian bread, cut into 1 inch slices, then cut in half

Combine first six ingredients. Refrigerate for at least 15 minutes. Slice and halve bread. Brush with olive oil and top with a little more fresh ground pepper. Grill or broil until toasted. Drizzle bread with balsamic vinegar and top with bruschetta mixture. Garnish with freshly grated Parmesan cheese. Serve immediately.

For a printable copy of this recipe, click here.

Meal Plan and Grocery List 6/27- 7/4

With the holiday weekend approaching, it is likely we'll be heading West to celebrate the 4th of July with our families. So this week, I'm only planning meals through Thursday. I'm sure I'll be cooking (and taking pictures for all of you)over the weekend. I just haven't decided what I'll contribute to those pitch-in style cook outs just yet. So many recipes to choose from...

Monday June 29th

Buffalo Wing Hoagies

Tuesday June 30th

Spicy Coconut Shrimp Soup

Wednesday July 1st

Texas Beef BBQ

Thursday July 2nd

Crescent Reuben Bake

Friday July 3rd

Hmmm. Not sure yet.

Saturday July 4th

Happy Fourth of July!

Sunday July 5th

Birthday party
Happy 2nd Birthday to my nephew Hudson!


Grocery List

Produce

garlic
parsley
lettuce
celery
plum tomatoes
mushrooms
red bell pepper
ginger root
basil
2 large sweet onions
green onions

Meat

ready to use Southwest chicken strips
1 lb large shrimp
4 lb beef roast
1 1/4 lb. deli corned beef

Dairy

butter
2 tubes crescent rolls
1 lb. sliced Swiss cheese
1 egg

Dry Goods

chili powder
hoagie buns
brown sugar
ground mustard
paprika
kaiser rolls
caraway seeds
sugar
thyme
hamburger buns

Canned Goods

hot sauce
bbq sauce
ranch or bleu cheese dressing
24 oz. chicken broth
fish sauce
red curry paste
coconut milk
lime juice
spicy hot V8
vinegar
ketchup
Worcestershire sauce
14 oz. sauerkraut
Thousand Island dressing

Friday, June 26, 2009

A Summertime Risotto


We enjoyed this tomato and fresh corn risotto for dinner with brats hot off the grill. The addition of corn sliced right-off-the-cob and ripe, red tomatoes, plus fresh basil made the creamy risotto a surprisingly refreshing summer side.

This is only my second risotto. The first being a shrimp and spinach risotto that I made way back in blustery February. Something I have learned about preparing risotto is that you want to keep your cooking liquid warm before adding it to the risotto. This will help to maintain an even temperature in the skillet. Adding cold liquid to hot rice lengthens the cooking time. So that's my first step. I measured out the appropriate amount of milk, water, and chicken broth and poured them into a saucepan to heat. Once the liquids are nice and hot, I reduce the heat to low and keep them warm. Pardon this picture. I have no idea why I took such a "crappy" shot. I guess I was trying to show the water, milk, and broth. In retrospect, it is a silly picture and not terribly illustrative or informative. Oh well, now I need a picture here and this is all I have. Thanks for bearing with me. LOL.


Here I've posed all of the produce involved in the recipe. Again, I'm not really sure what purpose this photo serves. (I'm having an "off" night) I know...it shows all the yummy fresh things going into this risotto. Yeah. That's it.


In a skillet, melt 2 tablespoons of butter. Add in a garlic clove and a large, finely chopped onion. Saute until tender.


Then stir in 3/4 cup of arborio rice. Cook and stir for a couple of minutes, heating the rice.


Now add in one cup of the hot liquid mixture. Cook and stir until all liquid is absorbed. Add remaining water mixture, 1/2 cup at a time, stirring constantly. Allow the liquid to absorb between additions. A picture would have been good here. Yet, it did not occur to me. I'm a total space cadet today. Arrgh!

Here's the goal: a very creamy, near-tender rice. Once you get here (it takes 20 minutes or so) and all of the hot liquid is added and absorbed, then you can stop all that crazy cooking and stirring and do something else with your life...


like add the other ingredients. Here are 1-1/3 cups of fresh corn, a large tomato, seeded and chopped, about half a cup of basil, sliced thin, and half a cup of grated cheese. I used 1/4 cup of parmigiano-reggiano and 1/4 cup of the store brand stuff to maximize the flavor and keep down costs.


Stir the ingredients into the risotto and heat through. Salt and pepper to taste.


And there you go, the perfect summertime risotto. Enjoy!


Tomato 'n' Corn Risotto from the 2009 Annual Taste of Home Recipes Cookbook

2-1/2 cups water
2 cups milk
3 tablespoons chicken broth
1 large onion, finely chopped
1 garlic clove, minced
2 tablespoons butter
3/4 cup uncooked arborio rice
1-1/3 cups fresh corn (about 4 ears of corn)
1 medium tomato, peeled, seeded and chopped
1/2 cup grated Parmesan cheese
1/2 cup fresh basil leaves, thinly sliced
1/2 teaspoon salt
Pepper to taste

In a large saucepan, heat the water, milk and broth; keep warm. In a large
skillet, saute onion and garlic in butter until tender. Add rice; cook and stir
for 2-3 minutes. Stir in 1 cup hot water mixture. Cook and stir until all liquid
is absorbed. Add remaining water mixture, 1/2 cup at a time, stirring
constantly. Allow the liquid to absorb between additions. Cook until risotto is
creamy and rice is almost tender.(Cooking time is about 20 minutes.) Stir in the
remaining ingredients; heat through.

Yield: 5 servings.

Nutrition Facts: One serving: 3/4 cup Calories: 295 Fat: 11 g Saturated Fat: 6 g Cholesterol: 29 mg Sodium: 476 mg Carbohydrate: 41 g Fiber: 2 g Protein: 10 g

Weight Watcher Points: 6 per serving

Tuesday, June 23, 2009

Pasta for Two, Please.


Remember my recent trip to the West Side Market? It was on that trip that I discovered Ohio City Pasta (for those of you in the greater Cleveland area that's booth E-3 at the Market). Now, I love fresh pasta. It's so much better than the dry stuff. I even make my own from time to time. It's a lot of work. The pasta I purchased from the market was out of this world good and I didn't have to break a sweat rolling and cutting and shaping. Can't beat that! I'll be returning to Ohio City Pasta as soon as I use up the remaining 6 bundles of fettuccine in my freezer. I need to try some of their ravioli next time!

Why am I going on about this pasta? Well, it was the pasta itself that inspired this dinner. Usually, I find a recipe for sauce and the pasta is an afterthought. For instance, I'll prepare a delicious Bolognese sauce recipe and just toss some store brand spaghetti into a pot, because really, it's all about the sauce. The spaghetti is just there to move the sauce into my mouth. well, not this time. This time I had black squid ink and Spanish saffron fettuccine in my possession. I confess, I didn't just walk up to the counter and announce with conviction, "Squid ink fettuccine please!" I received a little guidance from the helpful gentleman selling the pasta. I asked, "Squid ink pasta? Now what does that taste like?" He assured me that the flavor wasn't fishy at all, but had briny finish...like the sea. Then he went on to let me know that the squid ink pasta paired well with the saffron pasta and would be excellent with a seafood sauce. I love that. A meal plan. With that little culinary lesson in my pocket, I had much more confidence to prepare squid ink pasta in my kitchen and I headed home swinging my bag of many colored (and flavored)fresh pasta.


I decided to make a simple clam sauce to serve over my gourmet pasta. I wanted the subtle flavors of the pasta to shine through. Here is the cast of characters for tonight's dinner: olive oil, butter, flour, onion, garlic, parsley, minced clam, clam juice, salt, pepper, and of course, pasta. I used 8-10 oz., 1 bundle of black squid ink and 1 bundle of saffron. You may also want a little Parmesan cheese to grate over the top before serving.


I started by heating a tablespoon of olive oil and a couple of tablespoons of butter in my skillet. Then I tossed in approximately 1/4 cup finely chopped onion and three large cloves of garlic. Add a little salt and fresh ground pepper too. While the onion and garlic saute I put the water on to boil for the pasta.


Once the onions are tender, stir in a tablespoon of flour. Add the clams, clam juice, and parsley. Cook and stir until slightly thickened. Toss the pasta in the hot water to cook.


Drain the cooked pasta and toss with your sauce. Now that I'm looking at this picture, there may be a subliminal issue to why I love this pasta so much. Gold and Black. It's Boilermaker Pasta! (I'm a Purdue University alum)


Dinner went down a little differently than I had planned. I wasn't sure how my "picky" child would react to black pasta. I decided to throw a pizza in the oven for the girls and feed them a little early. That way, my husband and I could enjoy a nice pasta dinner al fresco and catch up on the happenings of our day while we watched the girls play in the backyard. Then my hard-working husband phoned to say that he'd be a little late. No problem, I held off making dinner a little longer. Then he called to say that he was leaving his office in 5 minutes. So I made dinner. By now the girls had eaten their pizza and I was getting pretty hungry. Then dinner was ready. Still no sign of my husband. Not unusual. Sometimes he gets caught up in a last minute issue on the way out the door. So I called him. I heard "work sounds" in the background. He certainly wasn't in his car. Bummer. Dinner was ready and he was still at work. "Go ahead and eat" he encouraged, "I'll be on my way." And that is how I ended up having this "pasta for two" all by my lonesome. But I'm not sorry. Not at all. I didn't have to share. I carried my big bowl of fettuccine with clam sauce onto the deck and settled into my chair as the girls ran through the sprinkler and giggled in the yard. And then I took the first bite. Oh my. Eating this pasta was like taking a 15 minute vacation. Everything else sort of fell away. It was ridiculously good. I couldn't believe how good.

You know what wasn't so good? The carbohydrate crash that occurred a little while later as I was trying to get two squirmy kids to bed. Must...keep...moving...get...the...pajamas. Oh well, it was totally worth it. Maybe next time I'll practice a little moderation.


Fettuccine with Clam Sauce

4-5 oz. fresh black squid ink fettuccine
4-5 oz. fresh saffron fettuccine
1 tablespoon olive oil
2 tablespoons butter
1/4 cup finely chopped onion
3 large cloves garlic
salt
pepper
1 1/2 tablespoons flour
1 can minced clams
1/3-1/2 cup clam juice
1/4 cup fresh parsley, chopped
Parmesan cheese

Prepare pasta as directed. Drain and keep warm. Heat a skillet with olive oil and butter. Add onion, garlic, salt, and pepper. Saute until onion is tender. Stir in flour. Add clams, juice, and parsley. Cook and stir over medium heat until slightly thickened. Toss sauce with pasta and top with freshly grated Parmesan.

Sunday, June 21, 2009

Red Beans and Rice with Smoked Sausage


Prepared in one skillet, this meal was quick, easy, delicious, and inexpensive. In my recent post about Garlic Skewered Shrimp I provided some links to information on eating healthy during tough economic times. This dinner fits right in those guidelines. You can get a bag of rice and a can of beans for a little bit of nothin'. And good news... beans are an excellent, lowfat source of dietary fiber and protein. There's also vitamin B in there. Score! Smoked sausage seems to go on sale quite a bit, so wait for a buy one, get one free sale and stock up. Bonus points if you can get the turkey kind and shave some fat out of your diet!

I started by heating a couple of tablespoons of oil in a large skillet. Then I added a medium onion, finely chopped and a can of diced green chilies. I grabbed for my Cajun seasoning and added about 5-6 twists of the grinder. I sprinkled with a little salt and pepper too. Cook until the onions become tender.


Next I added 3/4 cup of rice, 1 1/2 cups of water, and a beef bouillon cube. Bring it all to a boil and then reduce the heat and cover. I think my rice was ready at around 15 minutes. Cooking time will vary depending on the type of rice.


Add in a can of red beans (I only had dark red kidney beans in my pantry, red beans or pinto would have been better), 1/2 cup of shredded cheese, a pound of cut up smoked sausage (I fried mine first, but you don't need to. It's purely a matter of taste), and a teaspoon of Frank's Red Hot. Stir it up and heat through.


That's it! Super easy and really good! I topped mine with a little extra cheese and hot sauce. Sour cream would have been good too...if you don't feel guilty about that sort of thing. Dig in!


Red Beans and Rice with Smoked Sausage

2 tablespoons vegetable oil
1 medium onion, finely chopped
Cajun seasoning
salt
pepper
1 can (4 oz.) chopped green chilies, drained
3/4 cup rice, uncooked
1 1/2 cups water
1 beef-flavored bouillon cube
1 can (16 oz.) red beans
1/2 cup shredded Monterrey Jack cheese
1 lb. smoked sausage, cut up
1 teaspoon of your favorite hot sauce (I used Frank's Red Hot)

In medium saucepan, heat oil over medium high heat; add onion, chilies, Cajun seasoning, salt, and pepper and saute until onion is tender. Add rice, water and bouillon cube. Bring to a boil. Reduce heat, simmer covered, 15 minutes or until rice is tender. Stir in beans, cheese, smoked sausage and hot sauce. Serve warm.
4 Servings.

Meal Plan and Grocery List 6/22 -6/28

Monday June 22nd

Smoked Sausage with Red Beans and Rice

Tuesday June 23rd

Chicken with Black Bean Salsa

Wednesday June 24th

Fresh Fettucini with Clam Sauce

Thursday June 25th

Garden Vegetable Soup
Grilled Cheese Sandwiches

Friday June 26th

Pizza...always pizza.

Saturday June 27th

Brats on the Grill
Tomato and Corn Risotto

Sunday June 28th

Bruschetta on the deck


Grocery List

Produce

3 medium onions
1 small red onion
plum tomato
garlic
parsley
carrots
cabbage
green beans
zucchini
5 ears corn
medium tomato
1/2 cup basil

Meat

1 lb. smoked sausage
4 boneless skinless chicken breasts
bratwurst

Dairy

4 oz. Monterrey Jack cheese
butter
parmesan cheese
American cheese
Milk

Dry Goods

beef bouillon
rice
Cajun seasoning
brown sugar
garlic powder
flour
pepper
basil
oregano
hot dog buns
arborio rice
French bread

Canned Goods

vegetable oil
diced green chilies
1 can red beans
tabasco or Frank's Red Hot
black beans
8 oz. unsweetened crushed pineapple
lime juice
olive oil
1 can minced clams
clam juice
3 cups broth
tomato paste

Chicken Manicotti with Chive Cream Sauce...a work in progress


This recipe gained my attention for a couple of reasons. First, because my husband loves manicotti, but I get bored of making the same recipe over and over again. I thought this might be a fun twist on the traditional favorite. The second reason I wanted to make manicotti, any manicotti, is because I wanted to make my own shells this time around. I first saw these crepe-type manicotti shells prepared by Donna at My Tasty Treasures. Then, a week or so ago I saw the manicotti crepes again, this time made by Katy at Food for a Hungry Soul. It was a sign. Time to make manicotti and try out the crepe v. store bought shell method. Before we get to the shells, lets make the filling.

I began by slicing up a couple of large boneless, skinless chicken breasts. I cooked them with a few cloves of garlic, salt, and pepper until they were done. I removed the cooked chicken breast to a bowl and left the cooking juices in the pan.


Then I mixed in a couple of tubs of reduced-fat chive and onion cream cheese into the skillet and stirred until the cheese was melted. I added an additional 2/3 cups of milk and 1/4 cup of Parmesan cheese to make the cream sauce.


While the cream cheese melted I added a 10 oz. bag of thawed broccoli, a small can of pimentos, and salt and pepper to the cooked chicken.


Next, I stirred in 3/4 cup of the sauce. Then I decided that it was all too chunky for manicotti filling.


So I plugged in my food processor and pulsed away until the filling was sufficiently chopped.


And then I spread 1/3 cup of the filling on each homemade manicotti crepe and rolled it up. This is much easier than stuffing the manicotti tubes!


My manicotti shells were like fingerprints. No two were alike. I placed all of the stuffed manicotti in a casserole dish, sprayed with a little non-stick spray.


And then I topped with the sauce which had gotten a little too thick. I should've thinned it, but by now, dinner needed to be in the oven and I needed to be getting dressed for my daughter's dance recital. So, I hastily smeared on the too-thick sauce, sprinkled the dish with a little paprika, slid it all into the oven, and dashed up the stairs, two at a time, to get ready for the recital.


Here is the finished product. My parents were visiting for the recital, so I had extra taste-testers. Everyone liked it. But I didn't love it. This recipe definitely has potential, but for me, it lacked that "wow" factor when it came to flavor. I'll make it again, however, next time I will use artichokes instead of broccoli. And there will be more garlic. Maybe a little basil. Oh, and more cheese in the filling. It needed to be cheesier. But all in all it was good. Oh, and I will definitely stick with the homemade manicotti crepes. Those were awesome!


Chicken Manicotti with Chive Cream Sauce adapted from Just Peachy Cooking Up a Cure Cookbook

12 manicotti shells
2-8 oz. packages cream cheese with chives and onions
2/3 cup milk
1/4 cup Parmesan cheese
1 tablespoon olive oil
2 chicken breasts, sliced
3 cloves garlic, minced
1- 10 oz. pkg. frozen chopped broccoli, thawed and drained
4 oz. jar diced pimento
fresh ground pepper
paprika

1. Prepare manicotti crepes or boil a package of manicotti shells 2.Heat olive oil in a skillet. Cook chicken in the skillet with garlic cloves until done. Salt and pepper. Remove chicken to a large bowl. Leave juices in the skillet 3.To make the sauce, add cream cheese to the skillet. Cook and stir until melted. Add in milk and Parmesan, stir until combined. 4. Add 3/4 cup sauce to the chicken mixture 5.Put filling in a food processor or blender and pulse until chopped 6.Stuff each manicotti shell with 1/3 cup of filling. Place stuffed manicotti in a 13 X 9 in. baking dish. Pour the remaining sauce over the shells. Sprinkle with paprika 6.Bake at 350 degrees for 30 minutes. Serves 6.