Wednesday, July 21, 2010

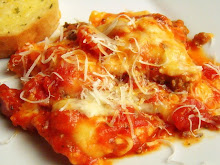
Chicken Lasagna


This creamy, cheesy, chicken lasagna was a huge hit with my family. They couldn't get enough! I found this recipe on Better Than Burgers, a blog with tons of yummy recipes cooked up by a pretty mother-daughter team, Julie and Dayna. I knew that my family would eat this, because there's not one thing in here that they don't like, but I had no idea how much they would enjoy it.

It was really simple to make too! I started by melting a couple of tablespoons of butter in a skillet. Then I added a pound of so of cut up boneless, skinless chicken breast and 2-3 cloves of minced garlic. I cooked the chicken just until it was no longer pink and removed it from the skillet.


Then I combined 2 cans of cream of chicken soup, a block of light cream cheese, 2 cups of light sour cream, and skim milk in the skillet. Because I only had oven ready (no boil) noodles, I also stirred in around a cup of water to soften up those noodles. Stir the ingredients together and bring them to a boil. Then, reduce to a simmer and stir the chicken back in to the mixture.


I built the lasagna by spreading some sauce on the bottom of a 9 X 13 inch baking dish, followed by noodles, then cheese. I repeated until the sauce was gone and the pan was full, ending with sauce and then cheese. If you're using "regular" lasagna noodles for this recipe, just cook them according to the package directions before using. Put the baking dish into a 350 degree oven and bake it for 20-25 minutes (a little longer if you're using oven ready noodles) until it's all hot and bubbly and melty. : )


As I said above, this dinner was a huge hit! I sprinkled some Italian spices over the top for garnish. I kept thinking that I wanted to add veggies...spinach and mushrooms or zucchini or something...but that's just me. If you want a "sure thing" that your family will eat, make it just like I did here. Still, next time I will experiment with some veggies. I can't help myself.


Chicken Lasagna adapted from Better Than Burgers

2-3 cloves minced garlic
2 T. butter (use the real stuff)
1 to 1- 1/2 lbs. chicken breast, cubed into small pieces
2 cans cream chicken soup
1-8 oz light cream cheese
2 c. light sour cream
1 c. skim milk
1 box lasagna noodles prepared according to package instructions
3-4 c. grated Monterrey Jack cheese
1-2 c. shredded Swiss cheese
Italian spice or dipping spices, for sprinkling over the top (optional)

In a large frying pan saute chicken and garlic in melted butter until the chicken is no longer pink. Removed chicken and keep warm.

Add cream soup, cream cheese, sour cream, and milk, to the skillet. Stir until ingredients melt and thicken slightly. Add chicken and continue to stir. Turn heat down and simmer for 2-3 minutes.

Spread a thin layer of sauce in a 9x13 baking dish. Then layer noodles, then cream sauce with chicken, then cheese. Continue to repeat until your pan is full, ending with cheese on top. Bake at 350 for 20-25 minutes or until hot and bubbly.

Notes: I used oven ready lasagna noodles for this recipe for the first time ever. I read up about them and discovered that you need to add a little extra liquid (in this case either broth or water) and cook the dish a little longer. I think I cooked mine about 10-15 minutes longer. I was pleased with the result and would use oven ready lasagna noodles again.

You could make this a day ahead or even make it and freeze it for a quick dinner later. Give it a try!


Enjoy!

Monday, July 19, 2010

Avocado Pesto Stuffed Cherry Tomatoes


I found this recipe in the December 2009 issue of Better Homes and Gardens magazine. My assumption is that the recipe was included in the issue as a holiday appetizer because of it's festive red and green colors. I was instantly intrigued by the recipe, but not for my Christmas party. I tore the page out of the magazine and stashed it in my summer recipes file. Finally summer came, but I hadn't found the perfect occasion to serve this fussy lil' appetizer. Until this Saturday....on Saturday night my husband and I participated in our neighborhood wine walk. Similar in concept to a progressive dinner, we travelled from house to house, spending about 45 minutes at each stop, tasting wine and sampling appetizers. 12 couples participated, however, we only travelled to 5 houses. This meant that we could team up with the hosting houses so that everyone contributed something. My friend Chris was hosting stop #3 and I was happy to co-hostess her stop with another one of our friends, Kelly. We definitely put out the the most food. I volunteered to bring bruschetta (which is turning out to be my signature summer side) and these avocado pesto stuffed cherry tomatoes. Our hostess picked up a Spanish Red Wine (Garancha de Fuego), some delicious boneless wings, an assortment of baked goodies and Kelly provided a spinach dip in addition to a semi-dry white wine with a bit of fizz.(I can't remember what that one was called).

Here's a picture of some of the food...snapped just as we saw the rest of the wine walkers coming down the sidewalk toward stop #3.


If you're a wino wine enthusiast like me, this is a great opportunity to try a variety of wine and see what others enjoy. I think that each house featured 2 types of wine, so 10 varieties in all. And if you're a total pig foodie like me it's a great chance to try some delicious food. I can't name everything that I ate, but some standouts from each house were: Homemade salsa and bread with a hot cheese dip at stop #1, a yummy BLT dip and Greek phyllo pies stuffed with spinach and feta at stop #2, of course, all of the food at stop # 3 was wonderful : ), a gooey brie with butterscotch sauce at stop #4, and chicken shumai at stop #5. I couldn't help but notice that my shorts were awfully snug the next day. As next month will mark our two year anniversary in this house...we are still relatively new to our established neighborhood. This was a great way to meet and get better acquainted with some of our neighbors. I'd definitely recommend organizing one of these events in your neighborhood. If you're not a wine drinker, no problem! Some of the participants just carried along their beverage of choice, passing on the wine and enjoying the food and company.

The stuffed cherry tomatoes proved an excellent addition to our stop # 3 snack table. They do require a bit of time and effort, but in my opinion, they were SO worth it! Some of my neighbors thought the same, because I received quite a few compliments on my contribution to the wine walk.

This recipe starts out simple enough. Wash some cherry tomatoes. The recipe calls for 30, but I used 40 and doubled the filling recipe.


Next, cut a thin slice from the top of each tomato. I'd also recommend cutting a very thin slice from the bottom too, so that they don't roll around when you try to plate them. I tried to skip that step at first, but when my tomatoes began rolling around after I filled them, I had to go back and level each and every bottom.


With a sharp paring knife, I cut down into each tomato a bit to "core" it.


It looked like this when I finished the step. Now I only needed to scrape the inside to remove the seeds.


After testing a couple of other options, I settled on a rickety, old school, vegetable peeler as the perfect tool for the job. Gently, scrape out the seeds. I stress gently, because I ruined the first couple of tomatoes in my attempt to cut and seed them. Once seeded, turn them upside down on a plate lined with paper towel and let them drain for 30 minutes.
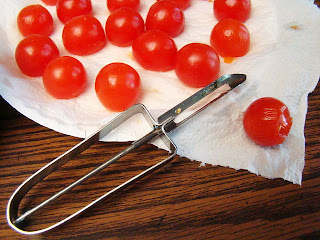


This whole process takes quite a bit of time, so you might want to pull up a chair and sit while you execute this step. I kept a little bowl for the "lids and guts" next to me.


While the tomatoes drained, I set about making my pesto. You can do this in the mixer, food processor, or blender. I used my Cuisinart CSB-76BC SmartStick 200-Watt Immersion Hand Blender, Brushed Chrome I combined the ingredients: cream cheese, avocado, prepared pesto, and lemon juice in the provided blender container.


Seconds later, the filling was ready!


Here are my hollowed and drained tomatoes, ready for filling.


I didn't get a shot of the filling step, but I filled one of my cake decorating bags with the filling and piped it into each cherry. A plastic baggie with the corner cut off would work just fine here too. After I filled them, I sprinkled fresh, chopped basil over the plate.


These really do make for a lovely presentation...and they're tasty too! I must've popped about half a dozen into my mouth while I was making them.


If you're not serving these at your home, I recommend tranporting them (tightly packed) in a covered container and then plating and garnishing with the basil when you reach your destination. This will save you the stress of watching these lil' beauties slide around on the plate as you make your way to the party. If they topple into one another, they get the messy pesto filling all over the place! I'm just sayin'...

Avocado Pesto-Stuffed Tomatoes recipe from Better Homes and Gardens original recipe found HERE

Prep: 40 minutes (I bet to differ)
Stand: 30 minutes

Ingredients
30 cherry tomatoes (about 1-1/4 pints)
1/2 medium avocado, pitted, peeled, and cut up
2 oz. cream cheese, softened
2 Tbsp. homemade or purchased basil pesto
1 tsp. lemon juice
Snipped fresh basil (optional)
Directions
1. Cut a thin slice from the top of each tomato. (If desired, cut a thin slice from bottoms of tomatoes so they stand upright.) With a small spoon or small lemon baller carefully hollow out the tomatoes. Line a baking sheet with paper towels. Invert tomatoes on the towels. Let stand 30 minutes to drain.

2. Meanwhile, for filling, in a food processor bowl combine avocado, cream cheese, pesto, and lemon juice. Cover; process until smooth. Spoon filling into a pastry bag fitted with a large plain round or open star tip.

3. Place tomatoes, open sides up, on a serving platter. Pipe filling into the tomato cups. Serve immediately or cover loosely and refrigerate up to 4 hours before serving. Sprinkle with snipped basil before serving. Makes 30 appetizers.

Nutrition Facts
Calories 18, Total Fat (g) 1, Saturated Fat (g) 1, Cholesterol (mg) 2, Sodium (mg) 16, Carbohydrate (g) 1, Total Sugar (g) 1, Vitamin C (DV%) 4, Calcium (DV%) 1, Iron (DV%) 1, Percent Daily Values are based on a 2,000 calorie diet

Notes: I found that a vegetable peeler, like the one pictured in this post was ideal for scraping out the seeds. A small spoon or melon baller would have proved to large to stick into the top of the tomato, thus mutilating the edible, pretty red bowl. Also, I'd recommend making 1 1/2-2 X more filling so that you have plenty to top off the tomatoes and room for mistakes. Finally, I don't recommend making these a day ahead or the morning before your event. Even with the lemon juice in the filling, the filling was un-appetizingly browned on the few that I had leftover the next day. Edible, but not as pretty.


Sunday, July 18, 2010

Meal Plan and Grocery List 7/19-7/25 and Forgiveness Clouds

Hi friends...I'm still here! I took the weekend off from blogging. Not on purpose, we were just so darn busy! On Friday night a friend and I chose to de-brief from a crazy week with a girl's night out! We opted for strip mall Mexican food and a late night shopping trip to the Super Kmart (I know, you want my life. Ha ha.) Hey, it was 10 for $10 week at Kmart! Gotta love chicken for $1/lb! We had a blast! By Friday I was "running on empty" and our outing, complete with grown up conversation, enchiladas, and lots of laughter turned out to be just what the doctor ordered. On Saturday, my husband and oldest daughter hit a baseball game while I prepared for the neighborhood Wine Walk (more about that in tomorrow's post) that we participated in last night. Today began with 2 consecutive vacation bible school programs and a bridal shower luncheon. Then it was home for a trip to the pool followed by a cookout with friends tonight. Lots of summer fun...but no time to write. I hope that you all had a wonderful weekend too!

Here's the meal plan for this week.


Monday July 19th

Bacon, Spinach, and Tomato Salsa Wraps

I know this made the meal plan last week, but it's such a perfect, quick, summer dinner that we're having it again. The ingredients are in season and my kids love these!

Tuesday July 20th

Chicken Lasagna

Wednesday July 21st

Grilled Sirloin and Vidalia Skewers

Thursday July 22nd

Italian Chopped Salad

Friday July 23rd- Sunday July 24th

Out of Town

We'll be dining on cookout and wedding food!


Grocery List

Produce

4 large tomatoes
red onion
cilantro
jalapeno pepper
lime
baby spinach
romaine lettuce
cauliflower
asparagus
garlic
4 Vidalia Onions
lemon

Meat

turkey bacon
6 boneless skinless chicken breasts
2 lbs. beef sirloin

Dairy

10 inch flour tortillas
Italian cheese crumbles
Parmesan cheese
butter
sour cream
cream cheese
milk
shredded Monterrey Jack Cheese
shredded Swiss cheese

Canned Goods

light mayonnaise
light Italian dressing
2 cans cream of chicken soup
cider vinegar

Dry Goods

rotini pasta
lasagna noodles
paprika
sugar
oregano
beef bouillon granules
garlic powder

Other

6-8 bamboo skewers


Forgiveness Clouds continued from my VBS snacks post.

I promised pictures of the Forgiveness Clouds, so here's one last "Goodies from the Galley" recipe from my week in our vacation bible school's High Seas Expedition kitchen.

A tray of Forgiveness Clouds:


Here's a closer look. I have to say that the Forgiveness Clouds that the children made didn't look much like the pretty picture provided in my "Goodies from the Galley" guide. The picture featured a neat layer of chocolate graham cracker crumbs, topped with a smooth layer of whipped topping, followed by a couple tablespoons of cherry pie filling and finished with a neat dollop of more whipped topping. As the kids (aged 5-11) prepared these, I had to remind myself that the point of this project was not perfectly presented, picturesque snacks. It was meant to be a learning experience. The children practiced following directions and measuring skills. They worked as a team. They felt a sense of accomplishment in preparing 170 snacks for their bible school friends. And, of course they learned what this snack represented.


The story that I read to the children before we began snack preparation dealt with the disciples, Peter and John, teaching about Jesus and how he loved us so much that he died on the cross for our forgiveness. The chocolate crust represented darkness...the sin. The red cherries represented the blood shed for us, and the white whipped topping represented the forgiveness....covering our sin.

I found that the children went extra heavy on the forgiveness. Good for them! I'm glad that I purchased extra tubs of whipped topping! : )


Forgiveness Clouds from High Seas Expedition VBS

Yield: 1

2 tablespoons chocolate graham cracker crumbs
2 tablespoons whipped topping
2 tablespoons extra-fruit cherry or strawberry pie filling
9 oz. clear plastic cup

Spoon graham cracker crumbs into the bottom of the cup. Top with 1 tablespoon whipped topping. Smooth slightly over the graham cracker crumbs. Top with pie filling. Finish with a dollop of more whipped topping.

Thursday, July 15, 2010

Easy Chicken Parmesan


While we like ramen noodles just as much as the next family, it was time to do some real cooking in this kitchen tonight. A couple of days ago, I had moved chicken breasts from my freezer to fridge to thaw for a recipe that I've my eye on for a while. I meant to make it last night, but 3 minute ramen noodles sounded like a much better option after a hot, busy summer day. Tonight, as the dinner hour rolled around, we trudged home exhausted and water-logged from the neighborhood pool. Again, I had neither the time or ambition to execute this recipe. A quick check of my fridge and pantry also indicated that I was short a few ingredients too. The familiar "I'm hungry" whines had begun not even 2 minutes after we arrived home and I knew that I had 30 minutes or less until my ravenous kiddos would form a mutiny and storm the pantry door. Plus bedtime was quickly approaching. Dinner needed to happen, like, NOW! What to do? Ramen noodles, again? Nah. I quickly shifted gears and came up with this quick, stovetop version of Chicken Parmesan. I needed to use the chicken and I had spaghetti, a jar of marinara, garlic, flour, Parmesan cheese, and olive oil. I was set.

I started some water boiling for the pasta and pounded the chicken breasts to 1/4 inch thickness, then gave them a sprinkle of salt and pepper.


Next, I mixed together a couple of eggs, a few minced garlic cloves, and a dash of hot sauce. The chicken took a dip in the egg mixture and then...


I coated it in equal parts of flour and Parmesan cheese. I also mixed in some spices. Italian seasoning would work fine here...or parsley. I used a dipping spice blend that we usually mix with olive oil for bread.


Then I heated a couple of tablespoons of olive oil in a skillet and browned the chicken for 3-5 minutes per side. Remove the chicken from the skillet and keep warm.


Since I had some mushrooms that needed to be used, I tossed them into the skillet and sauteed them for a few minutes.


I added a jar of marinara to the mushrooms and brought it to a simmer. Then I added the cooked and drained spaghetti. I returned the chicken to the skillet and tossed it all together until coated and heated through.


To top it all off, I sprinkled the mixture with some mozzarella cheese. Then I placed the lid on my skillet until the cheese melted.


Dish it up and sprinkle with some freshly grated Parmesan cheese. Quick, easy, and delicious. My family ate this up!


Easy Chicken Parmesan

1 lb. boneless, skinless chicken breast
8-12 oz. spaghetti noodles
2 eggs
3 cloves garlic, minced
dash of hot sauce
1/2 cup all purpose flour
1/2 cup Parmesan cheese
2 tablespoons parsley, or a teaspoon of Italian seasoning or dipping spices
2 tablespoons olive oil
1 cup sliced, fresh mushrooms (optional)
1 jar spaghetti sauce
1 cup shredded mozzarella
additional Parmesan cheese, for garnish (optional)
salt and pepper, to taste

1. Cook pasta according to package directions. Drain. Set aside.
2. Combine eggs, garlic, and hot sauce in a shallow dish. Set aside.
3. Combine flour, Parmesan, and spices in separate shallow dish. Set aside.
4. Pound chicken breasts to 1/4 inch thickness. Salt and pepper. Heat oil in a large skillet.
5. Dip chicken into egg mixture, then dredge in flour mixture.
6. Fry in olive oil for 3-5 minutes per side until the chicken is browned and juices run clear. Remove from skillet. Keep warm.
7. Saute mushrooms in the same skillet until tender. Stir in spaghetti sauce. Bring to a simmer. Add cooked pasta and chicken and toss until coated with the sauce. Heat through.
8. Sprinkle with mozzarella. Cover until cheese melts.
9. Serve topped with additional grated Parmesan.

Some of you expressed curiosity about Forgiveness Clouds. Would you believe that I forgot to take a picture!? I think we have a few leftover. I'll try to snap a picture tomorrow and post about it tomorrow.

Wednesday, July 14, 2010

Kid Snacks: Chip Wrecks and Surf n' Snakes

For the last three days, I have been the kitchen station leader for our church's vacation bible school. I have to say that the curriculum is really cool. Everything about the program (including the snacks) fits into this year's theme: High Seas Expedition. The support materials for this curriculum provide plans down to the last detail. My "Goodies from the Galley" folder includes excellent instructions, tips, field test logs, pictures, scripts for introducing the snack, a story for how it relates to the scripture, and ingredient worksheets to calculate just how much of every single ingredient and supply will be needed for "X" amount of kids. If you're shopping for VBS curriculum, I'd recommend Group Publishing. The bible stories this week come from the book of Acts. On the first day, the scripture dealt with Peter's escape from prison and we served Peter's Jail Mix (a spin on trail mix). Each element of the jail mix represented part of the story. For example, the Cheerios were the handcuffs, the pretzel sticks were the bars, etc.

Yesterday's scripture dealt with The Apostle Paul's voyage to Rome and the shipwreck that occurred on that voyage. On this day we served Chipwrecks. How clever. Here's an example of the story that goes with the snack, straight from my "Goodies from the Galley" folder: "These little chip dip ships (say that fast 5 times)with their cheese masts hoisted are sailing through the waves of the deep blue sea, but they may be headed for trouble. The Apostle Paul made many journeys on the sea. On one of those journeys the ship carrying Paul ran into a heavy storm-a typhoon-and his ship was tossed high and low in a rough sea. Everyone on board was terrified, except for Paul. As the ship was battered in the wind and waves, Paul reassured his companions that that even though the ship was doomed to go down, the God he served was able to keep all of them safe."

Here is a picture of one of the Chipwrecks.


Each day a group of crews (the children attending VBS are divided into 4 or 5 person crews. Each crew has 1-2 crew leaders) gives up it's Ship Rec Game time to prepare snacks for the entire VBS. This worked out to 5 crews at a time, so we set up 5 tables. Each day after the snack is served, and we've cleaned up the "galley", my awesome kitchen team (two other ladies and 3 teenagers) and I prepare for the next day's snack; setting out needed utensils, counting out plates, cups, and spoons, cutting and chopping ingredients, measuring ahead, etc. When the crews arrive to make the snack for the whole group, assembly runs very smoothly. We run a tight ship in our galley! Here is the kitchen station that we set up for the kids:


Here's a closer look at the ingredients needed for the Chipwrecks. Very simple, just blue corn chips, sliced cheddar, and ranch dressing or dip. This snack was a big hit with the kids!


Today's snack was Surf n' Snakes. Today's story: After the shipwreck we discussed yesterday, Paul has washed up on an island and survived a poisonous snake bite.

The kids did an awesome job making these snacks!


Here's a closer look at the blue jello (the sea), the whipped topping (the frothing seafoam), the vanilla wafer (the island), and the gummy worm (the snake). My daughter couldn't wait for today's snack! I don't make a lot of jello, but blue is her favorite, and topped with whipped topping, a vanilla wafer, and a gummy worm, this was a huge hit!


Have you ever made Jello for 170 kids? Yesterday, the other volunteers and I prepared 48 packets of blue Jello! Holy cow, it was a lot of Jello!

I have to say that I'm glad that I volunteered for this job. Sure, after 4 hours of making and serving snacks, I'm beat and I don't feel a bit like cooking in my home kitchen. Full disclosure: This evening, I served my family Ramen noodles and ice cream for dinner. But it has definitely been fun and rewarding work. I can't wait to show up to all of those smiling faces tomorrow and do it all again.

I hope you're all having a wonderful week! It's off to bed for me. Tomorrow we're making "Forgiveness Clouds". I better rest up!
Related Posts with Thumbnails